Introduction
You can access Original Kaede by highlighting Kaede at the character select screen, and pressing C 9 times, B once, and C 4 more times. If you do this right, you'll hear his voice, and then you can select him with A or D.
Original Kaede loses a bit of the advantages his awakened form has, playing more carefully with this version is recommended. He does have a better fireball, and access to air chains in any mode thanks to a glitch giving him decent damage and an instant overhead. Some rule sets for this game ban this entirely, (it can lead to an infinite) but usually 1 or 2 reps is allowed.
Normals
Standing
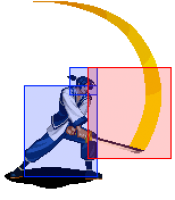
| 5A
Behold: the poke!
|
| DamageHow much damage the move does on hit/block. Characters in TLB2 have 256 health, but different defense modifiers.
|
StartupNumber of frames for the move to become active, first active frame included.
|
ActiveNumber of frames the move remains active for, and can hit the opponent on.
|
RecoveryNumber of frames after the active frames for the move to end and the character to become actionable, unless canceled from.
|
StateState your opponent must be in for the move to come out. Some moves can only be done when the opponent is on the ground, for example. Most moves can be done in any state.
|
Frame AdvHow much sooner or later you can act on hit/block when compared to your opponent, assuming the move is not canceled. +2 means you can act 2 frames before your opponent, -2 means your opponent can act 2 frames before you
|
MeterHow much meter the move builds on hit/block. A full bar of meter is 64 points.
|
GuardWhether the move can be blocked standing, crouching, or both. L means it has to be blocked crouching, H means standing, M means it can be blocked either way. Some moves cannot be blocked.
|
CancelWhether the move can be canceled on hit/block. ○ means it can be canceled and × means it cannot. △ means it has a special type of cancel, usually Desperation Move.
|
TechWhether you can tech the move. Air techs are performed by pressing D in the air, ground techs are rolls performed during otg recovery.
|
| P:10/1 S:6/0
|
-
|
-
|
-
|
-
|
-
|
-
|
-
|
-
|
-
|
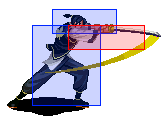
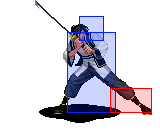
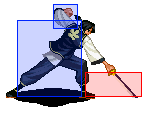
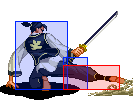
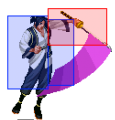
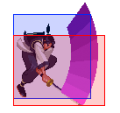
A very fast but decently long range poke with good horizontal priority. Easily O.Kaede's best grounded poke due to being incredibly noncommital and stuffing most approach attempts. Notably it can also combo into most specials depending on your range, with DP in particular being very consistent at even longer ranges. Can serve as an anti-air if spaced against jump ins with weak air-to-ground priority.
|
|
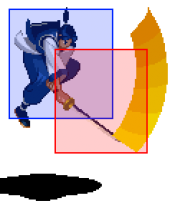
| 4A
Back strike
|
| DamageHow much damage the move does on hit/block. Characters in TLB2 have 256 health, but different defense modifiers.
|
StartupNumber of frames for the move to become active, first active frame included.
|
ActiveNumber of frames the move remains active for, and can hit the opponent on.
|
RecoveryNumber of frames after the active frames for the move to end and the character to become actionable, unless canceled from.
|
StateState your opponent must be in for the move to come out. Some moves can only be done when the opponent is on the ground, for example. Most moves can be done in any state.
|
Frame AdvHow much sooner or later you can act on hit/block when compared to your opponent, assuming the move is not canceled. +2 means you can act 2 frames before your opponent, -2 means your opponent can act 2 frames before you
|
MeterHow much meter the move builds on hit/block. A full bar of meter is 64 points.
|
GuardWhether the move can be blocked standing, crouching, or both. L means it has to be blocked crouching, H means standing, M means it can be blocked either way. Some moves cannot be blocked.
|
CancelWhether the move can be canceled on hit/block. ○ means it can be canceled and × means it cannot. △ means it has a special type of cancel, usually Desperation Move.
|
TechWhether you can tech the move. Air techs are performed by pressing D in the air, ground techs are rolls performed during otg recovery.
|
| P:10/1 S:6/0
|
-
|
-
|
-
|
-
|
-
|
-
|
-
|
-
|
-
|
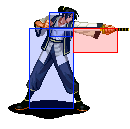
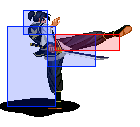
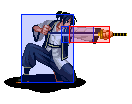
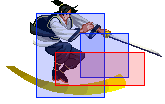
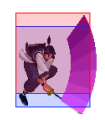
Combo starter with a pretty decent hitbox. Relegated to being combo/punish fodder since it's not particularly fast and it's overshadowed by 5A as a poke. Links into 6C, even though it's a 1 frame link it's the key to your maximum damage conversions.
|
|
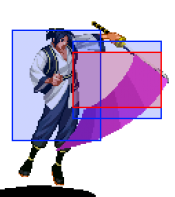
| 5B
Text
|
| DamageHow much damage the move does on hit/block. Characters in TLB2 have 256 health, but different defense modifiers.
|
StartupNumber of frames for the move to become active, first active frame included.
|
ActiveNumber of frames the move remains active for, and can hit the opponent on.
|
RecoveryNumber of frames after the active frames for the move to end and the character to become actionable, unless canceled from.
|
StateState your opponent must be in for the move to come out. Some moves can only be done when the opponent is on the ground, for example. Most moves can be done in any state.
|
Frame AdvHow much sooner or later you can act on hit/block when compared to your opponent, assuming the move is not canceled. +2 means you can act 2 frames before your opponent, -2 means your opponent can act 2 frames before you
|
MeterHow much meter the move builds on hit/block. A full bar of meter is 64 points.
|
GuardWhether the move can be blocked standing, crouching, or both. L means it has to be blocked crouching, H means standing, M means it can be blocked either way. Some moves cannot be blocked.
|
CancelWhether the move can be canceled on hit/block. ○ means it can be canceled and × means it cannot. △ means it has a special type of cancel, usually Desperation Move.
|
TechWhether you can tech the move. Air techs are performed by pressing D in the air, ground techs are rolls performed during otg recovery.
|
| P:24/3 S:13/0
|
-
|
-
|
-
|
-
|
-
|
-
|
-
|
-
|
-
|
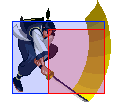
Slower than it should be, can be difficult to combo outside of chain combos
|
|
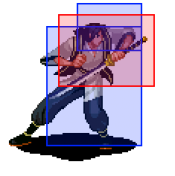
| 6B
Text
|
| DamageHow much damage the move does on hit/block. Characters in TLB2 have 256 health, but different defense modifiers.
|
StartupNumber of frames for the move to become active, first active frame included.
|
ActiveNumber of frames the move remains active for, and can hit the opponent on.
|
RecoveryNumber of frames after the active frames for the move to end and the character to become actionable, unless canceled from.
|
StateState your opponent must be in for the move to come out. Some moves can only be done when the opponent is on the ground, for example. Most moves can be done in any state.
|
Frame AdvHow much sooner or later you can act on hit/block when compared to your opponent, assuming the move is not canceled. +2 means you can act 2 frames before your opponent, -2 means your opponent can act 2 frames before you
|
MeterHow much meter the move builds on hit/block. A full bar of meter is 64 points.
|
GuardWhether the move can be blocked standing, crouching, or both. L means it has to be blocked crouching, H means standing, M means it can be blocked either way. Some moves cannot be blocked.
|
CancelWhether the move can be canceled on hit/block. ○ means it can be canceled and × means it cannot. △ means it has a special type of cancel, usually Desperation Move.
|
TechWhether you can tech the move. Air techs are performed by pressing D in the air, ground techs are rolls performed during otg recovery.
|
| P:40/5 S:19/0
|
-
|
-
|
-
|
-
|
-
|
-
|
-
|
-
|
-
|
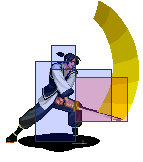
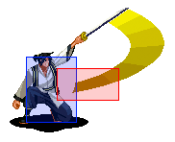
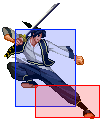
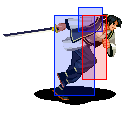
Huge range for a 6B, being comparable to Kagami and Moriya's 6B. Doesn't lead to anything on hit, but if spaced right it's difficult to punish on block. Solid damage on Power, and serves as a chain ender in Speed.
|
|
| 5C
Text
|
| DamageHow much damage the move does on hit/block. Characters in TLB2 have 256 health, but different defense modifiers.
|
StartupNumber of frames for the move to become active, first active frame included.
|
ActiveNumber of frames the move remains active for, and can hit the opponent on.
|
RecoveryNumber of frames after the active frames for the move to end and the character to become actionable, unless canceled from.
|
StateState your opponent must be in for the move to come out. Some moves can only be done when the opponent is on the ground, for example. Most moves can be done in any state.
|
Frame AdvHow much sooner or later you can act on hit/block when compared to your opponent, assuming the move is not canceled. +2 means you can act 2 frames before your opponent, -2 means your opponent can act 2 frames before you
|
MeterHow much meter the move builds on hit/block. A full bar of meter is 64 points.
|
GuardWhether the move can be blocked standing, crouching, or both. L means it has to be blocked crouching, H means standing, M means it can be blocked either way. Some moves cannot be blocked.
|
CancelWhether the move can be canceled on hit/block. ○ means it can be canceled and × means it cannot. △ means it has a special type of cancel, usually Desperation Move.
|
TechWhether you can tech the move. Air techs are performed by pressing D in the air, ground techs are rolls performed during otg recovery.
|
| P:10/1 S:9/0
|
-
|
-
|
-
|
-
|
-
|
-
|
-
|
-
|
-
|
Hits OTG. Cancel into 41236C after an OTG hit for extra meter build.
|
|
| 6C
Text
|
| DamageHow much damage the move does on hit/block. Characters in TLB2 have 256 health, but different defense modifiers.
|
StartupNumber of frames for the move to become active, first active frame included.
|
ActiveNumber of frames the move remains active for, and can hit the opponent on.
|
RecoveryNumber of frames after the active frames for the move to end and the character to become actionable, unless canceled from.
|
StateState your opponent must be in for the move to come out. Some moves can only be done when the opponent is on the ground, for example. Most moves can be done in any state.
|
Frame AdvHow much sooner or later you can act on hit/block when compared to your opponent, assuming the move is not canceled. +2 means you can act 2 frames before your opponent, -2 means your opponent can act 2 frames before you
|
MeterHow much meter the move builds on hit/block. A full bar of meter is 64 points.
|
GuardWhether the move can be blocked standing, crouching, or both. L means it has to be blocked crouching, H means standing, M means it can be blocked either way. Some moves cannot be blocked.
|
CancelWhether the move can be canceled on hit/block. ○ means it can be canceled and × means it cannot. △ means it has a special type of cancel, usually Desperation Move.
|
TechWhether you can tech the move. Air techs are performed by pressing D in the air, ground techs are rolls performed during otg recovery.
|
| P:15/1 S:13/0
|
-
|
-
|
-
|
-
|
-
|
-
|
-
|
-
|
-
|
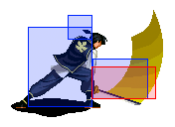
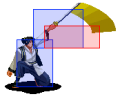
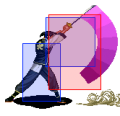
A wallbounce with decent range. Can be canceled in power for super confirms, or guarantee an OTG/oki in any mode. Difficult for some characters to punish on block if spaced and canceled, however it can always be punished if what you do (or don't do) after the hit is read.
|
|
| BC(Power)
Text
|
| DamageHow much damage the move does on hit/block. Characters in TLB2 have 256 health, but different defense modifiers.
|
StartupNumber of frames for the move to become active, first active frame included.
|
ActiveNumber of frames the move remains active for, and can hit the opponent on.
|
RecoveryNumber of frames after the active frames for the move to end and the character to become actionable, unless canceled from.
|
StateState your opponent must be in for the move to come out. Some moves can only be done when the opponent is on the ground, for example. Most moves can be done in any state.
|
Frame AdvHow much sooner or later you can act on hit/block when compared to your opponent, assuming the move is not canceled. +2 means you can act 2 frames before your opponent, -2 means your opponent can act 2 frames before you
|
MeterHow much meter the move builds on hit/block. A full bar of meter is 64 points.
|
GuardWhether the move can be blocked standing, crouching, or both. L means it has to be blocked crouching, H means standing, M means it can be blocked either way. Some moves cannot be blocked.
|
CancelWhether the move can be canceled on hit/block. ○ means it can be canceled and × means it cannot. △ means it has a special type of cancel, usually Desperation Move.
|
TechWhether you can tech the move. Air techs are performed by pressing D in the air, ground techs are rolls performed during otg recovery.
|
| 49
|
47
|
-
|
-
|
-
|
-
|
-
|
-
|
-
|
-
|
An unblockable which can be held down to delay. Due to significant startup and being possible to deflect, it's typically rather useless. In theory you can bait deflects fairly easily with it, but 41236C is just generally better at doing that.
|
|
| BC(Speed/EX)
Text
|
| DamageHow much damage the move does on hit/block. Characters in TLB2 have 256 health, but different defense modifiers.
|
StartupNumber of frames for the move to become active, first active frame included.
|
ActiveNumber of frames the move remains active for, and can hit the opponent on.
|
RecoveryNumber of frames after the active frames for the move to end and the character to become actionable, unless canceled from.
|
StateState your opponent must be in for the move to come out. Some moves can only be done when the opponent is on the ground, for example. Most moves can be done in any state.
|
Frame AdvHow much sooner or later you can act on hit/block when compared to your opponent, assuming the move is not canceled. +2 means you can act 2 frames before your opponent, -2 means your opponent can act 2 frames before you
|
MeterHow much meter the move builds on hit/block. A full bar of meter is 64 points.
|
GuardWhether the move can be blocked standing, crouching, or both. L means it has to be blocked crouching, H means standing, M means it can be blocked either way. Some moves cannot be blocked.
|
CancelWhether the move can be canceled on hit/block. ○ means it can be canceled and × means it cannot. △ means it has a special type of cancel, usually Desperation Move.
|
TechWhether you can tech the move. Air techs are performed by pressing D in the air, ground techs are rolls performed during otg recovery.
|
| 13/0
|
-
|
-
|
-
|
-
|
-
|
-
|
-
|
-
|
-
|
An overhead which can lead to combo. Reactable, and O.Kaede's lows are already fairly underwhelming, so it's not often very useful during pressure situations. Also works as an anti-air.
|
|
| 3B
Text
|
| DamageHow much damage the move does on hit/block. Characters in TLB2 have 256 health, but different defense modifiers.
|
StartupNumber of frames for the move to become active, first active frame included.
|
ActiveNumber of frames the move remains active for, and can hit the opponent on.
|
RecoveryNumber of frames after the active frames for the move to end and the character to become actionable, unless canceled from.
|
StateState your opponent must be in for the move to come out. Some moves can only be done when the opponent is on the ground, for example. Most moves can be done in any state.
|
Frame AdvHow much sooner or later you can act on hit/block when compared to your opponent, assuming the move is not canceled. +2 means you can act 2 frames before your opponent, -2 means your opponent can act 2 frames before you
|
MeterHow much meter the move builds on hit/block. A full bar of meter is 64 points.
|
GuardWhether the move can be blocked standing, crouching, or both. L means it has to be blocked crouching, H means standing, M means it can be blocked either way. Some moves cannot be blocked.
|
CancelWhether the move can be canceled on hit/block. ○ means it can be canceled and × means it cannot. △ means it has a special type of cancel, usually Desperation Move.
|
TechWhether you can tech the move. Air techs are performed by pressing D in the air, ground techs are rolls performed during otg recovery.
|
| -
|
-
|
-
|
-
|
-
|
-
|
-
|
-
|
-
|
-
|
|
|
|
- 4A, 5A, 5B, and 5C can all be canceled in both Power Mode and Speed Mode
- 6B (Power and Speed) is not cancelable
- 6C in Speed Mode is not cancelable
Crouching
| 2A
Text
|
| DamageHow much damage the move does on hit/block. Characters in TLB2 have 256 health, but different defense modifiers.
|
StartupNumber of frames for the move to become active, first active frame included.
|
ActiveNumber of frames the move remains active for, and can hit the opponent on.
|
RecoveryNumber of frames after the active frames for the move to end and the character to become actionable, unless canceled from.
|
StateState your opponent must be in for the move to come out. Some moves can only be done when the opponent is on the ground, for example. Most moves can be done in any state.
|
Frame AdvHow much sooner or later you can act on hit/block when compared to your opponent, assuming the move is not canceled. +2 means you can act 2 frames before your opponent, -2 means your opponent can act 2 frames before you
|
MeterHow much meter the move builds on hit/block. A full bar of meter is 64 points.
|
GuardWhether the move can be blocked standing, crouching, or both. L means it has to be blocked crouching, H means standing, M means it can be blocked either way. Some moves cannot be blocked.
|
CancelWhether the move can be canceled on hit/block. ○ means it can be canceled and × means it cannot. △ means it has a special type of cancel, usually Desperation Move.
|
TechWhether you can tech the move. Air techs are performed by pressing D in the air, ground techs are rolls performed during otg recovery.
|
| P:10/1 S:9/0
|
-
|
-
|
-
|
-
|
-
|
-
|
-
|
-
|
-
|
|
|
|
| 2B
Snk hitbox shenanigans
|
| DamageHow much damage the move does on hit/block. Characters in TLB2 have 256 health, but different defense modifiers.
|
StartupNumber of frames for the move to become active, first active frame included.
|
ActiveNumber of frames the move remains active for, and can hit the opponent on.
|
RecoveryNumber of frames after the active frames for the move to end and the character to become actionable, unless canceled from.
|
StateState your opponent must be in for the move to come out. Some moves can only be done when the opponent is on the ground, for example. Most moves can be done in any state.
|
Frame AdvHow much sooner or later you can act on hit/block when compared to your opponent, assuming the move is not canceled. +2 means you can act 2 frames before your opponent, -2 means your opponent can act 2 frames before you
|
MeterHow much meter the move builds on hit/block. A full bar of meter is 64 points.
|
GuardWhether the move can be blocked standing, crouching, or both. L means it has to be blocked crouching, H means standing, M means it can be blocked either way. Some moves cannot be blocked.
|
CancelWhether the move can be canceled on hit/block. ○ means it can be canceled and × means it cannot. △ means it has a special type of cancel, usually Desperation Move.
|
TechWhether you can tech the move. Air techs are performed by pressing D in the air, ground techs are rolls performed during otg recovery.
|
| P:22/2 S:19/0
|
-
|
-
|
-
|
-
|
-
|
-
|
-
|
-
|
-
|
|
|
|
| 2C
Text
|
| DamageHow much damage the move does on hit/block. Characters in TLB2 have 256 health, but different defense modifiers.
|
StartupNumber of frames for the move to become active, first active frame included.
|
ActiveNumber of frames the move remains active for, and can hit the opponent on.
|
RecoveryNumber of frames after the active frames for the move to end and the character to become actionable, unless canceled from.
|
StateState your opponent must be in for the move to come out. Some moves can only be done when the opponent is on the ground, for example. Most moves can be done in any state.
|
Frame AdvHow much sooner or later you can act on hit/block when compared to your opponent, assuming the move is not canceled. +2 means you can act 2 frames before your opponent, -2 means your opponent can act 2 frames before you
|
MeterHow much meter the move builds on hit/block. A full bar of meter is 64 points.
|
GuardWhether the move can be blocked standing, crouching, or both. L means it has to be blocked crouching, H means standing, M means it can be blocked either way. Some moves cannot be blocked.
|
CancelWhether the move can be canceled on hit/block. ○ means it can be canceled and × means it cannot. △ means it has a special type of cancel, usually Desperation Move.
|
TechWhether you can tech the move. Air techs are performed by pressing D in the air, ground techs are rolls performed during otg recovery.
|
| P:10/1 S:9/0
|
-
|
-
|
-
|
-
|
-
|
-
|
-
|
-
|
-
|
|
|
|
| 3C
Text
|
| DamageHow much damage the move does on hit/block. Characters in TLB2 have 256 health, but different defense modifiers.
|
StartupNumber of frames for the move to become active, first active frame included.
|
ActiveNumber of frames the move remains active for, and can hit the opponent on.
|
RecoveryNumber of frames after the active frames for the move to end and the character to become actionable, unless canceled from.
|
StateState your opponent must be in for the move to come out. Some moves can only be done when the opponent is on the ground, for example. Most moves can be done in any state.
|
Frame AdvHow much sooner or later you can act on hit/block when compared to your opponent, assuming the move is not canceled. +2 means you can act 2 frames before your opponent, -2 means your opponent can act 2 frames before you
|
MeterHow much meter the move builds on hit/block. A full bar of meter is 64 points.
|
GuardWhether the move can be blocked standing, crouching, or both. L means it has to be blocked crouching, H means standing, M means it can be blocked either way. Some moves cannot be blocked.
|
CancelWhether the move can be canceled on hit/block. ○ means it can be canceled and × means it cannot. △ means it has a special type of cancel, usually Desperation Move.
|
TechWhether you can tech the move. Air techs are performed by pressing D in the air, ground techs are rolls performed during otg recovery.
|
| P:19/2 S:15/0
|
-
|
-
|
-
|
-
|
-
|
-
|
-
|
-
|
-
|
|
|
|
Air
| J.A
Text
|
| DamageHow much damage the move does on hit/block. Characters in TLB2 have 256 health, but different defense modifiers.
|
StartupNumber of frames for the move to become active, first active frame included.
|
ActiveNumber of frames the move remains active for, and can hit the opponent on.
|
RecoveryNumber of frames after the active frames for the move to end and the character to become actionable, unless canceled from.
|
StateState your opponent must be in for the move to come out. Some moves can only be done when the opponent is on the ground, for example. Most moves can be done in any state.
|
Frame AdvHow much sooner or later you can act on hit/block when compared to your opponent, assuming the move is not canceled. +2 means you can act 2 frames before your opponent, -2 means your opponent can act 2 frames before you
|
MeterHow much meter the move builds on hit/block. A full bar of meter is 64 points.
|
GuardWhether the move can be blocked standing, crouching, or both. L means it has to be blocked crouching, H means standing, M means it can be blocked either way. Some moves cannot be blocked.
|
CancelWhether the move can be canceled on hit/block. ○ means it can be canceled and × means it cannot. △ means it has a special type of cancel, usually Desperation Move.
|
TechWhether you can tech the move. Air techs are performed by pressing D in the air, ground techs are rolls performed during otg recovery.
|
| P:10/1 S:9/0
|
-
|
-
|
-
|
-
|
-
|
-
|
-
|
-
|
-
|
|
|
|
| J.B
Text
|
| DamageHow much damage the move does on hit/block. Characters in TLB2 have 256 health, but different defense modifiers.
|
StartupNumber of frames for the move to become active, first active frame included.
|
ActiveNumber of frames the move remains active for, and can hit the opponent on.
|
RecoveryNumber of frames after the active frames for the move to end and the character to become actionable, unless canceled from.
|
StateState your opponent must be in for the move to come out. Some moves can only be done when the opponent is on the ground, for example. Most moves can be done in any state.
|
Frame AdvHow much sooner or later you can act on hit/block when compared to your opponent, assuming the move is not canceled. +2 means you can act 2 frames before your opponent, -2 means your opponent can act 2 frames before you
|
MeterHow much meter the move builds on hit/block. A full bar of meter is 64 points.
|
GuardWhether the move can be blocked standing, crouching, or both. L means it has to be blocked crouching, H means standing, M means it can be blocked either way. Some moves cannot be blocked.
|
CancelWhether the move can be canceled on hit/block. ○ means it can be canceled and × means it cannot. △ means it has a special type of cancel, usually Desperation Move.
|
TechWhether you can tech the move. Air techs are performed by pressing D in the air, ground techs are rolls performed during otg recovery.
|
| P:21/2 S:10/0
|
-
|
-
|
-
|
-
|
-
|
-
|
-
|
-
|
-
|
|
|
|
| J.C
The highest of highs
|
| DamageHow much damage the move does on hit/block. Characters in TLB2 have 256 health, but different defense modifiers.
|
StartupNumber of frames for the move to become active, first active frame included.
|
ActiveNumber of frames the move remains active for, and can hit the opponent on.
|
RecoveryNumber of frames after the active frames for the move to end and the character to become actionable, unless canceled from.
|
StateState your opponent must be in for the move to come out. Some moves can only be done when the opponent is on the ground, for example. Most moves can be done in any state.
|
Frame AdvHow much sooner or later you can act on hit/block when compared to your opponent, assuming the move is not canceled. +2 means you can act 2 frames before your opponent, -2 means your opponent can act 2 frames before you
|
MeterHow much meter the move builds on hit/block. A full bar of meter is 64 points.
|
GuardWhether the move can be blocked standing, crouching, or both. L means it has to be blocked crouching, H means standing, M means it can be blocked either way. Some moves cannot be blocked.
|
CancelWhether the move can be canceled on hit/block. ○ means it can be canceled and × means it cannot. △ means it has a special type of cancel, usually Desperation Move.
|
TechWhether you can tech the move. Air techs are performed by pressing D in the air, ground techs are rolls performed during otg recovery.
|
| P:10/1 S:9/0
|
-
|
-
|
-
|
-
|
-
|
-
|
-
|
-
|
-
|
This is the reason you pick O.Kaede. Thanks to a coding error, Kaede has access to air chains if he does a jumping attack, then a 236 motion, then either A or B (as long as the jumping button and the button to use the motion aren't the same). This means O.Kaede can cancel his instant overhead j.C into j.236B (j.B) for combos. This makes his punishes, even for attacks that are only slightly minus on block, really good. Without this, it's fair to call him a worse Kaede, so if you want to play him, learning how to do the loop consistently is essential.
|
|
- all but low A and low C in Power mode can cancel when crouching
Speed chain
| 5A>A
Text
|
| DamageHow much damage the move does on hit/block. Characters in TLB2 have 256 health, but different defense modifiers.
|
StartupNumber of frames for the move to become active, first active frame included.
|
ActiveNumber of frames the move remains active for, and can hit the opponent on.
|
RecoveryNumber of frames after the active frames for the move to end and the character to become actionable, unless canceled from.
|
StateState your opponent must be in for the move to come out. Some moves can only be done when the opponent is on the ground, for example. Most moves can be done in any state.
|
Frame AdvHow much sooner or later you can act on hit/block when compared to your opponent, assuming the move is not canceled. +2 means you can act 2 frames before your opponent, -2 means your opponent can act 2 frames before you
|
MeterHow much meter the move builds on hit/block. A full bar of meter is 64 points.
|
GuardWhether the move can be blocked standing, crouching, or both. L means it has to be blocked crouching, H means standing, M means it can be blocked either way. Some moves cannot be blocked.
|
CancelWhether the move can be canceled on hit/block. ○ means it can be canceled and × means it cannot. △ means it has a special type of cancel, usually Desperation Move.
|
TechWhether you can tech the move. Air techs are performed by pressing D in the air, ground techs are rolls performed during otg recovery.
|
| -
|
-
|
-
|
-
|
-
|
-
|
-
|
-
|
-
|
-
|
|
|
|
| 5A>B>C
Text
|
| DamageHow much damage the move does on hit/block. Characters in TLB2 have 256 health, but different defense modifiers.
|
StartupNumber of frames for the move to become active, first active frame included.
|
ActiveNumber of frames the move remains active for, and can hit the opponent on.
|
RecoveryNumber of frames after the active frames for the move to end and the character to become actionable, unless canceled from.
|
StateState your opponent must be in for the move to come out. Some moves can only be done when the opponent is on the ground, for example. Most moves can be done in any state.
|
Frame AdvHow much sooner or later you can act on hit/block when compared to your opponent, assuming the move is not canceled. +2 means you can act 2 frames before your opponent, -2 means your opponent can act 2 frames before you
|
MeterHow much meter the move builds on hit/block. A full bar of meter is 64 points.
|
GuardWhether the move can be blocked standing, crouching, or both. L means it has to be blocked crouching, H means standing, M means it can be blocked either way. Some moves cannot be blocked.
|
CancelWhether the move can be canceled on hit/block. ○ means it can be canceled and × means it cannot. △ means it has a special type of cancel, usually Desperation Move.
|
TechWhether you can tech the move. Air techs are performed by pressing D in the air, ground techs are rolls performed during otg recovery.
|
| -
|
-
|
-
|
-
|
-
|
-
|
-
|
-
|
-
|
-
|
|
|
|
- All moves in this section are exclusive to speed/EX mode
Special Moves
Single Slash Squall - 236A/B
| 236A
Text
|
| DamageHow much damage the move does on hit/block. Characters in TLB2 have 256 health, but different defense modifiers.
|
StartupNumber of frames for the move to become active, first active frame included.
|
ActiveNumber of frames the move remains active for, and can hit the opponent on.
|
RecoveryNumber of frames after the active frames for the move to end and the character to become actionable, unless canceled from.
|
StateState your opponent must be in for the move to come out. Some moves can only be done when the opponent is on the ground, for example. Most moves can be done in any state.
|
Frame AdvHow much sooner or later you can act on hit/block when compared to your opponent, assuming the move is not canceled. +2 means you can act 2 frames before your opponent, -2 means your opponent can act 2 frames before you
|
MeterHow much meter the move builds on hit/block. A full bar of meter is 64 points.
|
GuardWhether the move can be blocked standing, crouching, or both. L means it has to be blocked crouching, H means standing, M means it can be blocked either way. Some moves cannot be blocked.
|
CancelWhether the move can be canceled on hit/block. ○ means it can be canceled and × means it cannot. △ means it has a special type of cancel, usually Desperation Move.
|
TechWhether you can tech the move. Air techs are performed by pressing D in the air, ground techs are rolls performed during otg recovery.
|
| P:21/2 S:19/2
|
-
|
-
|
-
|
-
|
-
|
-
|
M
|
-
|
-
|
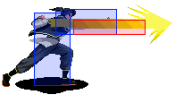
A single hit projectile unlike Awakened Kaede version. It's still easily hopped over with good reaction, and has fairly long recovery. Useful for frame traps.
|
|
| 236B
Text
|
| DamageHow much damage the move does on hit/block. Characters in TLB2 have 256 health, but different defense modifiers.
|
StartupNumber of frames for the move to become active, first active frame included.
|
ActiveNumber of frames the move remains active for, and can hit the opponent on.
|
RecoveryNumber of frames after the active frames for the move to end and the character to become actionable, unless canceled from.
|
StateState your opponent must be in for the move to come out. Some moves can only be done when the opponent is on the ground, for example. Most moves can be done in any state.
|
Frame AdvHow much sooner or later you can act on hit/block when compared to your opponent, assuming the move is not canceled. +2 means you can act 2 frames before your opponent, -2 means your opponent can act 2 frames before you
|
MeterHow much meter the move builds on hit/block. A full bar of meter is 64 points.
|
GuardWhether the move can be blocked standing, crouching, or both. L means it has to be blocked crouching, H means standing, M means it can be blocked either way. Some moves cannot be blocked.
|
CancelWhether the move can be canceled on hit/block. ○ means it can be canceled and × means it cannot. △ means it has a special type of cancel, usually Desperation Move.
|
TechWhether you can tech the move. Air techs are performed by pressing D in the air, ground techs are rolls performed during otg recovery.
|
| P:24/3 S:23/2
|
-
|
-
|
-
|
-
|
-
|
-
|
M
|
P ○/○ S ○/○
|
-
|
Similar to A version, but it travels faster but comes out slower.
|
|
- Kaede launches an air energy projectile.
Single Slash Air Fang - 623A/B
| 623A
Text
|
| DamageHow much damage the move does on hit/block. Characters in TLB2 have 256 health, but different defense modifiers.
|
StartupNumber of frames for the move to become active, first active frame included.
|
ActiveNumber of frames the move remains active for, and can hit the opponent on.
|
RecoveryNumber of frames after the active frames for the move to end and the character to become actionable, unless canceled from.
|
StateState your opponent must be in for the move to come out. Some moves can only be done when the opponent is on the ground, for example. Most moves can be done in any state.
|
Frame AdvHow much sooner or later you can act on hit/block when compared to your opponent, assuming the move is not canceled. +2 means you can act 2 frames before your opponent, -2 means your opponent can act 2 frames before you
|
MeterHow much meter the move builds on hit/block. A full bar of meter is 64 points.
|
GuardWhether the move can be blocked standing, crouching, or both. L means it has to be blocked crouching, H means standing, M means it can be blocked either way. Some moves cannot be blocked.
|
CancelWhether the move can be canceled on hit/block. ○ means it can be canceled and × means it cannot. △ means it has a special type of cancel, usually Desperation Move.
|
TechWhether you can tech the move. Air techs are performed by pressing D in the air, ground techs are rolls performed during otg recovery.
|
| P:5+17 S:3+14
|
7
|
-
|
-
|
-
|
-
|
-
|
M
|
-
|
-
|
|
|
|
| 623B
Text
|
| DamageHow much damage the move does on hit/block. Characters in TLB2 have 256 health, but different defense modifiers.
|
StartupNumber of frames for the move to become active, first active frame included.
|
ActiveNumber of frames the move remains active for, and can hit the opponent on.
|
RecoveryNumber of frames after the active frames for the move to end and the character to become actionable, unless canceled from.
|
StateState your opponent must be in for the move to come out. Some moves can only be done when the opponent is on the ground, for example. Most moves can be done in any state.
|
Frame AdvHow much sooner or later you can act on hit/block when compared to your opponent, assuming the move is not canceled. +2 means you can act 2 frames before your opponent, -2 means your opponent can act 2 frames before you
|
MeterHow much meter the move builds on hit/block. A full bar of meter is 64 points.
|
GuardWhether the move can be blocked standing, crouching, or both. L means it has to be blocked crouching, H means standing, M means it can be blocked either way. Some moves cannot be blocked.
|
CancelWhether the move can be canceled on hit/block. ○ means it can be canceled and × means it cannot. △ means it has a special type of cancel, usually Desperation Move.
|
TechWhether you can tech the move. Air techs are performed by pressing D in the air, ground techs are rolls performed during otg recovery.
|
| -
|
-
|
-
|
-
|
-
|
-
|
-
|
M
|
-
|
-
|
|
|
|
- Kaede does a jumping upward slashing uppercut
- B version can follow-up with knockdown.
Single Slash Fillet Flash = 214A/B
| 214A/B
Text
|
| DamageHow much damage the move does on hit/block. Characters in TLB2 have 256 health, but different defense modifiers.
|
StartupNumber of frames for the move to become active, first active frame included.
|
ActiveNumber of frames the move remains active for, and can hit the opponent on.
|
RecoveryNumber of frames after the active frames for the move to end and the character to become actionable, unless canceled from.
|
StateState your opponent must be in for the move to come out. Some moves can only be done when the opponent is on the ground, for example. Most moves can be done in any state.
|
Frame AdvHow much sooner or later you can act on hit/block when compared to your opponent, assuming the move is not canceled. +2 means you can act 2 frames before your opponent, -2 means your opponent can act 2 frames before you
|
MeterHow much meter the move builds on hit/block. A full bar of meter is 64 points.
|
GuardWhether the move can be blocked standing, crouching, or both. L means it has to be blocked crouching, H means standing, M means it can be blocked either way. Some moves cannot be blocked.
|
CancelWhether the move can be canceled on hit/block. ○ means it can be canceled and × means it cannot. △ means it has a special type of cancel, usually Desperation Move.
|
TechWhether you can tech the move. Air techs are performed by pressing D in the air, ground techs are rolls performed during otg recovery.
|
| -
|
-
|
-
|
-
|
-
|
-
|
-
|
M/H
|
-
|
-
|
You can cancel the 2nd hit with 236236AB to get a fireball for some reason
|
|
| 214B
Text
|
| DamageHow much damage the move does on hit/block. Characters in TLB2 have 256 health, but different defense modifiers.
|
StartupNumber of frames for the move to become active, first active frame included.
|
ActiveNumber of frames the move remains active for, and can hit the opponent on.
|
RecoveryNumber of frames after the active frames for the move to end and the character to become actionable, unless canceled from.
|
StateState your opponent must be in for the move to come out. Some moves can only be done when the opponent is on the ground, for example. Most moves can be done in any state.
|
Frame AdvHow much sooner or later you can act on hit/block when compared to your opponent, assuming the move is not canceled. +2 means you can act 2 frames before your opponent, -2 means your opponent can act 2 frames before you
|
MeterHow much meter the move builds on hit/block. A full bar of meter is 64 points.
|
GuardWhether the move can be blocked standing, crouching, or both. L means it has to be blocked crouching, H means standing, M means it can be blocked either way. Some moves cannot be blocked.
|
CancelWhether the move can be canceled on hit/block. ○ means it can be canceled and × means it cannot. △ means it has a special type of cancel, usually Desperation Move.
|
TechWhether you can tech the move. Air techs are performed by pressing D in the air, ground techs are rolls performed during otg recovery.
|
| -
|
-
|
-
|
-
|
-
|
-
|
-
|
M/H
|
-
|
-
|
|
|
|
- Kaede runs forward to deliver 3 slashes
- Both version ends in a knockdown
- Super cancel able
East Wind Wallop - 214C
| 214C
Text
|
| DamageHow much damage the move does on hit/block. Characters in TLB2 have 256 health, but different defense modifiers.
|
StartupNumber of frames for the move to become active, first active frame included.
|
ActiveNumber of frames the move remains active for, and can hit the opponent on.
|
RecoveryNumber of frames after the active frames for the move to end and the character to become actionable, unless canceled from.
|
StateState your opponent must be in for the move to come out. Some moves can only be done when the opponent is on the ground, for example. Most moves can be done in any state.
|
Frame AdvHow much sooner or later you can act on hit/block when compared to your opponent, assuming the move is not canceled. +2 means you can act 2 frames before your opponent, -2 means your opponent can act 2 frames before you
|
MeterHow much meter the move builds on hit/block. A full bar of meter is 64 points.
|
GuardWhether the move can be blocked standing, crouching, or both. L means it has to be blocked crouching, H means standing, M means it can be blocked either way. Some moves cannot be blocked.
|
CancelWhether the move can be canceled on hit/block. ○ means it can be canceled and × means it cannot. △ means it has a special type of cancel, usually Desperation Move.
|
TechWhether you can tech the move. Air techs are performed by pressing D in the air, ground techs are rolls performed during otg recovery.
|
| N/A
|
N/A
|
N/A
|
36
|
-
|
N/A
|
-
|
N/A
|
-
|
-
|
Just like Awakened Kaede, it doesn't grant any invincibility but rather crossup.
|
|
- Kaede rolls forward
- possibly ends up on opposite site of opponent, but may leave him vulnerable
Ittou Raitei - 7/8/9CD (in air)
| j.CD
Text
|
| DamageHow much damage the move does on hit/block. Characters in TLB2 have 256 health, but different defense modifiers.
|
StartupNumber of frames for the move to become active, first active frame included.
|
ActiveNumber of frames the move remains active for, and can hit the opponent on.
|
RecoveryNumber of frames after the active frames for the move to end and the character to become actionable, unless canceled from.
|
StateState your opponent must be in for the move to come out. Some moves can only be done when the opponent is on the ground, for example. Most moves can be done in any state.
|
Frame AdvHow much sooner or later you can act on hit/block when compared to your opponent, assuming the move is not canceled. +2 means you can act 2 frames before your opponent, -2 means your opponent can act 2 frames before you
|
MeterHow much meter the move builds on hit/block. A full bar of meter is 64 points.
|
GuardWhether the move can be blocked standing, crouching, or both. L means it has to be blocked crouching, H means standing, M means it can be blocked either way. Some moves cannot be blocked.
|
CancelWhether the move can be canceled on hit/block. ○ means it can be canceled and × means it cannot. △ means it has a special type of cancel, usually Desperation Move.
|
TechWhether you can tech the move. Air techs are performed by pressing D in the air, ground techs are rolls performed during otg recovery.
|
| P:31 S:24
|
0
|
N/A
|
-
|
-
|
KD
|
-
|
N/A
|
-
|
-
|
A simple air-throw. Doesn't lead to much advantage on hit, and has fairly poor anti-air priority. Its primary use is as a combo tool, due to being possible to "rejump" into from certain setups. Is part of Kaede's optimal meterless command grab confirms in Power Mode, and isn't very useful in Speed/EX since he has better meterless options in those modes.
|
|
- Kaede catches opponent in air and slams them into the ground.
Single Slash Storm Blast - 41236C (in close)
| 41236C
Text
|
| DamageHow much damage the move does on hit/block. Characters in TLB2 have 256 health, but different defense modifiers.
|
StartupNumber of frames for the move to become active, first active frame included.
|
ActiveNumber of frames the move remains active for, and can hit the opponent on.
|
RecoveryNumber of frames after the active frames for the move to end and the character to become actionable, unless canceled from.
|
StateState your opponent must be in for the move to come out. Some moves can only be done when the opponent is on the ground, for example. Most moves can be done in any state.
|
Frame AdvHow much sooner or later you can act on hit/block when compared to your opponent, assuming the move is not canceled. +2 means you can act 2 frames before your opponent, -2 means your opponent can act 2 frames before you
|
MeterHow much meter the move builds on hit/block. A full bar of meter is 64 points.
|
GuardWhether the move can be blocked standing, crouching, or both. L means it has to be blocked crouching, H means standing, M means it can be blocked either way. Some moves cannot be blocked.
|
CancelWhether the move can be canceled on hit/block. ○ means it can be canceled and × means it cannot. △ means it has a special type of cancel, usually Desperation Move.
|
TechWhether you can tech the move. Air techs are performed by pressing D in the air, ground techs are rolls performed during otg recovery.
|
| P:12 S:9
|
0
|
N/A
|
34
|
-
|
Launch
|
-
|
N/A
|
-
|
-
|
A very fast and rewarding command grab. Relatively fast animation on whiff, but still punishable on reaction and has the same range as a regular throw. A cornerstone of Kaede's mixup game in all modes, due to his lackluster high/low opportunities. Just like Awakened Kaede, it is untechable upon launch and only cause soft knockdown if you don't follow-up.
- Can't juggle into SDM due to the startup.
- Can't juggle into Super Speed Combos from midscreen.
|
|
- Kaede does a small assault, allows for further juggling after finishes.
Desperation Move
Lively Dragon Pounce - 21416AB
| 21416AB
Text
|
| DamageHow much damage the move does on hit/block. Characters in TLB2 have 256 health, but different defense modifiers.
|
StartupNumber of frames for the move to become active, first active frame included.
|
ActiveNumber of frames the move remains active for, and can hit the opponent on.
|
RecoveryNumber of frames after the active frames for the move to end and the character to become actionable, unless canceled from.
|
StateState your opponent must be in for the move to come out. Some moves can only be done when the opponent is on the ground, for example. Most moves can be done in any state.
|
Frame AdvHow much sooner or later you can act on hit/block when compared to your opponent, assuming the move is not canceled. +2 means you can act 2 frames before your opponent, -2 means your opponent can act 2 frames before you
|
MeterHow much meter the move builds on hit/block. A full bar of meter is 64 points.
|
GuardWhether the move can be blocked standing, crouching, or both. L means it has to be blocked crouching, H means standing, M means it can be blocked either way. Some moves cannot be blocked.
|
CancelWhether the move can be canceled on hit/block. ○ means it can be canceled and × means it cannot. △ means it has a special type of cancel, usually Desperation Move.
|
TechWhether you can tech the move. Air techs are performed by pressing D in the air, ground techs are rolls performed during otg recovery.
|
| P:76/9 S:71/8
|
-
|
-
|
-
|
-
|
-
|
-
|
M
|
-
|
-
|
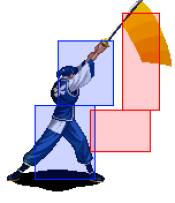
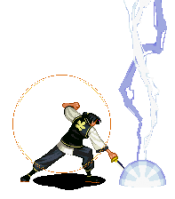
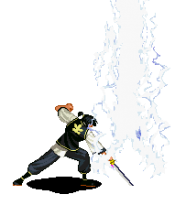
A pilar of lightning that moves horizontally. Very good as an anti air, usually used to close out a round with a good read. It is very much unsafe on block, especially when done at close range so you shouldn't be using this move like a spacing tool or neutral check while in Desperation. Holding the move doesn't increase its damage.
|
|
- Kaede strikes the ground creating a single vertical forward-moving electrical strike.
- Chargeable.
Super Desperation Moves
Lively "Bad Dragon Rising" - 21416B
| 21416B
Text
|
| DamageHow much damage the move does on hit/block. Characters in TLB2 have 256 health, but different defense modifiers.
|
StartupNumber of frames for the move to become active, first active frame included.
|
ActiveNumber of frames the move remains active for, and can hit the opponent on.
|
RecoveryNumber of frames after the active frames for the move to end and the character to become actionable, unless canceled from.
|
StateState your opponent must be in for the move to come out. Some moves can only be done when the opponent is on the ground, for example. Most moves can be done in any state.
|
Frame AdvHow much sooner or later you can act on hit/block when compared to your opponent, assuming the move is not canceled. +2 means you can act 2 frames before your opponent, -2 means your opponent can act 2 frames before you
|
MeterHow much meter the move builds on hit/block. A full bar of meter is 64 points.
|
GuardWhether the move can be blocked standing, crouching, or both. L means it has to be blocked crouching, H means standing, M means it can be blocked either way. Some moves cannot be blocked.
|
CancelWhether the move can be canceled on hit/block. ○ means it can be canceled and × means it cannot. △ means it has a special type of cancel, usually Desperation Move.
|
TechWhether you can tech the move. Air techs are performed by pressing D in the air, ground techs are rolls performed during otg recovery.
|
| 85/12
|
-
|
-
|
-
|
-
|
KD
|
-
|
M
|
-
|
-
|
Similar in concept to 21416AB, however, you cannot combo into this from 41236C command grab or DM cancel into it from 214A, as such, its uses are very limited. If not all hits connect, it does less damage than the regular DM, making it a very inconsistent tool in general. Use it for max damage conversions off of 6C. Holding the move doesn't increase its damage.
|
|
- Similar motion to the Lively Dragon Pounce, only resulting in three strikes.
- Chargeable.
Combos
Any Mode
- (LOOP) 4A, 4A, 5A, 623B>623B
- 41236C, J.CD
- Dash A/B, 214A
- (LOOP), 5C, 623B>623B
- (LOOP), 5C, 214A
- 41236C, 623B>623B
- 41236C, 21416AB
Power Mode Only
hcf C, qcf, qcf AB
j B, B, qcf, qcf AB
j B, f C, qcb, db, f B
EX Mode Only
j B, b A, A, A, B, qcf, qcf B
Power and EX Mode
hcf C (close in), qcb, db, f B
Dash A/B, qcf, qcf B
j B, B, qcf, qcf B
Speed and EX Mode
j B, A, B, C
j B, b A, A, A, B, f C
Dash A/B, d B, qcf B
Dash A/B, B, qcb A
Dash A/B, B, BC, dp B(x2)
j B, b A, A, A, B, qcf B
Super Speed Combos
- A + B + C + A + B + C + A + B + 236C
- A + B + C + A + B + C + C + B + 236A
- A + B + C + 2C + A + 2C + 6BC
- A + B + C + 2C + A + BC + A + 236B
Videos
