|
|
| Line 468: |
Line 468: |
| |blockAdv=-10 | | |blockAdv=-10 |
| |gbar= | | |gbar= |
| |description= | | |description=Terry hits the ground after striking a pose, creating a large wave of fire around his fist. This move has rather slow start-up and is not safe on block, and cannot be comboed into, but can be cancelled into another Special or Desperation Move as a trade-off. Due to these qualities, its use in battle is rather limited and rarely advised. |
| }} | | }} |
| }} | | }} |
| Line 486: |
Line 486: |
| |blockAdv=-10~-1 (A)<br>-20~-3 (C) | | |blockAdv=-10~-1 (A)<br>-20~-3 (C) |
| |gbar= | | |gbar= |
| |description= | | |description=Terry charges at the opponent with a glowing fist. The distance he travels depends on the button pressed; the A version travels one third of the screen, while the C version travels at a full-screen distance. Alongside this, the A version has a fast amount of start-up, which makes it easier to combo into and harder to punish if spaced enough, and the C version has a slower startup, which cannot be comboed into but harder to punish at a full-screen distance. However, it is very unsafe on block at a point-blank distance, further encouraging spacial strategy with the move's use. |
| }} | | }} |
| }} | | }} |
| Line 504: |
Line 504: |
| |blockAdv=-5 | | |blockAdv=-5 |
| |gbar= | | |gbar= |
| |description= | | |description=Terry strikes a close uppercut that is followed by a long-range overhead blow. It is rather unsafe regardless of if it hits or is blocked, but pushes Terry back a fair distance if it is blocked, and keeps the second hit's overhead property if cancelled into from a Normal. The move is also the same regardless of which strength of button is pressed, unlike many of Terry's other moves, which vary based on that condition. |
| }} | | }} |
| }} | | }} |
| Line 522: |
Line 522: |
| |blockAdv=-13 (B)<br>-17 (D) | | |blockAdv=-13 (B)<br>-17 (D) |
| |gbar= | | |gbar= |
| |description= | | |description=Terry jumps with a rising knee before punching the opponent to the ground. The distance of the move varies with the strength of the button pressed, alongside the connectivity of the second hit if the move is comboed into from a grounded Normal; the B version has a shorter distance, but the second hit will not connect if it is comboed from grounded Normals, while the D version has a longer distance with the second hit connecting reliably from cancellable grounded Normals. The second hit's hard knockdown property, alongside Terry landing very close to the opponent's fall body, can provide good wake-up option setups, but the move is best used at the end of a combo due to multiple flaws. It is not reliable as an anti-air due to the time it takes Terry to reach an aerial position, and is not usable as a reversal due to its lack of reversal conditions such as invulnerable startup. It has horrible recovery when whiffed, and is easy to punish if blocked up close. Another flaw in the move is that the opponent can roll in between the first and second hit if the move is blocked. |
| }} | | }} |
| }} | | }} |
| Line 540: |
Line 540: |
| |blockAdv=-23 (B)<br>-24 (D) | | |blockAdv=-23 (B)<br>-24 (D) |
| |gbar= | | |gbar= |
| |description= | | |description=Terry lunges his shoulders at the opponent, which pops them into the air if it hits. It is easy to combo into from heavy close and grounded Normals (including df+C and f+A) and can be followed up with ''Power Dunk'', which makes it best used in the middle of combos, likely as an ender. The move deals the same amount of damage regardless of the button pressed, which is not much outside of a bit of the opponent's Guard Bar, but the heavy kick version travels a farther distance than the light kick version. However, if the move is used raw, it has very slow start-up, long recovery if whiffed, and is punishable on block. |
| }} | | }} |
| }} | | }} |
| Line 558: |
Line 558: |
| |blockAdv=-33 (A)<br>-46 (C) | | |blockAdv=-33 (A)<br>-46 (C) |
| |gbar= | | |gbar= |
| |description= | | |description=Terry deals multiple spinning punches aimed at the feet first while rising upward. This is Terry's best reversal and anti-air due to its quick start-up and invulnerability during it, more-so the heavy punch version because of its farther vertical distance. The A version of the move travels at a shorter vertical distance, which allows it to stop regular jumps and super-jumping attacks, but only lower-body invulnerability and only deals 5 hits. The C version, however, has full-body invulnerability alongside the aforementioned farther vertical distance and deals 7 hits. Regardless, both versions are highly unsafe if whiffed and on block. |
| }} | | }} |
| }} | | }} |
| Line 576: |
Line 576: |
| |blockAdv=-5 (B)<br>-7 (D) | | |blockAdv=-5 (B)<br>-7 (D) |
| |gbar= | | |gbar= |
| |description= | | |description=Terry does a flip kick that can be used as a preemptive anti-air against mid to long range jumps or full jumps. The B version starts up faster, deals 2 hits, travels towards the opponent at a short distance and is hard to punish on block, while the D version travels farther, deals only one hit, is easier to punish on block, and whiffs on crouching opponents. Neither version deals a knockdown on a successful hit, which may leave a player to further struggle with characters who excel at closer distances. |
| }} | | }} |
| }} | | }} |
|
| |
| <!--'''Power Wave''' - (qcf + A)
| |
|
| |
| * Projectile which travels along the ground at a good speed and has plus frames
| |
|
| |
| * Great for zoning or to end in blockstrings
| |
|
| |
| '''Round Wave''' - (qcf + C)
| |
|
| |
| * Energy explosion around Terry's fist. You can't combo into it, but if it hits, it's possible to special cancel it (except into qcf+A) as a follow up.
| |
|
| |
| * Has pretty slow start-up, and isn't safe on block, plus you can't combo into it which makes it's use it battle rather limited and unsafe
| |
|
| |
| * Soft knockdown
| |
|
| |
| * Super cancel-able
| |
|
| |
| * Special cancel-able
| |
|
| |
| '''Burn Knuckle''' - (qcb + A/C)
| |
|
| |
| * Terry charges with a glowing fist
| |
|
| |
| * A version travel one third of the screen; C version travels full screen
| |
|
| |
| * Light punch version has a good amount of start-up which makes it easy to combo into, and hard to punish if spaced at its maximum distance. At point blank it is very unsafe on block
| |
|
| |
| * Heavy punch version has slower start-up (can't combo into it), and hard to punish if spaced full screen. Similar to the light punch version, at point blank it is very unsafe on block.
| |
|
| |
| '''Quick Burning''' - (dp + A/C)
| |
|
| |
| * One close uppercut followed by a long range overhead blow
| |
|
| |
| * Even though the second hit is negative frames, Terry is pushed back a fair distance if blocked.
| |
|
| |
| * The second hit which is the overhead doesn't lose it's overhead property if if the whole special move is cancelled from a normal attack (example cr. D into dp+P)
| |
|
| |
| * Both punch strengths (light punch and heavy punch) of Quick Burning have similar qualities and properties
| |
|
| |
| '''Power Dunk''' - (dp + B/D)
| |
|
| |
| * Rising knee followed by a punch to the ground. Best used at the end of a combo, not reliable as an anti-air or a reversal because it has no invincibility or very fast start up. It has horrible recovery on whiff, and is easy to punish if blocked up close. The opponent can roll in between the first and second hit if blocked. The second hit causes a hard knockdown and Terry lands very close to their fall body which can provide good wake-up option setups.
| |
|
| |
| * Light punch version has a shorter distance than the heavy punch version. Second doesn't hit if you combo it from any standing or crouching normals.
| |
|
| |
| * Heavy punch version has a much longer distance than the light punch version, and second hit connects are reliably from cancel-able light or heavy normals.
| |
|
| |
| * Hard knockdown
| |
|
| |
| * Hits mid
| |
|
| |
| '''Power Charge''' - (hcf + B/D)
| |
|
| |
| * Lunging attack which pops opponent into the air. Best used in the middle of combos to end with '''Power Dunk'''. Very slow start-up, no invincibility, long recovery if whiffed and punish-able on block. It doesn't deal much damage except a good amount of the opponent guard meter.
| |
|
| |
| * Light kick version and heavy kick version deal the same amount of damage, but the heavy kick version travels a farther distance than the light kick version.
| |
|
| |
| * Can be cancelled on block and on hit into '''Power Dunk'''.
| |
|
| |
| * Easy to combo into from heavy close standing normals, df+C and f+A
| |
|
| |
| * Super Cancel-able
| |
|
| |
| '''Rising Tackle''' - Charge (d~u + A/C)
| |
|
| |
| * Rising attack spinning punches, aimed at the feet first. Best used as a reversal & anti-air because of its quick start-up, more-so the heavy punch version. Both punch versions are highly unsafe if whiffed and on block.
| |
|
| |
| * Light punch version travels vertically at a shorter distance than the heavy punch version and doesn't have any invincibility. This version can be used to anti-air regular jumps and super jumping attacks but must be performed rather early or else it may get beaten out. Delivers 5 hits.
| |
|
| |
| * Heavy punch version travels farther vertically than the light punch version, and has a small amount of start-up invincibility which is best used as a reversal option and anti air. Delivers 7 hits.
| |
|
| |
| '''Crack Shoot''' - (qcb + B/D)
| |
|
| |
| * This flip kick can be used as a preemptive anti-air against mid to long range jumps or full jumps.
| |
|
| |
| * Light kick version starts up faster, travels towards the opponent at a short distance and is hard to punish on block, while the heavy kick version travels farther, easier to punish on block and whiffs on crouching opponents.
| |
|
| |
| * B version hits twice; D version hits once
| |
|
| |
| * Doesn't knockdown opponent if hit
| |
|
| |
| * Hits mid-->
| |
|
| |
|
| ===<u>Desperation Moves</u>=== | | ===<u>Desperation Moves</u>=== |
One of the most iconic SNK characters, Terry has been with the King of Fighters series since its debut, and as always, is one of the simplest characters in the game. He has good damage on his bread-and-butters, but lacks somewhat in mixups and has generally average tools; don't let this discourage you, however, as he is a beginner-friendly all-rounder and works well for a starting pick.
Movelist
Normals
Standing (Close)
| cl.A
|
| Damage
|
Guard
|
Startup
|
Active
|
Recovery
|
Hit Advantage
|
Block Advantage
|
Guard Bar
|
| 20
|
Mid
|
3
|
5
|
5
|
2
|
0
|
|
A jab that can hit most opponents in a high or low state. It can be chained into itself, a light kick button, df+C, or cancelled into any Special Move.
|
|
| cl.B
|
| Damage
|
Guard
|
Startup
|
Active
|
Recovery
|
Hit Advantage
|
Block Advantage
|
Guard Bar
|
| 20
|
Mid
|
4
|
5
|
7
|
0
|
-2
|
|
A knee to the chest that can also hit crouching opponents. It is only chainable into itself or st.B, but can be cancelled into a Command Move or Special/Desperation Move (although only df+C combos from it).
|
|
| cl.C
|
| Damage
|
Guard
|
Startup
|
Active
|
Recovery
|
Hit Advantage
|
Block Advantage
|
Guard Bar
|
| 55 (40 + 15)
|
Mid
|
3
|
10 (7 + 3)
|
15
|
-2
|
-4
|
|
A gut punch that hits twice and leans slightly on the unsafe side. Either hit of the punch is cancellable into a Command Move or Special and can be used to start or continue a high or middle-level combo.
|
|
| cl.D
|
| Damage
|
Guard
|
Startup
|
Active
|
Recovery
|
Hit Advantage
|
Block Advantage
|
Guard Bar
|
| 55
|
Mid
|
4
|
4
|
22
|
-6
|
-8
|
|
A rather fast, but punishable upward kick. Despite its slow recovery, it can also be cancelled into Command Moves or Special Moves, giving it a similar use to cl.C but without the extra hit.
|
|
Standing (Far)
| st.A
|
| Damage
|
Guard
|
Startup
|
Active
|
Recovery
|
Hit Advantage
|
Block Advantage
|
Guard Bar
|
| 30
|
Mid
|
3
|
4
|
5
|
3
|
1
|
|
A light jab that can hit most standing or airborne opponents, making it one of Terry's better tools for stopping hops. It can chain into st.B and can be cancelled into Command or Special Moves, but cancels best into df+C.
|
|
| st.B
|
| Damage
|
Guard
|
Startup
|
Active
|
Recovery
|
Hit Advantage
|
Block Advantage
|
Guard Bar
|
| 20
|
Mid
|
5
|
4
|
9
|
-1
|
-3
|
|
A weak, but rather far kick from the left leg. This cannot be cancelled into anything, which makes it work better as a poke.
|
|
| st.C
|
| Damage
|
Guard
|
Startup
|
Active
|
Recovery
|
Hit Advantage
|
Block Advantage
|
Guard Bar
|
| 60
|
Mid
|
5
|
7
|
16
|
-3
|
-5
|
|
A far punch from the left arm. It is rather unsafe, but it can be cancelled into any Special Move.
|
|
| st.D
|
| Damage
|
Guard
|
Startup
|
Active
|
Recovery
|
Hit Advantage
|
Block Advantage
|
Guard Bar
|
| 70
|
Mid
|
19
|
4
|
15
|
1
|
-1
|
|
A slow and moving kick that newer players may use on accident. It is rather safe, leaving Terry at the smallest advantage on hit, but will move him back when blocked and can be easily stopped.
|
|
| st.CD
|
| Damage
|
Guard
|
Startup
|
Active
|
Recovery
|
Hit Advantage
|
Block Advantage
|
Guard Bar
|
| 70
|
Mid
|
14
|
3
|
21
|
Soft Knockdown
|
-2
|
|
A standard Blowback attack that is a hop kick that moves Terry forward. Like others, it knocks down on hit, but it pushes Terry back when blocked; alongside this, it can also be whiff cancelled.
|
|
Crouching
| cr.A
|
| Damage
|
Guard
|
Startup
|
Active
|
Recovery
|
Hit Advantage
|
Block Advantage
|
Guard Bar
|
| 25
|
Mid
|
3
|
4
|
6
|
2
|
0
|
|
A crouching punch that is both chainable and cancellable. It mainly chains into light kicks, but can also be cancelled into any Command Move or Special Move, best cancelling into df+C.
|
|
| cr.B
|
| Damage
|
Guard
|
Startup
|
Active
|
Recovery
|
Hit Advantage
|
Block Advantage
|
Guard Bar
|
| 25
|
Low
|
3
|
3
|
8
|
1
|
-1
|
|
A low-hitting kick that chains into other light normals and can be whiff cancelled. Like other crouching normals, it can be cancelled into any Command Move or Special Move, with df+C being an ideal cancel option for combos.
|
|
| cr.C
|
| Damage
|
Guard
|
Startup
|
Active
|
Recovery
|
Hit Advantage
|
Block Advantage
|
Guard Bar
|
| 60
|
Mid
|
6
|
5
|
19
|
-4
|
-6
|
|
A slower crouching punch from the right arm. Can be cancelled into any Command Move or Special Move with ease, and furthermore whiff cancelled.
|
|
| cr.D
|
| Damage
|
Guard
|
Startup
|
Active
|
Recovery
|
Hit Advantage
|
Block Advantage
|
Guard Bar
|
| 70
|
Low
|
10
|
18
|
22
|
Soft Knockdown
|
-12
|
|
A slow sweep kick that knocks the opponent down. It can be cancelled into any Command or Special Move, although the poor practicality of doing it on a successful hit may encourage the player to whiff cancel or cancel it when blocked.
|
|
Jumping
| j.A
|
| Damage
|
Guard
|
Startup
|
Active
|
Recovery
|
Hit Advantage
|
Block Advantage
|
Guard Bar
|
| 30
|
High
|
3
|
7...
|
-
|
-
|
-
|
|
Terry deals a downward chop to the opponent. This can be used for a multitude of ideas, but mainly as an air-to-ground, jump-in, or instant overhead.
|
|
| j.B
|
| Damage
|
Guard
|
Startup
|
Active
|
Recovery
|
Hit Advantage
|
Block Advantage
|
Guard Bar
|
| 25
|
High
|
2
|
8...
|
-
|
-
|
-
|
|
Terry does a funky horizontal kick with his right leg. This is good as an air-to-air and can also be used stop incoming hops and jumps from a middle or long-ranged distance, but can be low profiled if performed too early.
|
|
| j.C
|
| Damage
|
Guard
|
Startup
|
Active
|
Recovery
|
Hit Advantage
|
Block Advantage
|
Guard Bar
|
| 55
|
High
|
3
|
9...
|
-
|
-
|
-
|
|
Terry punches at a position angled downward. This is another move best used as an air-to-ground or jump-in.
|
|
| j.D
|
| Damage
|
Guard
|
Startup
|
Active
|
Recovery
|
Hit Advantage
|
Block Advantage
|
Guard Bar
|
| 55
|
High
|
8
|
7...
|
-
|
-
|
-
|
|
Terry does a jumping kick angled downward. This is can be used as a cross-up, usable against standing or crouching opponents, and is probably Terry's best air-to-ground option despite its slower start-up.
|
|
| nj.D
|
| Damage
|
Guard
|
Startup
|
Active
|
Recovery
|
Hit Advantage
|
Block Advantage
|
Guard Bar
|
| 55
|
High
|
2
|
10...
|
-
|
-
|
-
|
|
Terry does an upward kick mid-air. This can be used as an air-to-air, since its hitbox doesn't directly target opponents above him.
|
|
| j.CD
|
| Damage
|
Guard
|
Startup
|
Active
|
Recovery
|
Hit Advantage
|
Block Advantage
|
Guard Bar
|
| 70
|
Mid
|
13
|
6...
|
-
|
Soft Knockdown
|
-
|
|
Terry does a horizontally-aimed jumping kick as an aerial Blowback. This is Terry's best air-to-air due to its knockdown property and taller hitbox, and can be used as a tool to pressure opponents in the corner. Despite this, however, it can be low profiled.
|
|
Throws
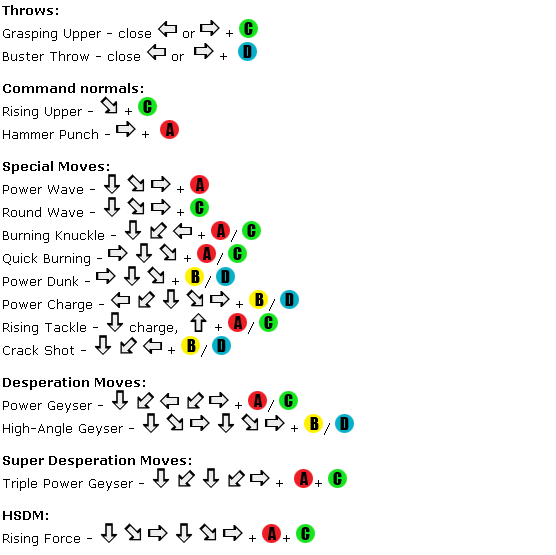
| Grasping (b/f + C when close to opponent)
|
| Damage
|
Guard
|
Startup
|
Active
|
Recovery
|
Hit Advantage
|
Block Advantage
|
Guard Bar
|
| 80
|
n/a
|
-
|
-
|
-
|
Soft Knockdown
|
-
|
|
Terry grabs the opponent and uppercuts them. Due to the opponent landing near the corner of the screen and its ability as a throw, this can be seen as a good "get off me" tool, but will not work in this way if escaped.
|
|
| Buster Throw (b/f + D when close to opponent)
|
| Damage
|
Guard
|
Startup
|
Active
|
Recovery
|
Hit Advantage
|
Block Advantage
|
Guard Bar
|
| 80
|
n/a
|
-
|
-
|
-
|
Hard Knockdown
|
-
|
|
Terry slams the opponent in the opposite direction. The opponent lands a character space away from the corner of the screen, but if Terry gets close enough again it can see itself being used for okizeme setups involving jumping attacks.
|
|
Command Moves
| Rising Upper (df + C)
|
| Damage
|
Guard
|
Startup
|
Active
|
Recovery
|
Hit Advantage
|
Block Advantage
|
Guard Bar
|
| 50
|
Mid
|
3
|
6
|
19
|
-5
|
-7
|
|
Terry does a quick uppercut before going back into a crouching position. This Command Move is good and easy to use in combos before a Special or Desperation Move due to its ease in chaining from most Normals and Special cancel ability, or can be used to end a blockstring if any attempts at confirming are not successful. It can also be used as an anti-air, but the player should be mindful of its slow start-up as it may trade or get beaten out by the opponent's jumping Normals if timed improperly.
|
|
| Hammer Punch (f + A)
|
| Damage
|
Guard
|
Startup
|
Active
|
Recovery
|
Hit Advantage
|
Block Advantage
|
Guard Bar
|
| 45
|
High (Mid if cancelled)
|
20 (18 if cancelled)
|
4
|
21 (23 if cancelled)
|
-5 (-7 if cancelled)
|
-7 (-9 if cancelled)
|
|
Terry takes a large step forward to deliver a low aiming hook punch that hits overhead. This Command Move is not cancel-able by itself, but it is as easy to cancel into from many of his crouching and standing Normals, similar to Rising Upper. It only combos from heavy Normals, and gains the ability to Special Cancel at the cost of its overhead property. The player should be careful when using the move, however; at the end of a blockstring, the opponent can roll before the move hits if they are expecting it, but Terry gets pushed back a great distance if it is successfully blocked, which may be good if the player needs some space away from the opponent so they can properly react and read their next actions of movement.
|
|
Special Moves
| Power Wave (qcf, A)
|
| Damage
|
Guard
|
Startup
|
Active
|
Recovery
|
Hit Advantage
|
Block Advantage
|
Guard Bar
|
| 50
|
Mid
|
14
|
1...
|
31
|
0
|
-2
|
|
Terry hits the ground, creating a grounded wave of fire. This is a projectile which travels along the ground at a good speed, has plus frames varying on the space between Terry and the projectile, and is great for zoning or ending blockstrings.
|
|
| Round Wave (qcf, C)
|
| Damage
|
Guard
|
Startup
|
Active
|
Recovery
|
Hit Advantage
|
Block Advantage
|
Guard Bar
|
| 75
|
Mid
|
19
|
10
|
18
|
Soft Knockdown
|
-10
|
|
Terry hits the ground after striking a pose, creating a large wave of fire around his fist. This move has rather slow start-up and is not safe on block, and cannot be comboed into, but can be cancelled into another Special or Desperation Move as a trade-off. Due to these qualities, its use in battle is rather limited and rarely advised.
|
|
| Burn Knuckle (qcb, P)
|
| Damage
|
Guard
|
Startup
|
Active
|
Recovery
|
Hit Advantage
|
Block Advantage
|
Guard Bar
|
65 (A)
90 (C)
|
Mid
|
13 (A)
20 (C)
|
10 (A)
18 (C)
|
19 (A)
20 (C)
|
Soft Knockdown
|
-10~-1 (A)
-20~-3 (C)
|
|
Terry charges at the opponent with a glowing fist. The distance he travels depends on the button pressed; the A version travels one third of the screen, while the C version travels at a full-screen distance. Alongside this, the A version has a fast amount of start-up, which makes it easier to combo into and harder to punish if spaced enough, and the C version has a slower startup, which cannot be comboed into but harder to punish at a full-screen distance. However, it is very unsafe on block at a point-blank distance, further encouraging spacial strategy with the move's use.
|
|
| Quick Burning (dp, P)
|
| Damage
|
Guard
|
Startup
|
Active
|
Recovery
|
Hit Advantage
|
Block Advantage
|
Guard Bar
|
| 65 (45 + 20)
|
Mid (first hit)
High (second hit)
|
4
|
16
|
21
|
-3
|
-5
|
|
Terry strikes a close uppercut that is followed by a long-range overhead blow. It is rather unsafe regardless of if it hits or is blocked, but pushes Terry back a fair distance if it is blocked, and keeps the second hit's overhead property if cancelled into from a Normal. The move is also the same regardless of which strength of button is pressed, unlike many of Terry's other moves, which vary based on that condition.
|
|
| Power Dunk (dp, K)
|
| Damage
|
Guard
|
Startup
|
Active
|
Recovery
|
Hit Advantage
|
Block Advantage
|
Guard Bar
|
90 (45 + 45, B)
100 (50 + 50, D)
|
Mid
|
6 (B)
7 (D)
|
39 (B)
43 (D)
|
19 (B)
21 (D)
|
Hard Knockdown (first hit)
-11 (second hit, B)
-15 (second hit, D)
|
-13 (B)
-17 (D)
|
|
Terry jumps with a rising knee before punching the opponent to the ground. The distance of the move varies with the strength of the button pressed, alongside the connectivity of the second hit if the move is comboed into from a grounded Normal; the B version has a shorter distance, but the second hit will not connect if it is comboed from grounded Normals, while the D version has a longer distance with the second hit connecting reliably from cancellable grounded Normals. The second hit's hard knockdown property, alongside Terry landing very close to the opponent's fall body, can provide good wake-up option setups, but the move is best used at the end of a combo due to multiple flaws. It is not reliable as an anti-air due to the time it takes Terry to reach an aerial position, and is not usable as a reversal due to its lack of reversal conditions such as invulnerable startup. It has horrible recovery when whiffed, and is easy to punish if blocked up close. Another flaw in the move is that the opponent can roll in between the first and second hit if the move is blocked.
|
|
| Power Charge (hcf, K)
|
| Damage
|
Guard
|
Startup
|
Active
|
Recovery
|
Hit Advantage
|
Block Advantage
|
Guard Bar
|
| 30
|
Mid
|
11 (B)
16 (D)
|
4
|
37 (B)
38 (D)
|
Soft Knockdown
|
-23 (B)
-24 (D)
|
|
Terry lunges his shoulders at the opponent, which pops them into the air if it hits. It is easy to combo into from heavy close and grounded Normals (including df+C and f+A) and can be followed up with Power Dunk, which makes it best used in the middle of combos, likely as an ender. The move deals the same amount of damage regardless of the button pressed, which is not much outside of a bit of the opponent's Guard Bar, but the heavy kick version travels a farther distance than the light kick version. However, if the move is used raw, it has very slow start-up, long recovery if whiffed, and is punishable on block.
|
|
| Rising Tackle ([d]~u, P)
|
| Damage
|
Guard
|
Startup
|
Active
|
Recovery
|
Hit Advantage
|
Block Advantage
|
Guard Bar
|
50 (10*5, A)
95 (50 + 20+ 5*4 + 5, C)
|
Mid
|
5
|
14 (A)
24 (C)
|
35 (A)
39 (C)
|
Soft Knockdown
|
-33 (A)
-46 (C)
|
|
Terry deals multiple spinning punches aimed at the feet first while rising upward. This is Terry's best reversal and anti-air due to its quick start-up and invulnerability during it, more-so the heavy punch version because of its farther vertical distance. The A version of the move travels at a shorter vertical distance, which allows it to stop regular jumps and super-jumping attacks, but only lower-body invulnerability and only deals 5 hits. The C version, however, has full-body invulnerability alongside the aforementioned farther vertical distance and deals 7 hits. Regardless, both versions are highly unsafe if whiffed and on block.
|
|
| Crack Shoot (qcb, K)
|
| Damage
|
Guard
|
Startup
|
Active
|
Recovery
|
Hit Advantage
|
Block Advantage
|
Guard Bar
|
65 (45 + 20, B)
55 (D)
|
Mid
|
10 (B)
9 (D)
|
5 (B)
16 (D)
|
21 (B)
23 (D)
|
-3 (B)
-5 (D)
|
-5 (B)
-7 (D)
|
|
Terry does a flip kick that can be used as a preemptive anti-air against mid to long range jumps or full jumps. The B version starts up faster, deals 2 hits, travels towards the opponent at a short distance and is hard to punish on block, while the D version travels farther, deals only one hit, is easier to punish on block, and whiffs on crouching opponents. Neither version deals a knockdown on a successful hit, which may leave a player to further struggle with characters who excel at closer distances.
|
|
Desperation Moves
| Power Geyser (qcb, db, f, P or qcb, f, P)
|
| Damage
|
Guard
|
Startup
|
Active
|
Recovery
|
Hit Advantage
|
Block Advantage
|
Guard Bar
|
| -
|
-
|
-
|
-
|
-
|
-
|
-
|
|
|
| High Angle Geyser (qcf, qcf, K)
|
| Damage
|
Guard
|
Startup
|
Active
|
Recovery
|
Hit Advantage
|
Block Advantage
|
Guard Bar
|
| -
|
-
|
-
|
-
|
-
|
-
|
-
|
|
|
Super Desperation Moves
| Power Geyser (qcb, db, f, 2P or qcb, f, 2P)
|
| Damage
|
Guard
|
Startup
|
Active
|
Recovery
|
Hit Advantage
|
Block Advantage
|
Guard Bar
|
| -
|
-
|
-
|
-
|
-
|
-
|
-
|
|
|
Hidden Super Desperation Move
| Rising Force (qcf, qcf, 2P)
|
| Damage
|
Guard
|
Startup
|
Active
|
Recovery
|
Hit Advantage
|
Block Advantage
|
Guard Bar
|
| -
|
-
|
-
|
-
|
-
|
-
|
-
|
|
|
Combos
You can always use cl.D instead of cl.C
0 Stock
- cl.C, f+A/df+C, hcf+K, dp+D/d~u+C
Main BnB combo. dp+D is easier and causes hard knockdown; d~u+C does tiny bit more damage, but causes soft knockdown and is much harder to perform. d~u+C can be done by holding d immediately after hcf (in one motion, like hcf, d), then u+P as Power Charge hits, there's a very short time to charge the move so it's tricky to get it right.
- cr.B, cr.A/cr.B/cl.B, df+C, hcf+K, dp+K/d~u+C
Similar BnB combo started from low confirm chain.
- cl.C, f+A/df+C, qcb+A
- cr.B, cr.A/cr.B/cl.B, df+C, qcb+A
Somewhat easier versions of main BnBs, also safer on block, but less damage and soft knockdown.
- cl.C, f+A/df+C, qcb+A
- cr.B, cr.A/cr.B/cl.B, df+C, qcb+A
Not much damage but pretty safe on block, good as blockstrings.
- cr.B, cr.A/cr.B, d~u+P/dp+D
Slightly easier but non-optimal combo from lows.
1 Stock
- cl.C, f+A/df+C, qcb,db,f+P/qcfx2+K
- cr.B, cr.A/cr.B/st.B, df+C, qcb,db,f+P
2 Stock
- cl.C, f+A/df+C, hcf+K (SC) qcb,db,f+P
- cr.B, cr.A/cr.B, d~u+P (SC) qcb,db,f+P
- cl.C, f+A, BC run, cl.C(1), f+A, dp+P, (C)hcf+K (SC) qcb,db,f+P
- cl.C(1), f+A, BC run, cl.D, (f+A), dp+P, (C)dp+B(1), (C)hcf+B, (C)qcb+B, dp+K(1)/d~u+P(1) (SC) qcb,db,f+P
( if you use the second f+A, cancel dp+P on the 1st hit. )
- (Corner) cl.C(1), f+A, BC run, cl.D, (f+A), dp+P, (C)dp+B(1), (C)hcf+B, (C)qcb+B, dp+K(1), (C)qcf+C, (dp+K(1)) (SC) qcb,db,f+P
( Same note as above. You have to delay the dp+K(1) before it for qcf+C to connect, which is the corner-only part of the combo. )
3 Stock
- cl.C, f+A/df+C, qcfx2+AC / qcb,db,f+AC
- cl.C, f+A, BC run, cl.C(1), f+A, (qcfx2+AC)/(dp+P, (SC) qcb,db,f+AC)
Strategy
Use Burn Knuckle when they least expect it.
Videos
阿澤.Aze (Terry Best Rounds)
External Links
Dream Cancel discussion forum thread
{{Navbox 2002UM}}
[[Category:The King of Fighters 2k2UM]]

