-Happy New Year 2025!
The Last Blade 2/Hibiki Takane: Difference between revisions
Felsen 2020 (talk | contribs) |
|||
| (35 intermediate revisions by 4 users not shown) | |||
| Line 58: | Line 58: | ||
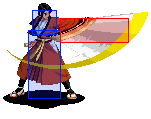
{{AttackData-LB2 | {{AttackData-LB2 | ||
|damage=P 13/1 S 11/0 | |damage=P 13/1 S 11/0 | ||
|startup= | |startup=5 | ||
|active=4 | |active=4 | ||
|recovery=24 | |recovery=24 | ||
| Line 77: | Line 77: | ||
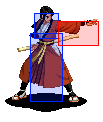
{{AttackData-LB2 | {{AttackData-LB2 | ||
|damage=P 13/1 S 11/0 | |damage=P 13/1 S 11/0 | ||
|startup= | |startup=5 | ||
|active=2 | |active=2 | ||
|recovery=11 | |recovery=11 | ||
| Line 96: | Line 96: | ||
{{AttackData-LB2 | {{AttackData-LB2 | ||
|damage=P 30/3 S 16/0 | |damage=P 30/3 S 16/0 | ||
|startup= | |startup=4 | ||
|active=4 | |active=4 | ||
|recovery=--- | |recovery=--- | ||
| Line 110: | Line 110: | ||
|header=no | |header=no | ||
|damage=P 30/3 S 16/0 | |damage=P 30/3 S 16/0 | ||
|startup= | |startup= 10 total | ||
|active=2 | |active=2 | ||
|recovery=--- | |recovery=--- | ||
| Line 124: | Line 124: | ||
|header=no | |header=no | ||
|damage=P 30/3 S 16/0 | |damage=P 30/3 S 16/0 | ||
|startup= | |startup= 12 total | ||
|active=2 | |active=2 | ||
|recovery=21 | |recovery=21 | ||
| Line 150: | Line 150: | ||
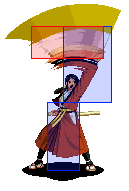
{{AttackData-LB2 | {{AttackData-LB2 | ||
|damage=P 50/6 S 23/0 | |damage=P 50/6 S 23/0 | ||
|startup= | |startup=14 | ||
|active=4 | |active=4 | ||
|recovery=41 | |recovery=41 | ||
| Line 159: | Line 159: | ||
|cancel=P ×/△ S ×/× | |cancel=P ×/△ S ×/× | ||
|tech=Air | |tech=Air | ||
|description=Hibiki slashes forward.<br \>The △ indicates that you can cancel it with BC | |description=Hibiki slashes forward. Works as anti jump and your main punish for anti air or air to air deflects. <br \>The △ indicates that you can cancel it with BC | ||
}} | }} | ||
}} | }} | ||
| Line 169: | Line 169: | ||
{{AttackData-LB2 | {{AttackData-LB2 | ||
|damage=P 13/1 S 11/0 | |damage=P 13/1 S 11/0 | ||
|startup= | |startup=10 | ||
|active=2 | |active=2 | ||
|recovery=19 | |recovery=19 | ||
| Line 178: | Line 178: | ||
|cancel=P ○/○ S ○/○ | |cancel=P ○/○ S ○/○ | ||
|tech=None | |tech=None | ||
|description=Hibiki does a low kick. | |description=Hibiki does a low kick. Primary use is an alternate otg. Slower to come out than 3B, deals less damage, and has less range. On the flip side it’s always safe to use as an otg (3b can be punished on a neutral wake up for a lot of the cast). | ||
}} | }} | ||
}} | }} | ||
| Line 188: | Line 188: | ||
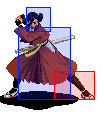
{{AttackData-LB2 | {{AttackData-LB2 | ||
|damage=P 19/2 S 16/0 | |damage=P 19/2 S 16/0 | ||
|startup= | |startup=10 | ||
|active=4 | |active=4 | ||
|recovery=39 | |recovery=39 | ||
| Line 207: | Line 207: | ||
{{AttackData-LB2 | {{AttackData-LB2 | ||
|damage=P 21/-- S 21/-- | |damage=P 21/-- S 21/-- | ||
|startup= | |startup=6 | ||
|active=2 | |active=2 | ||
|recovery=44 | |recovery=44 | ||
| Line 217: | Line 217: | ||
|tech=None | |tech=None | ||
|description=Hibiki slashes downwards.<br \>Hits OTG, Do it with 3BCD so you don't have to dash before it, or if you have to, you don't have to stop and potentially miss it on that case, 663BCD (easier on a stick). | |description=Hibiki slashes downwards.<br \>Hits OTG, Do it with 3BCD so you don't have to dash before it, or if you have to, you don't have to stop and potentially miss it on that case, 663BCD (easier on a stick). | ||
*Be careful when deciding to use this to otg. Many characters can punish it if they get up normally and are close to you, especially when cornered. It’s not as bad as Setsuna’s 3B in this regard but in many cases it may be better to use 5C as an otg attack for safety. | |||
}} | }} | ||
}} | }} | ||
| Line 228: | Line 229: | ||
{{AttackData-LB2 | {{AttackData-LB2 | ||
|damage=P 26/3 S 19/0 | |damage=P 26/3 S 19/0 | ||
|startup= | |startup=8 | ||
|active=2 | |active=2 | ||
|recovery=21 | |recovery=21 | ||
| Line 247: | Line 248: | ||
{{AttackData-LB2 | {{AttackData-LB2 | ||
|damage=P 26/3 S 19/0 | |damage=P 26/3 S 19/0 | ||
|startup= | |startup=8 | ||
|active=2 | |active=2 | ||
|recovery=44 | |recovery=44 | ||
| Line 268: | Line 269: | ||
{{AttackData-LB2 | {{AttackData-LB2 | ||
|damage=8/0 | |damage=8/0 | ||
|startup= | |startup=4 | ||
|active=2 | |active=2 | ||
|recovery=27 | |recovery=27 | ||
| Line 287: | Line 288: | ||
{{AttackData-LB2 | {{AttackData-LB2 | ||
|damage=28/0 | |damage=28/0 | ||
|startup= | |startup=13 | ||
|active=4 | |active=4 | ||
|recovery=22 | |recovery=22 | ||
| Line 308: | Line 309: | ||
{{AttackData-LB2 | {{AttackData-LB2 | ||
|damage=P 13/1 S 11/0 | |damage=P 13/1 S 11/0 | ||
|startup= | |startup=4 | ||
|active=4 | |active=4 | ||
|recovery=16 | |recovery=16 | ||
| Line 322: | Line 323: | ||
{{MoveData | {{MoveData | ||
|image=LB2_Hibiki_d+B.png | |image=LB2_Hibiki_d+B.png | ||
|caption=Don't. Use. | |caption=Don't. Use. In. Power. | ||
|name=2B | |name=2B | ||
|data= | |data= | ||
{{AttackData-LB2 | {{AttackData-LB2 | ||
|damage=P 28/3 S 23/0 | |damage=P 28/3 S 23/0 | ||
|startup= | |startup=6 | ||
|active=2 | |active=2 | ||
|recovery=67 | |recovery=67 | ||
| Line 336: | Line 337: | ||
|cancel=P ×/○ S ○/○ | |cancel=P ×/○ S ○/○ | ||
|tech=Air | |tech=Air | ||
|description=Hibiki does a crouching swing, leaving you with worse framedata on hit | |description= *Hibiki does a crouching swing, leaving you with worse framedata on hit in power. In power mode there’s no real good use for this, aside from taking a round when nothing else will reach. | ||
*In speed it's actually very useful poke since it's cancelable. It’s very quick for a heavy attack , has great range, and confirms cancels nicely into other moves to secure advantage. | |||
}} | }} | ||
}} | }} | ||
| Line 346: | Line 348: | ||
{{AttackData-LB2 | {{AttackData-LB2 | ||
|damage=P 13/1 S 11/0 | |damage=P 13/1 S 11/0 | ||
|startup= | |startup=6 | ||
|active=2 | |active=2 | ||
|recovery=14 | |recovery=14 | ||
| Line 365: | Line 367: | ||
{{AttackData-LB2 | {{AttackData-LB2 | ||
|damage=P 24/3 S 19/0 | |damage=P 24/3 S 19/0 | ||
|startup= | |startup=14 | ||
|active=4 | |active=4 | ||
|recovery=24 | |recovery=24 | ||
| Line 380: | Line 382: | ||
====Air==== | ====Air==== | ||
{{MoveData | {{MoveData | ||
|image=LB2_Hibiki_jA. | |image=LB2_Hibiki_jA.png | ||
|caption=Look mom I'm playing neutral | |caption=Look mom I'm playing neutral | ||
|name=j.A | |name=j.A | ||
| Line 386: | Line 388: | ||
{{AttackData-LB2 | {{AttackData-LB2 | ||
|damage=P 13/1 S 11/0 | |damage=P 13/1 S 11/0 | ||
|startup= | |startup=6 | ||
|active=2 | |active=2 | ||
|recovery=--- | |recovery=--- | ||
| Line 399: | Line 401: | ||
}} | }} | ||
{{MoveData | {{MoveData | ||
|image=LB2_Hibiki_jB. | |image=LB2_Hibiki_jB.png | ||
|caption=Get in the blender! | |caption=Get in the blender! | ||
|name=j.B | |name=j.B | ||
| Line 405: | Line 407: | ||
{{AttackData-LB2 | {{AttackData-LB2 | ||
|damage=P 26/3 S 13/0 | |damage=P 26/3 S 13/0 | ||
|startup= | |startup=8 | ||
|active=2 | |active=2 | ||
|recovery=--- | |recovery=--- | ||
| Line 414: | Line 416: | ||
|cancel=P ×/× S ×/× | |cancel=P ×/× S ×/× | ||
|tech=Air | |tech=Air | ||
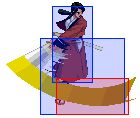
|description=Your best combo starter and very good move too. | |description=Your best combo starter and very good move too. Tied with Zantetsu j.B as best crossup in game. | ||
}} | }} | ||
}} | }} | ||
{{MoveData | {{MoveData | ||
|image=LB2_Hibiki_jC. | |image=LB2_Hibiki_jC.png | ||
|caption=Just who uses this | |caption=Just who uses this | ||
|name=j.C | |name=j.C | ||
| Line 424: | Line 426: | ||
{{AttackData-LB2 | {{AttackData-LB2 | ||
|damage=P 13/1 S 11/0 | |damage=P 13/1 S 11/0 | ||
|startup= | |startup=9 | ||
|active=3 | |active=3 | ||
|recovery=--- | |recovery=--- | ||
| Line 439: | Line 441: | ||
===Universal Mechanics=== | ===Universal Mechanics=== | ||
{{MoveData | {{MoveData | ||
|image=LB2_Hibiki_CD. | |image=LB2_Hibiki_CD.png | ||
|caption=EEEY! | |caption=EEEY! | ||
|input=C+D | |input=C+D | ||
| Line 446: | Line 448: | ||
{{AttackData-LB2 | {{AttackData-LB2 | ||
|damage=P28/-- S22/-- | |damage=P28/-- S22/-- | ||
|startup= | |startup= -- | ||
|active= -- | |active= -- | ||
|recovery= | |recovery= 33 | ||
|state= Any | |state= Any | ||
|frame advantage= P --/-- S --/-- | |frame advantage= P --/-- S --/-- | ||
| Line 455: | Line 457: | ||
|cancel= P --/-- S --/-- | |cancel= P --/-- S --/-- | ||
|tech= -- | |tech= -- | ||
|description=Throw. You can always do a 3b after it, dealing 49 (Power) or 43 (Speed) points of damage. | |description=Throw. You can always do a 3b after it, dealing 49 (Power) or 43 (Speed) points of damage. If you throw them into a corner and do 3B every character can punish you for it if they wake up neutral, anywhere else is character specific so keep that in mind. Still pretty useful as throws are good, if it whiffs, you'll hear a gasp. You can hold any direction while doing it | ||
<gallery class="mw-collapsible mw-collapsed" data-expandtext="show hitboxes" data-collapsetext="hide hitboxes"> | <gallery class="mw-collapsible mw-collapsed" data-expandtext="show hitboxes" data-collapsetext="hide hitboxes"> | ||
17b. | 17b.png|2nd part | ||
</gallery> | </gallery> | ||
}} | }} | ||
}} | }} | ||
{{MoveData | {{MoveData | ||
|image=LB2_Hibiki_pBC. | |image=LB2_Hibiki_pBC.png | ||
|caption=Power Version | |caption=Power Version | ||
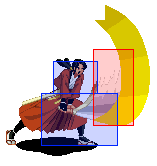
|name=5B+C | |name=5B+C | ||
|image2=LB2_Hibiki_sBC. | |image2=LB2_Hibiki_sBC.png | ||
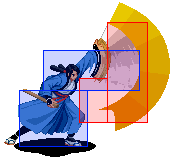
|caption2=Speed/EX Version | |caption2=Speed/EX Version | ||
|data= | |data= | ||
| Line 471: | Line 473: | ||
|version=Power | |version=Power | ||
|damage=61/-- | |damage=61/-- | ||
|startup= | |startup=46~66 | ||
|active=2 | |active=2 | ||
|recovery=44 | |recovery=44 | ||
| Line 488: | Line 490: | ||
|version=Speed/EX | |version=Speed/EX | ||
|damage=19/0 | |damage=19/0 | ||
|startup= | |startup=23 | ||
|active=3 | |active=3 | ||
|recovery=23 | |recovery=23 | ||
| Line 507: | Line 509: | ||
|name=Distance Slash | |name=Distance Slash | ||
|input=236A/B | |input=236A/B | ||
|image=LB2_Hibiki_qcf+A2. | |image=LB2_Hibiki_qcf+A2.png | ||
|caption=A version | |caption=A version | ||
|image2=LB2_Hibiki_qcf+B2. | |image2=LB2_Hibiki_qcf+B2.png | ||
|caption2=B version | |caption2=B version | ||
|data= | |data= | ||
| Line 515: | Line 517: | ||
|version=A | |version=A | ||
|damage= P 28/3 S 23/2 | |damage= P 28/3 S 23/2 | ||
|startup= | |startup= 6 | ||
|active= 2 | |active= 2 | ||
|recovery= 62 | |recovery= 62 | ||
| Line 532: | Line 534: | ||
|version=B | |version=B | ||
|damage= P 24/3 S 21/2 | |damage= P 24/3 S 21/2 | ||
|startup= | |startup= 6 | ||
|active= 2 | |active= 2 | ||
|recovery= 72 | |recovery= 72 | ||
| Line 550: | Line 552: | ||
{{MoveData | {{MoveData | ||
|image=LB2_Hibiki_dp+B2. | |image=LB2_Hibiki_dp+B2.png | ||
|caption=HAKKEN! | |caption=HAKKEN! | ||
|name=Beckoning Slash | |name=Beckoning Slash | ||
| Line 573: | Line 575: | ||
}} | }} | ||
{{MoveData | {{MoveData | ||
|image=LB2_Hibiki_dp+C2. | |image=LB2_Hibiki_dp+C2.png | ||
|caption=Please wait warmly, girls are preparing... | |caption=Please wait warmly, girls are preparing... | ||
|name=Piercing Moon Pounce | |name=Piercing Moon Pounce | ||
| Line 580: | Line 582: | ||
{{AttackData-LB2 | {{AttackData-LB2 | ||
|damage= P 50/6 S 45/5 | |damage= P 50/6 S 45/5 | ||
|startup= | |startup= 29~49 | ||
|active= 4 | |active= 4 | ||
|recovery= 27 | |recovery= 27 | ||
| Line 589: | Line 591: | ||
|cancel= P ×/× S ×/× | |cancel= P ×/× S ×/× | ||
|tech= None | |tech= None | ||
|description=Very slow attack and usually not worth it, has some nice setups in the corner.<br \>You can hold C and it hits overhead.No it's not unblockable. Gives you a | |description=Very slow attack and usually not worth it, has some nice setups in the corner.<br \>You can hold C and it hits overhead.No it's not unblockable. Gives you a fandango confirm in Speed/Ex. 236A, 236B and her DM can connect after as well. <br \>Click on show hitboxes to see the startup boxes. Cannot combo normally except after 6C near a corner in power or after a launching fandango in speed/ex. Only guaranteed after a deflect otherwise. | ||
<gallery class="mw-collapsible mw-collapsed" data-expandtext="show hitboxes" data-collapsetext="hide hitboxes"> | <gallery class="mw-collapsible mw-collapsed" data-expandtext="show hitboxes" data-collapsetext="hide hitboxes"> | ||
| Line 598: | Line 600: | ||
{{MoveData | {{MoveData | ||
|image=LB2_Hibiki_hcf+C1. | |image=LB2_Hibiki_hcf+C1.png | ||
|caption=Looks too much like a throw, this isn't broken unlike her SS7 counterpart, as per the words of a great sage 'Deflect is the great equalizer' you can get some really nice damage out of it however. | |caption=Looks too much like a throw, this isn't broken unlike her SS7 counterpart, as per the words of a great sage 'Deflect is the great equalizer' you can get some really nice damage out of it however. | ||
|name=Heavenly Being Blade | |name=Heavenly Being Blade | ||
| Line 605: | Line 607: | ||
{{AttackData-LB2 | {{AttackData-LB2 | ||
|damage= P 32/-- S 28/-- | |damage= P 32/-- S 28/-- | ||
|startup= | |startup= 6 | ||
|active= 12 | |active= 12 | ||
|recovery= 20 | |recovery= 20 | ||
| Line 616: | Line 618: | ||
|description=Counter movement.<br \>You'll probably never use it in a real match unless you got godlike reads, and even then, deflect would be a better option due to more damage and somewhat better oki.<br \>One very important thing to note is that if you get the right timing, you can hit both C/BC and the ground hit, always dealing 70 damage (BC is recommended due to less recovery) you'll also get an ambiguous mixup.<br \>Click on show hitboxes to see the rest of the move | |description=Counter movement.<br \>You'll probably never use it in a real match unless you got godlike reads, and even then, deflect would be a better option due to more damage and somewhat better oki.<br \>One very important thing to note is that if you get the right timing, you can hit both C/BC and the ground hit, always dealing 70 damage (BC is recommended due to less recovery) you'll also get an ambiguous mixup.<br \>Click on show hitboxes to see the rest of the move | ||
<gallery class="mw-collapsible mw-collapsed" data-expandtext="show hitboxes" data-collapsetext="hide hitboxes"> | <gallery class="mw-collapsible mw-collapsed" data-expandtext="show hitboxes" data-collapsetext="hide hitboxes"> | ||
LB2_Hibiki_hcf+C2. | LB2_Hibiki_hcf+C2.png|2nd part | ||
LB2_Hibiki_hcf+C3. | LB2_Hibiki_hcf+C3.png|3rd part | ||
</gallery> | </gallery> | ||
}} | }} | ||
| Line 623: | Line 625: | ||
|version=C | |version=C | ||
|damage= P 39/- S 35/- | |damage= P 39/- S 35/- | ||
|startup= | |startup= 2 | ||
|active= 2 | |active= 2 | ||
|recovery= 59 | |recovery= 59 | ||
| Line 633: | Line 635: | ||
|tech= None | |tech= None | ||
|description=If you do, however, hit them with this button since it deals more damage. Can do 3B after it but rather hard | |description=If you do, however, hit them with this button since it deals more damage. Can do 3B after it but rather hard | ||
<gallery class="mw-collapsible mw-collapsed" data-expandtext="show hitboxes" data-collapsetext="hide hitboxes">LB2_Hibiki_hcf+CC. | <gallery class="mw-collapsible mw-collapsed" data-expandtext="show hitboxes" data-collapsetext="hide hitboxes">LB2_Hibiki_hcf+CC.png|C version | ||
</gallery> | </gallery> | ||
}} | }} | ||
| Line 639: | Line 641: | ||
|version=BC | |version=BC | ||
|damage= P 24 S 23 | |damage= P 24 S 23 | ||
|startup= | |startup= 2 | ||
|active= 2 | |active= 2 | ||
|recovery= 49 | |recovery= 49 | ||
| Line 648: | Line 650: | ||
|cancel= P ×/× S ×/× | |cancel= P ×/× S ×/× | ||
|tech= None | |tech= None | ||
|description=It's her other option.<br \> You don't really have to do it.<br \> In certain circumstances you can do a 3b after it.<gallery class="mw-collapsible mw-collapsed" data-expandtext="show hitboxes" data-collapsetext="hide hitboxes">LB2_Hibiki_hcf+CBC. | |description=It's her other option.<br \> You don't really have to do it.<br \> In certain circumstances you can do a 3b after it.<gallery class="mw-collapsible mw-collapsed" data-expandtext="show hitboxes" data-collapsetext="hide hitboxes">LB2_Hibiki_hcf+CBC.png|BC version | ||
</gallery> | </gallery> | ||
}} | }} | ||
| Line 661: | Line 663: | ||
{{AttackData-LB2 | {{AttackData-LB2 | ||
|damage= P --/-- S --/-- | |damage= P --/-- S --/-- | ||
|startup= | |startup= 3 | ||
|active= | |active= 15 | ||
|recovery= | |recovery= | ||
|state= Any | |state= Any | ||
|frame advantage= P --/-- S --/-- | |frame advantage= P --/-- S --/-- | ||
| Line 670: | Line 672: | ||
|cancel= P ×/× S ×/× | |cancel= P ×/× S ×/× | ||
|tech= --- | |tech= --- | ||
|description=This move can dodge from high attacks. It is pretty good, however, there's not much reason to use it.<br \>You can dodge some fireballs but it's a high commitment.Plus, you might get punished here.<br \> Follow up with '''Ma O Tsumeru Koto Kanyou Nari''' (6C) to dash forward. Follow up with '''Ma O Oku Koto Kanyou Nari''' (4C) to hop backwards<br \>Probably has potential, still unexplored.<gallery class="mw-collapsible mw-collapsed" data-expandtext="show hitboxes" data-collapsetext="hide hitboxes"> | |description=This move can dodge from high attacks. It is pretty good, however, there's not much reason to use it.<br \>You can dodge some fireballs but it's a high commitment.Plus, you might get punished here. Active frames listed are upper body invincible. <br \> Follow up with '''Ma O Tsumeru Koto Kanyou Nari''' (6C) to dash forward. Follow up with '''Ma O Oku Koto Kanyou Nari''' (4C) to hop backwards<br \>Probably has potential, still unexplored.<gallery class="mw-collapsible mw-collapsed" data-expandtext="show hitboxes" data-collapsetext="hide hitboxes"> | ||
LB2_Hibiki_AB2.jpg|2nd part | LB2_Hibiki_AB2.jpg|2nd part | ||
LB2_Hibiki_AB3.jpg|3rd part | LB2_Hibiki_AB3.jpg|3rd part | ||
| Line 678: | Line 680: | ||
|version=4C | |version=4C | ||
|damage= --- | |damage= --- | ||
|startup= | |startup= 2 | ||
|active= --- | |active= --- | ||
|recovery= 27 | |recovery= 27 | ||
| Line 697: | Line 699: | ||
|version=6C | |version=6C | ||
|damage= --- | |damage= --- | ||
|startup= | |startup= 5 | ||
|active= 25~29 | |active= 25~29 | ||
|recovery= 40 | |recovery= 40 | ||
| Line 722: | Line 724: | ||
==Desperation Moves== | ==Desperation Moves== | ||
{{MoveData | {{MoveData | ||
|image=LB2_Hibiki_qcb+db+f+AB1. | |image=LB2_Hibiki_qcb+db+f+AB1.png | ||
|caption=Dash to win | |caption=Dash to win | ||
|name=Heavenly Spirit of Victory | |name=Heavenly Spirit of Victory | ||
|input= | |input=2146AB | ||
|data= | |data= | ||
{{AttackData-LB2 | {{AttackData-LB2 | ||
|damage= P 81/-- S 86/-- | |damage= P 81/-- S 86/-- | ||
|startup= | |startup= 19 | ||
|active= 7 | |active= 7 | ||
|recovery= 49,60 | |recovery= 49,60 | ||
| Line 738: | Line 740: | ||
|cancel= P ×/× S ×/× | |cancel= P ×/× S ×/× | ||
|tech= None | |tech= None | ||
|description=Hibiki dashes forward to slash through opponet. Travels a great distance, hits from 3/4 screen | |description=Hibiki dashes forward to slash through opponet. Travels a great distance, hits from 3/4 screen. Confirms from any normal on hit except the ones which aren't cancellable, except for 3C (Why is 3C cancellable anyway?) | ||
<gallery class="mw-collapsible mw-collapsed" data-expandtext="show hitboxes" data-collapsetext="hide hitboxes"> | <gallery class="mw-collapsible mw-collapsed" data-expandtext="show hitboxes" data-collapsetext="hide hitboxes"> | ||
LB2_Hibiki_qcb+db+f+AB2. | LB2_Hibiki_qcb+db+f+AB2.png|2nd part (If it whiffs, it'll return to the first part) | ||
LB2_Hibiki_qcb+db+f+AB3.jpg|3rd part | LB2_Hibiki_qcb+db+f+AB3.jpg|3rd part | ||
LB2_Hibiki_qcb+db+f+AB4.jpg|4th part | LB2_Hibiki_qcb+db+f+AB4.jpg|4th part | ||
| Line 749: | Line 751: | ||
==Super Desperation Move== | ==Super Desperation Move== | ||
{{MoveData | {{MoveData | ||
|image=LB2_Hibiki_f+hcf+B1. | |image=LB2_Hibiki_f+hcf+B1.png | ||
|caption=Stylish | |caption=Stylish | ||
|name=No Fear Feint | |name=No Fear Feint | ||
| Line 757: | Line 759: | ||
|version=Startup Boxes | |version=Startup Boxes | ||
|damage= --- | |damage= --- | ||
|startup= | |startup= 6 | ||
|active= | |active= 5,3,3,4,(3),1 | ||
|recovery= | |recovery= 61 | ||
|state= Any | |state= Any | ||
|frame advantage= --- | |frame advantage= --- | ||
| Line 766: | Line 768: | ||
|cancel= ×/× | |cancel= ×/× | ||
|tech= None | |tech= None | ||
|description= | |description=Incredibly stylish and hard to combo into. It can be confirmed from quick pokes such as 4A and 5A if you’re close enough, as well as 5B, dashing high, and 2B (in ex). Up close it is an unblockable hit grab, which means it can’t catch an opponent who is throw invincible during block stun (this doesn’t apply to opponents in hit stun). It’s possible to be deflected as well. The initial active frames that trigger the locked animation can hit on either side of Hibiki, making things like dash under sdm or AB~6C sdm as you run through opponents possible. | ||
* If connects near opponent, makes a flash of light and deals %50+ damage (On Hit ver) | * If connects near opponent, makes a flash of light and deals %50+ damage (On Hit ver) | ||
* If opponent is a distance away, will strike upwards with less damage (On Whiff ver) | * If opponent is a distance away, will strike upwards with less damage (On Whiff ver) | ||
* number in parentheses is the gap between the last grab box and the ranged hit. | |||
<br \>Click on show hitboxes to see the startup boxes | <br \>Click on show hitboxes to see the startup boxes | ||
<gallery class="mw-collapsible mw-collapsed" data-expandtext="show hitboxes" data-collapsetext="hide hitboxes"> | <gallery class="mw-collapsible mw-collapsed" data-expandtext="show hitboxes" data-collapsetext="hide hitboxes"> | ||
LB2_Hibiki_f+hcf+B2. | LB2_Hibiki_f+hcf+B2.png|2nd part | ||
LB2_Hibiki_f+hcf+B3. | LB2_Hibiki_f+hcf+B3.png|3rd part | ||
LB2_Hibiki_f+hcf+B4. | LB2_Hibiki_f+hcf+B4.png|4th part | ||
LB2_Hibiki_f+hcf+B5. | LB2_Hibiki_f+hcf+B5.png|5th part | ||
</gallery> | </gallery> | ||
}} | }} | ||
| Line 780: | Line 783: | ||
|version=Hit up close | |version=Hit up close | ||
|damage= 90 | |damage= 90 | ||
|startup= | |startup= 6 | ||
|active= 5 | |active= 5,3,3,4 | ||
|recovery= --- | |recovery= --- | ||
|state= Any | |state= Any | ||
| Line 799: | Line 802: | ||
|version=On Whiff/Hit far | |version=On Whiff/Hit far | ||
|damage= 32/-- | |damage= 32/-- | ||
|startup= | |startup= 24 | ||
|active= | |active= 1 | ||
|recovery= 61 | |recovery= 61 | ||
|state= Any | |state= Any | ||
| Line 810: | Line 813: | ||
|description=On whiff it'll look like this.<br \>Click on show hitboxes to see the boxes | |description=On whiff it'll look like this.<br \>Click on show hitboxes to see the boxes | ||
<gallery class="mw-collapsible mw-collapsed" data-expandtext="show hitboxes" data-collapsetext="hide hitboxes"> | <gallery class="mw-collapsible mw-collapsed" data-expandtext="show hitboxes" data-collapsetext="hide hitboxes"> | ||
LB2_Hibiki_f+hcf+Bw. | LB2_Hibiki_f+hcf+Bw.png|Whiff | ||
</gallery> | </gallery> | ||
}} | }} | ||
| Line 823: | Line 826: | ||
===Power Mode=== | ===Power Mode=== | ||
''For a more in depth view of Power Hibiki combos, please see the doc in [[#External Links]].'' | ''For a more in depth view of Power Hibiki combos, please see the doc in [[#External Links]].'' | ||
*4A 4A 5A 236A/B or 2146AB | |||
*2C/4A 5A 641236B | |||
*JB 5B 623B 2146AB | |||
====Meterless BnBs==== | ====Meterless BnBs==== | ||
| Line 847: | Line 852: | ||
* Dash A/B xx 623B, Dash, 3B | * Dash A/B xx 623B, Dash, 3B | ||
: Buffering dash and doing 3BCD helps a lot, input would be 663BCD | : Buffering dash and doing 3BCD helps a lot, input would be 663BCD | ||
* j. | * deep crossup j.B 4A, 5B xx 236A/B | ||
: Only works on Juzoh, Amano | : Only works on Juzoh, Amano, Shigen and Kouryu. Deep crossup j.B is required 4A, 5B is a tight link, so practice it | ||
====Optmized metered BnBs==== | ====Optmized metered BnBs==== | ||
| Line 877: | Line 882: | ||
* xx 623B xx 236A/B | * xx 623B xx 236A/B | ||
: You can delay 236A/B. | : You can delay 236A/B. | ||
* xx 623B xx DM | * xx 623B xx DM (ex mode) | ||
* xx 623B xx 41236C, 22B' | * xx 623B xx 41236C, 22B' | ||
: Very important combo, fandango confirm | : Very important combo, fandango confirm | ||
| Line 890: | Line 895: | ||
====Super Speed Combos==== | ====Super Speed Combos==== | ||
* A + B + C + A + B + C + A + B + 236C | * A + B + C + A + B + C + A + B + 236C | ||
* A + B + C + A + B + C + C + B | * A + B + C + A + B + C + C + B + 236A | ||
* A + B + C + 2C + A + 2C + 6BC | * A + B + C + 2C + A + 2C + 6BC | ||
* A + B + C + 2C + A + 6BC + A + 236B | * A + B + C + 2C + A + 6BC + A + 236B | ||
Latest revision as of 07:44, 12 December 2024
Overview
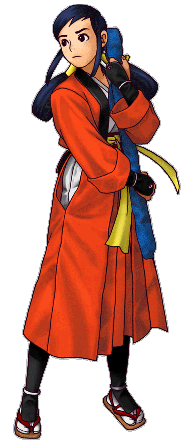
Hibiki in general is the type of character who uses her long reaching normals to control space, if you've played Samurai Shodown she is basically a female Ukyo Tachibana, and her B buttons are also great in this game. No matter the mode you choose. She's very strong in both Power and Speed/EX modes, Power being more focused on space control, neutral and punishes, while Speed is more focused on rushdown and pressure.
| Style | Strengths | Weaknesses |
|---|---|---|
| Power |
|
|
| Speed |
|
|
| EX |
|
|
Strategy
Hibiki's best way of dealing damage is by zoning out her opponents, but in Speed and EX modes she works aggressively as well. If you're going to play with her in power, learn how to use your B normals, especially 6B and 5B on power her 2B is pretty bad, but it can be cancelled on block in case you make a mistake. And your A normals, for pokes and confirms. 5B is going to be your best friend, it's a 3f anti-air (Takes 9f to get to the ground) and cancels into everything, it's simply good. Your bnb in power are going to be these two:
(j.X) 5B 236A/B
(j.X) 4A 4A 5A 236A/B
The difference from one another is that the second option deals a little more damage. The optimized version is, however
(j.X) 5B 623B (changes sides) dash 3B
Doing 663BCD is going to help a lot doing this link consistently
If you're going to play in speed, they won't be as necessary as your main focus of damage will be your combos with A starters, for example,
4A 5AA/{5A2A} 5B 236A/B
4A 5AA/{5A2A} 2B BC 236A/B
Which is your bnb in that mode.
Normals
Standing
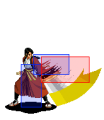
5A
 |
|---|
4A
 |
|---|
5B
 |
|---|
6B
 |
|---|
5C
 |
|---|
6C
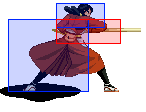 |
|---|
3B
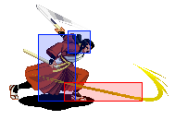 |
|---|
Dashing normals
Check System if you can't get this to come out
Dashing High
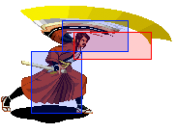 |
|---|
Dashing Low
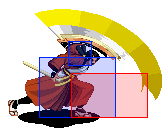 |
|---|
Speed Chain
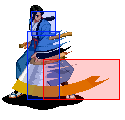
A>A
 |
|---|
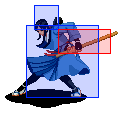
C of A>B>C
 |
|---|
Crouching
2A
 |
|---|
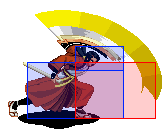
2B
 |
|---|
2C
 |
|---|
3C
 |
|---|
Air
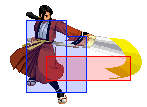
j.A
 |
|---|
j.B
 |
|---|
j.C
 |
|---|
Universal Mechanics
| Throw C+D  |
|---|
5B+C
  |
|---|
Special Moves
| Distance Slash 236A/B 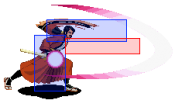  |
|---|
| Beckoning Slash 623B 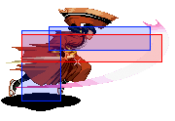 |
|---|
| Piercing Moon Pounce 623C 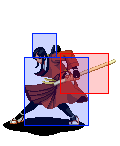 |
|---|
| Kami Hitoe ni te Kawasu Nari AB  |
|---|
Sanae O Okotaranu Kokoro Nari - Hold Start
- Hibiki holds her sword close as it glows, asking her father for help.
- Meter is charged slowly in this motion.
- No hurtbox provided, since it's the same as her standing
Desperation Moves
| Heavenly Spirit of Victory 2146AB  |
|---|
Super Desperation Move
| No Fear Feint 641236B 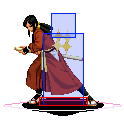 |
|---|
Combos
Hibiki is a very fun character, during matches you won't be doing much more than your BnBs, but it's possible to make her a powerhouse. One of her best characteristics, is that both her Power and Speed damage outputs are similar, so you can freely choose the one who best suits our playstyle. Power for a more defensive gameplay, and Speed for a more offensive gameplay.
NOTE: Before every combo, except those with 623C and 6[6]A/B (Dash A/B) starters, you can use a jX starter.
NOTE: In both modes, you can exchange a 4A for a 2C (except during chain combos on Speed mode), with a harder link but a low starter. The damage is the same.
Power Mode
For a more in depth view of Power Hibiki combos, please see the doc in #External Links.
- 4A 4A 5A 236A/B or 2146AB
- 2C/4A 5A 641236B
- JB 5B 623B 2146AB
Meterless BnBs
- 5B xx 236A/B
- 6C xx 623B
- If it crosses sides, end with a 3B
- Dash A/B xx 236A/B
- 4A/2C, 5A xx 236A/B
Metered BnBs
- 2C xx 2146ab
- 5B xx 2146AB
- 6C xx 2146AB
- j.X, 641236B
- You're not going to use this one much
- 2C/4A/5A xx 641236B
- Sometimes it won't 'combo' but will connect, you can do a 6A to start buffering
Optmized meterless BnBs
- 4A, 4A, 5A xx 236A/B
- 4A/2C, 4A/2C, 4A/2C, 4A/2C, 5A xx 236A/B
- Only works on crouching Mukuro. If he's not crouching, do 4Ax3
- 5B xx 623B, Dash, 3B
- Dash A/B xx 623B, Dash, 3B
- Buffering dash and doing 3BCD helps a lot, input would be 663BCD
- deep crossup j.B 4A, 5B xx 236A/B
- Only works on Juzoh, Amano, Shigen and Kouryu. Deep crossup j.B is required 4A, 5B is a tight link, so practice it
Optmized metered BnBs
- 4A, 2C, 4A, 5A xx 2146AB
- You'll find it easier to do it like that because 4A makes you go backward, making you miss the third 4A. Do 5A as 214A and then do 6AB quickly
- 623B has to cross sides, most optimized confirm for 2146AB DM if you add a j.B starter
Corner and near corner only
- 5B xx 623B, 236A/B
- A version has to be done exactly in the corner. If you delay too much, 236B whiffs. Theoretically possible to do in the corner
- 6C xx 623C, 3B
Speed and EX Mode
- EX can't cancel 623B xx 236A/B
Bread and Butter combos
- If you're in the corner, you don't need to dash for the 3B to reach
- 4A > 5AA > 5B (Ender)
- Doing 4AAA works as 4A 5AA
- You have many variations on how to end Speed and EX combos, and they'll be listed in the next section
Combo Enders
- > 6B
- > 6C, (3B)
- Range dependant
- xx DM
- xx 236A/B
- xx 623B xx 236A/B
- You can delay 236A/B.
- xx 623B xx DM (ex mode)
- xx 623B xx 41236C, 22B'
- Very important combo, fandango confirm
- > 3C (3B)
- 5BC, Normal
- 5BC, 5B Setups a 236B if you can time it right, high risk
- 5BC. nA/C Only works in the corner
- 5B xx 5BC Will sometimes whiff, can't be recommended
- > 5BC, 236A/B
- > 5BC, delay (fall) 3B
Super Speed Combos
- A + B + C + A + B + C + A + B + 236C
- A + B + C + A + B + C + C + B + 236A
- A + B + C + 2C + A + 2C + 6BC
- A + B + C + 2C + A + 6BC + A + 236B
