-Happy New Year 2025!
The King of Fighters XIII/Goro Daimon: Difference between revisions
Created page with "{| style="margin-right:1em;" align="right" | __TOC__ |} Image:Daimonxiii.jpgImage:Spacer.gifImage:Daimon sprite.gif Image:Daimonxiiimoves.png :[http://yout..." |
Franck Frost (talk | contribs) No edit summary |
||
| (26 intermediate revisions by 4 users not shown) | |||
| Line 1: | Line 1: | ||
{| style="margin- | {{CharNavbox XIII}} | ||
{| class="wikitable" style="float:right; margin-left:10px;" | |||
|- | |||
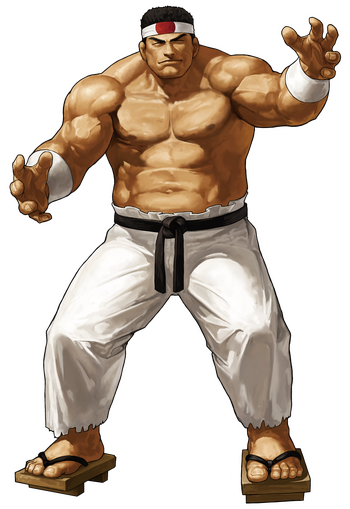
[[ | |[[File:XIII_Daimon_Profile.png|350px]] | ||
<center><font size="4"><b>Goro Daimon</b></font></center> | |||
|- | |||
|- | |||
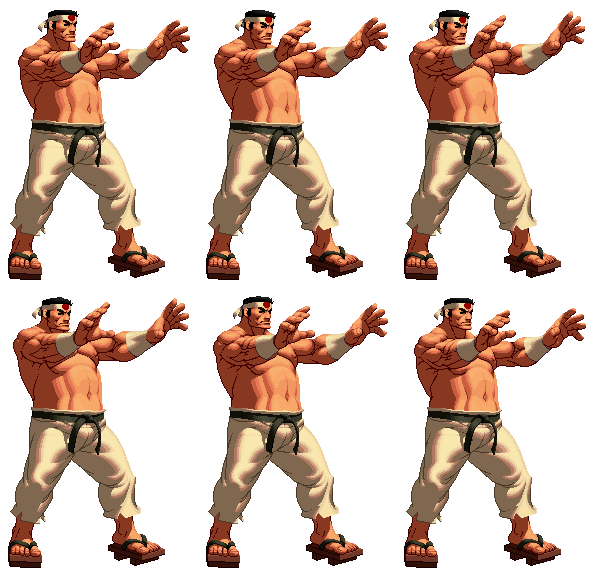
| [[File:XIII_Daimon.gif]] | |||
|} | |||
{{TOClimit|3}} | |||
==Movelist== | |||
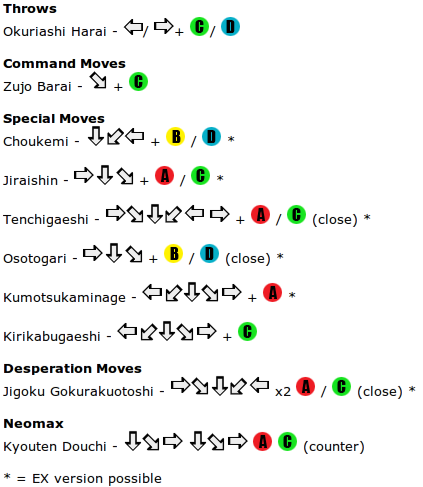
[[Image:Daimonxiiimoves.png]] | [[Image:Daimonxiiimoves.png]] | ||
:[http://youtu.be/A5Vch2CNQiY Goro Daimon's Move List Video] | :[http://youtu.be/A5Vch2CNQiY Goro Daimon's Move List Video] | ||
| Line 38: | Line 45: | ||
|} | |} | ||
==Console Changes== | |||
- Crouching C’s recovery time has been reduced. | - Crouching C’s recovery time has been reduced. | ||
| Line 58: | Line 65: | ||
==Gameplay Overview== | ==Gameplay Overview== | ||
{{StrengthsAndWeaknesses | |||
| pros= | |||
* Good situational normals | |||
* Great anti-air options | |||
* Good counter hit j.CD setups | |||
* Powerful and easy HD combos | |||
* Easy drive/super cancel combos | |||
* Scary close range offense | |||
| cons= | |||
* Big target | |||
* Needs to work hard to get around projectiles | |||
* Not very mobile | |||
* Easy to overwhelm while on the defense | |||
* Needs meter for big damage | |||
}} | |||
==Normals== | |||
===Far Standing Normals=== | |||
==== ==== | |||
{{FrameDataCargo-KOFXIII | |||
|moveId=daimon_sta | |||
|description=Hits mid. Goro steps forward slightly with a fast palm thrust at shoulder height. In previous KOF games, the reach was much farther but it is slightly reduced in this game. It is best used for zoning against hops and stopping those blindly running towards you. It is neutral on block but it isn't as fast as other characters far A's. Overall, a great normal to use often to regulate space and stop hops. | |||
}} | |||
==== ==== | |||
{{FrameDataCargo-KOFXIII | |||
|moveId=daimon_stb | |||
|description=Cancel-able, hits low. Goro pokes out his foot aiming to his opponents shins. One of his best normals because it is fast, has a great range, hits low, and you can combo from it if you are close enough. A great poke that is important to Goro's offense. | |||
}} | |||
==== ==== | |||
{{FrameDataCargo-KOFXIII | |||
|moveId=daimon_stc | |||
|description=Somewhat of a fierce, slow push looking attack that hits at a shoulder height. It's best used as a preemptive anti-air at mid-range because it is great at stopping hyper hops in advance. The only drawback to this move is it's start up is rather slow and he is open to low attacks during the animation, so use this carefully. | |||
}} | |||
==== ==== | |||
{{FrameDataCargo-KOFXIII | |||
|moveId=daimon_std | |||
|description=This move retains its usefulness and attributes from past games as being a very good anti-air move, both for those hopping or jumping in, or stuffing attempted jumps from cornered opponents. It still can be stuffed by some jumpins if you don't time it correctly and it still has a fair amount of recovery if whiffed, so exercise caution when using this move. | |||
}} | |||
===Close Standing Normals=== | |||
==== ==== | |||
{{FrameDataCargo-KOFXIII | |||
|moveId=daimon_cla | |||
|description=Chain/cancel-able, hits mid. A quick jab to the gut that you can combo into. It's range is rather short, so you must be fairly close to the opponent for it to active. Good use to mix up between using is s.B since that attack hits low | |||
}} | |||
==== ==== | |||
{{FrameDataCargo-KOFXIII | |||
|moveId=daimon_clc | |||
|description=A quick backfist to the midscreen that is neutral on block. It will probably be used more as a first or second hit for a few of his combos. It is a good normal to throw out in close range next to his s.B for a mid/low mix up. | |||
}} | |||
===Crouching Normals=== | |||
==== ==== | |||
{{FrameDataCargo-KOFXIII | |||
|moveId=daimon_cra | |||
|description=A great low palm thrust that has a small amount of less range than his s.A but it is still good to use together with his s.B, and you can cancel it into his df+C as well. It is also neutral on block which can be good on offensive for baiting the opponent movements when they leave block stun. | |||
}} | |||
==== ==== | |||
{{FrameDataCargo-KOFXIII | |||
|moveId=daimon_crb | |||
|description=Goro crouches and pokes his foot out hitting the opponents toes. The range isn't as a far as his s.B, and you can't cancel this kick into anything else, but it seems to have more plus frames, which can be good for offensive pressure. | |||
}} | |||
==== ==== | |||
{{FrameDataCargo-KOFXIII | |||
|moveId=daimon_crc | |||
|description=This is a good alternative to his s.C which can be vulnerable to low attacks, this attack is good for stopping hop/jumps attacks that whiffs on crouchers because the vertical hitbox along with Goro crouching. | |||
}} | |||
==== ==== | |||
{{FrameDataCargo-KOFXIII | |||
|moveId=daimon_crd | |||
|description=Not a bad sweep even though the range is shorter than his d.B, it's good that you can cancel it into his other special moves (like qcb+B or dp+C) to shorten its recovery. But comparing the potential of his s.B, it would be a better option to not use this sweep if you are trying to punish against moves that have a fair amount of pushback, which the sweep couldn't punish. | |||
}} | |||
===Jumping Normals=== | |||
==== ==== | |||
{{FrameDataCargo-KOFXIII | |||
|moveId=daimon_ja | |||
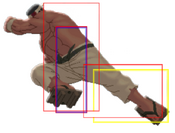
|description=Goro punches down at a 50 degree angle at a short range. Good for jumping in with and comes out fast. It can also crossup some opponents as well. | |||
}} | |||
==== ==== | |||
{{FrameDataCargo-KOFXIII | |||
|moveId=daimon_jb | |||
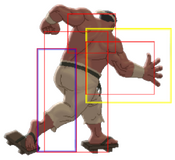
|description=A deep knee that hits in-between an almost 30-40 degree angle. A crossup attack of choice Goro which can look a little ambiguous sometimes. | |||
}} | |||
==== ==== | |||
{{FrameDataCargo-KOFXIII | |||
|moveId=daimon_jc | |||
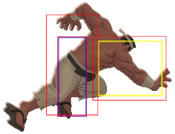
|description=Goro looks like hes diving off a platform to hit you with both of his elbows. His body's hitbox is almost completely horizontal during this attack, and he hits downward at a 50 degree angle. | |||
}} | |||
==== ==== | |||
{{FrameDataCargo-KOFXIII | |||
|moveId=daimon_jd | |||
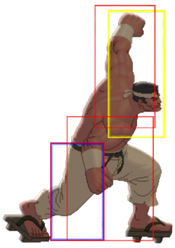
|description= One of Goro's best jumping attacks. It points at a steep angle at almost 30 degrees and can be used as an instant overhead against certain crouching characters. It can form some rather nasty high/low mixups when used in conjunction with is stand B (which hits low). | |||
}} | |||
===Blowback Normals=== | |||
==== ==== | |||
{{FrameDataCargo-KOFXIII | |||
|moveId=daimon_stcd | |||
|description=A big palm slap to the opponent's stomach causing a techable knockdown. Goro doesn't move an inch during this move so he can't really gain any kind of range with this specials if you whiff cancel it. | |||
}} | |||
==== ==== | |||
{{FrameDataCargo-KOFXIII | |||
|moveId=daimon_jcd | |||
|description=Goro lays an aerial smackdown which causes a hard knockdown. It hits at an 60 degree angle but can be ducked under by some characters crouching B's, even while used during a hop. On counter hit, it causes the opponent bounce against the wall then fall towards you for a follow-up (hcf+A, hcf+C when they hit the ground, df+C into hcf+A, or HD mode etc.) of your choice. | |||
}} | |||
==Throws== | |||
===Okuriashi Harai=== | |||
{{FrameDataCargo-KOFXIII | |||
|moveId=daimon_throw | |||
|description=Causes hard knockdown. | |||
}} | |||
==Command Normals== | |||
===Zujo Barai=== | |||
{{FrameDataCargo-KOFXIII | |||
|moveId=daimon_df+c | |||
|description=Goro's old crouching swing upwards. It is great for anti air and has a great hit box. It chains off a d.A and s.C and can be combo into his qcb + K, hcf + C, hcb~ f+P command grab or his hcb x2 + P DM. You can still do df.C (anti-air) cancel into qcb + K. | |||
}} | |||
== | == DM == | ||
=== | =====<font style="visibility:hidden; float:right">↓↙←B</font>===== | ||
{{MoveData | |||
|image=KOFIII_Daimon_↓↙←B.png | |||
|caption= | |||
|name= | |||
|input=↓↙←B | |||
|data= | |||
{{AttackData-KOFXIII | |||
|Startup=34 | |||
|Active=- | |||
|Recovery=- | |||
|Adv. Hit=- | |||
|On Block=- | |||
}} | |||
}} | |||
=====<font style="visibility:hidden; float:right">↓↙←D</font>===== | |||
{{MoveData | |||
|image=KOFIII_Daimon_↓↙←D.png | |||
|caption= | |||
|name= | |||
|input=↓↙←D | |||
|data= | |||
{{AttackData-KOFXIII | |||
|Startup=41 | |||
|Active=- | |||
|Recovery=- | |||
|Adv. Hit=- | |||
|On Block=- | |||
}} | |||
}} | |||
=====<font style="visibility:hidden; float:right">↓↙←BD</font>===== | |||
{{MoveData | |||
|image=KOFIII_Daimon_↓↙←BD.png | |||
|caption= | |||
|name= | |||
|input=↓↙←BD | |||
|data= | |||
{{AttackData-KOFXIII | |||
|Startup=37 | |||
|Active=- | |||
|Recovery=- | |||
|Adv. Hit=- | |||
|On Block=- | |||
}} | |||
}} | |||
=====<font style="visibility:hidden; float:right">→↓↘A</font>===== | |||
{{MoveData | |||
|image=KOFIII_Daimon_→↓↘A.png | |||
|caption= | |||
|name= | |||
|input=→↓↘A | |||
|data= | |||
{{AttackData-KOFXIII | |||
|Startup=27 | |||
|Active=2 | |||
|Recovery=34 | |||
|Adv. Hit=Knockdown | |||
|On Block=Unblockable | |||
}} | |||
}} | |||
=====<font style="visibility:hidden; float:right">→↓↘C</font>===== | |||
{{MoveData | |||
|image=KOFIII_Daimon_→↓↘C.png | |||
|caption= | |||
|name= | |||
|input=→↓↘C | |||
|data= | |||
{{AttackData-KOFXIII | |||
|Startup=33 | |||
|Active=- | |||
|Recovery=- | |||
|Adv. Hit=- | |||
|On Block=- | |||
}} | |||
}} | |||
=====<font style="visibility:hidden; float:right">→↓↘AC</font>===== | |||
{{MoveData | |||
|image=KOFIII_Daimon_→↓↘AC.png | |||
|caption= | |||
|name= | |||
|input=→↓↘AC | |||
|data= | |||
{{AttackData-KOFXIII | |||
|Startup=15 | |||
|Active=6 | |||
|Recovery=33 | |||
|Adv. Hit=Knockdown | |||
|On Block= -18 | |||
}} | |||
}} | |||
=====<font style="visibility:hidden; float:right">→↘↓↙←,→A</font>===== | |||
{{MoveData | |||
|image=KOFIII_Daimon_→↘↓↙←,→A.png | |||
|caption= | |||
|name= | |||
|input=→↘↓↙←,→A | |||
|data= | |||
{{AttackData-KOFXIII | |||
|Startup=1 | |||
|Active=1 | |||
|Recovery=37 | |||
|Adv. Hit=Knockdown | |||
|On Block=Unblockable | |||
}} | |||
}} | |||
=====<font style="visibility:hidden; float:right">→↘↓↙←,→C</font>===== | |||
{{MoveData | |||
|image=KOFIII_Daimon_→↘↓↙←,→C.png | |||
|caption= | |||
|name= | |||
|input=→↘↓↙←,→C | |||
|data= | |||
{{AttackData-KOFXIII | |||
|Startup=1 | |||
|Active=1 | |||
|Recovery=37 | |||
|Adv. Hit=Knockdown | |||
|On Block=Unblockable | |||
}} | |||
}} | |||
=====<font style="visibility:hidden; float:right">→↘↓↙←,→AC</font>===== | |||
{{MoveData | |||
|image=KOFIII_Daimon_→↘↓↙←,→AC.png | |||
|caption= | |||
|name= | |||
|input=→↘↓↙←,→AC | |||
|data= | |||
{{AttackData-KOFXIII | |||
|Startup=1 | |||
|Active=1 | |||
|Recovery=41 | |||
|Adv. Hit=Knockdown | |||
|On Block=Unblockable | |||
}} | |||
}} | |||
=====<font style="visibility:hidden; float:right">→↓↘B</font>===== | |||
{{MoveData | |||
|image=KOFIII_Daimon_→↓↘B.png | |||
|caption= | |||
|name= | |||
|input=→↓↘B | |||
|data= | |||
{{AttackData-KOFXIII | |||
|Startup=9 | |||
|Active=3 | |||
|Recovery=31 | |||
|Adv. Hit=Knockdown | |||
|On Block=Unblockable | |||
}} | |||
}} | |||
=====<font style="visibility:hidden; float:right">→↓↘D</font>===== | |||
{{MoveData | |||
|image=KOFIII_Daimon_→↓↘D.png | |||
|caption= | |||
|name= | |||
|input=→↓↘D | |||
|data= | |||
{{AttackData-KOFXIII | |||
|Startup=9 | |||
|Active=3 | |||
|Recovery=31 | |||
|Adv. Hit=Knockdown | |||
|On Block=Unblockable | |||
}} | |||
}} | |||
=====<font style="visibility:hidden; float:right">→↓↘BD</font>===== | |||
{{MoveData | |||
|image=KOFIII_Daimon_→↓↘BD.png | |||
|caption= | |||
|name= | |||
|input=→↓↘BD | |||
|data= | |||
{{AttackData-KOFXIII | |||
|Startup=9 | |||
|Active=2 | |||
|Recovery=20 | |||
|Adv. Hit=Knockdown | |||
|On Block=Unblockable | |||
}} | |||
}} | |||
=====<font style="visibility:hidden; float:right">←↙↓↘→A</font>===== | |||
{{MoveData | |||
|image=KOFIII_Daimon_←↙↓↘→A.png | |||
|caption= | |||
|name= | |||
|input=←↙↓↘→A | |||
|data= | |||
{{AttackData-KOFXIII | |||
|Startup=6 | |||
|Active=2 | |||
|Recovery=31 | |||
|Adv. Hit=Knockdown | |||
|On Block= -10 | |||
}} | |||
}} | |||
=== | =====<font style="visibility:hidden; float:right">←↙↓↘→C</font>===== | ||
{{MoveData | |||
|image=KOFIII_Daimon_←↙↓↘→C.png | |||
|caption= | |||
|name= | |||
|input=←↙↓↘→C | |||
|data= | |||
{{AttackData-KOFXIII | |||
|Startup=19 | |||
|Active=2 | |||
|Recovery=26 | |||
|Adv. Hit=Knockdown | |||
|On Block= -5 | |||
}} | |||
}} | |||
=====<font style="visibility:hidden; float:right">←↙↓↘→AC</font>===== | |||
{{MoveData | |||
|image=KOFIII_Daimon_←↙↓↘→AC.png | |||
|caption= | |||
|name= | |||
|input=←↙↓↘→AC | |||
|data= | |||
{{AttackData-KOFXIII | |||
|Startup=5 | |||
|Active=2 | |||
|Recovery=39 | |||
|Adv. Hit=Knockdown | |||
|On Block= -18 | |||
}} | |||
}} | |||
== SDM/NeoMAX == | |||
=====<font style="visibility:hidden; float:right">→↘↓↙←,→↘↓↙←A/C</font>===== | |||
{{MoveData | |||
|image=KOFIII_Daimon_→↘↓↙←,→↘↓↙←A/C.png | |||
|caption= | |||
|name= | |||
|input=→↘↓↙←,→↘↓↙←A/C | |||
|data= | |||
{{AttackData-KOFXIII | |||
|Startup=1 | |||
|Active=2 | |||
|Recovery=49 | |||
|Adv. Hit=Knockdown | |||
|On Block=Unblockable | |||
}} | |||
}} | |||
=====<font style="visibility:hidden; float:right">→↘↓↙←,→↘↓↙←AC</font>===== | |||
{{MoveData | |||
|image=KOFIII_Daimon_→↘↓↙←,→↘↓↙←AC.png | |||
|caption= | |||
|name= | |||
|input=→↘↓↙←,→↘↓↙←AC | |||
|data= | |||
{{AttackData-KOFXIII | |||
|Startup=1 | |||
|Active=2 | |||
|Recovery=49 | |||
|Adv. Hit=Knockdown | |||
|On Block=Unblockable | |||
}} | |||
}} | |||
=====<font style="visibility:hidden; float:right">↓↘→↓↘→AC</font>===== | |||
{{MoveData | |||
|image=KOFIII_Daimon_↓↘→↓↘→AC.png | |||
|caption= | |||
|name= | |||
|input=↓↘→↓↘→AC | |||
|data= | |||
{{AttackData-KOFXIII | |||
|Startup=1 | |||
|Active=30 | |||
|Recovery=11 | |||
|Adv. Hit=Knockdown | |||
|On Block=Unblockable | |||
}} | |||
}} | |||
===Standing=== | ===Standing=== | ||
| Line 209: | Line 600: | ||
* Damage: 500 | * Damage: 500 | ||
= Move Metadata = | == Move Metadata == | ||
| Line 633: | Line 772: | ||
|} | |} | ||
=Videos= | ==Videos== | ||
'''Juicy Bits: Daimon Tutorial''' | '''Juicy Bits: Daimon Tutorial''' | ||
| Line 644: | Line 783: | ||
{{#ev:youtube|oDLA9CT_GD0}} | {{#ev:youtube|oDLA9CT_GD0}} | ||
=Contributors= | ==Contributors== | ||
[http://dreamcancel.com/forum/index.php?action=profile;u=31 AmedoS310] [http://dreamcancel.com/forum/index.php?topic=1694.msg65062#msg65062] | [http://dreamcancel.com/forum/index.php?action=profile;u=31 AmedoS310] [http://dreamcancel.com/forum/index.php?topic=1694.msg65062#msg65062] | ||
| Line 658: | Line 797: | ||
[http://dreamcancel.com/forum/index.php?action=profile;u=6145 uncleaner] [http://dreamcancel.com/forum/index.php?topic=1694.msg68339#msg68339] | [http://dreamcancel.com/forum/index.php?action=profile;u=6145 uncleaner] [http://dreamcancel.com/forum/index.php?topic=1694.msg68339#msg68339] | ||
=Links & References= | ==Links & References== | ||
http://game.snkplaymore.co.jp/official/kof-xiii/blog/archives/2012/04/post_66.html | http://game.snkplaymore.co.jp/official/kof-xiii/blog/archives/2012/04/post_66.html | ||
=Discussion Threads= | ==Discussion Threads== | ||
Discuss at [http://dreamcancel.com/forum/index.php?board=87.0 Dream Cancel] | Discuss at [http://dreamcancel.com/forum/index.php?board=87.0 Dream Cancel] | ||
Latest revision as of 18:04, 17 April 2023
|
|
Movelist
| 0 Stock, No Drive Gauge |
Anywhere |
s.A, s.B, dp+K = 194 dmg |
| 1 Stock, No Drive Gauge |
Anywhere |
j.D, s.A, s.B, hcbx2+P = 329 dmg |
| 0 Stock, 1+ Drive Gauge | Anywhere | s.A, s.B, dp+K (DC), dp+A = 298 dmg |
Console Changes
- Crouching C’s recovery time has been reduced.
- Kirikabugaeshi’s (qcf+C) recovery time on a whiff has been reduced. Doesn’t cause a knockback when blocked.
- EX Chou Ukemi (qcb+BD) can be canceled with a special or a super. Meaning that Goro can go straight into a throw from his invincible roll.
- Kirikabugaeshi (hcf+C) and Kumotsukaminage (hcf+A) can be drive canceled.
- A super cancel version of Jigoku-Gokurakuotoshi (hcb*2+ P) has been added to the game.
- EX Chou Oosotogari’s (dp+BD) recovery time on a whiff has been reduced.
Producer Yamamoto says: "As a judo fighter, we’ve strengthened his grab attacks. You need to super cancel, but he can combo his Jigoku-Gokurakuotoshi from all sorts of grab attacks. He can even do HD combos with just grab attacks, so please try them out."
Gameplay Overview
| [ Info Needed ] | |
| Pros | Cons |
|
|
Normals
Far Standing Normals
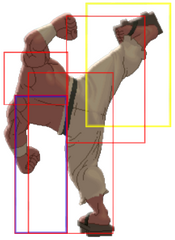
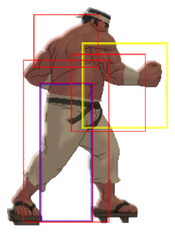
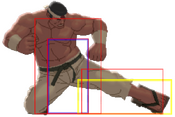
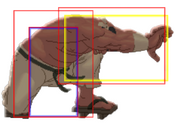
| stand A
st.A
A |
|---|
| stand B
st.B
B |
|---|
| stand C
st.C
C |
|---|
| stand D
st.D
D |
|---|
Close Standing Normals
| close A
cl.A
cl.A |
|---|
| close C
cl.C
cl.C |
|---|
Crouching Normals
| crouch A
cr.A
2A |
|---|
| crouch B
cr.B
2B |
|---|
| crouch C
cr.C
2C |
|---|
| crouch D
cr.D
2D |
|---|
Jumping Normals
| jump A
j.A
j.A |
|---|
| jump B
j.B
j.B |
|---|
| jump C
j.C
j.C |
|---|
| jump D
j.D
j.D |
|---|
Blowback Normals
| stand CD
st.CD
CD |
|---|
| jump CD
j.CD
j.CD |
|---|
Throws
Okuriashi Harai
| Okuriashi Harai
Close, b/f+C/D
Close, 4/6C/D
|
|---|
Command Normals
Zujo Barai
| Zujo Barai
df+C
3C |
|---|
DM
↓↙←B
↓↙←B |
|---|
↓↙←D
↓↙←D |
|---|
↓↙←BD
↓↙←BD |
|---|
→↓↘A
→↓↘A |
|---|
→↓↘C
→↓↘C |
|---|
→↓↘AC
→↓↘AC |
|---|
→↘↓↙←,→A
→↘↓↙←,→A |
|---|
→↘↓↙←,→C
→↘↓↙←,→C |
|---|
→↘↓↙←,→AC
→↘↓↙←,→AC |
|---|
→↓↘B
→↓↘B |
|---|
→↓↘D
→↓↘D |
|---|
→↓↘BD
→↓↘BD |
|---|
←↙↓↘→A
←↙↓↘→A |
|---|
←↙↓↘→C
←↙↓↘→C |
|---|
←↙↓↘→AC
←↙↓↘→AC |
|---|
SDM/NeoMAX
→↘↓↙←,→↘↓↙←A/C
→↘↓↙←,→↘↓↙←A/C |
|---|
→↘↓↙←,→↘↓↙←AC
→↘↓↙←,→↘↓↙←AC |
|---|
↓↘→↓↘→AC
↓↘→↓↘→AC |
|---|
Standing
far A: 30 damage, hits mid. Goro steps forward slightly with a fast palm thrust at shoulder height. In previous KOF games, the reach was much farther but it is slightly reduced in this game. It is best used for zoning against hops and stopping those blindly running towards you. It is neutral on block but it isn't as fast as other characters far A's. Overall, a great normal to use often to regulate space and stop hops.
s.A: 30 damage, chain/cancel-able, hits mid. A quick jab to the gut that you can combo into. It's range is rather short, so you must be fairly close to the opponent for it to active. Good use to mix up between using is s.B since that attack hits low
s.B: 40 damage, cancel-able, hits low. Goro pokes out his foot aiming to his opponents shins. One of his best normals because it is fast, has a great range, hits low, and you can combo from it if you are close enough. A great poke that is important to Goro's offense.
far C: 80 damage, hits mid. Somewhat of a fierce, slow push looking attack that hits at a shoulder height. It's best used as a preemptive anti-air at mid-range because it is great at stopping hyper hops in advance. The only drawback to this move is it's start up is rather slow and he is open to low attacks during the animation, so use this carefully.
s.C: 80 damage, cancelable, hits mid. A quick backfist to the midscreen that is neutral on block. It will probably be used more as a first or second hit for a few of his combos. It is a good normal to throw out in close range next to his s.B for a mid/low mix up.
s.D: 90 damage, hits mid. This move retains its usefulness and attributes from past games as being a very good anti-air move, both for those hopping or jumping in, or stuffing attempted jumps from cornered opponents. It still can be stuffed by some jumpins if you don't time it correctly and it still has a fair amount of recovery if whiffed, so exercise caution when using this move.
Crouching
d. A: 25 damage, cancelable, hits mid. A great low palm thrust that has a small amount of less range than his s.A but it is still good to use together with his s.B, and you can cancel it into his df+C as well. It is also neutral on block which can be good on offensive for baiting the opponent movements when they leave block stun.
d. B: 30 damage, hits low. Goro crouches and pokes his foot out hitting the opponents toes. The range isn't as a far as his s.B, and you can't cancel this kick into anything else, but it seems to have more plus frames, which can be good for offensive pressure.
d. C: 80 damage, cancelable, hit mid. This is a good alternative to his s.C which can be vulnerable to low attacks, this attack is good for stopping hop/jumps attacks that whiffs on crouchers because the vertical hitbox along with Goro crouching.
d. D: 80 damage, whiff/cancelable, hits low. Not a bad sweep even though the range is shorter than his d.B, it's good that you can cancel it into his other special moves (like qcb+B or dp+C) to shorten its recovery. But comparing the potential of his s.B, it would be a better option to not use this sweep if you are trying to punish against moves that have a fair amount of pushback, which the sweep couldn't punish.
Jumping
j. A: 45 (40) damage, hits overhead. Goro punches down at a 50 degree angle at a short range. Good for jumping in with and comes out fast. It can also crossup some opponents as well.
j. B: 45 (40) damage, hits overhead. A deep knee that hits in-between an almost 30-40 degree angle. A crossup attack of choice Goro which can look a little ambiguous sometimes.
j. C: 72 (70) damage, hits overhead. Goro looks like hes diving off a platform to hit you with both of his elbows. His body's hitbox is almost completely horizontal during this attack, and he hits downward at a 50 degree angle.
j. D: 70 (68) damage, hits overhead. One of Goro's best jumping attacks. It points at a steep angle at almost 30 degrees and can be used as an instant overhead against certain crouching characters. It can form some rather nasty high/low mixups when used in conjunction with is stand B (which hits low).
Blowback Attack
CD: 75 damage, cancel-able, hits mid. A big palm slap to the opponent's stomach causing a techable knockdown. Goro doesn't move an inch during this move so he can't really gain any kind of range with this specials if you whiff cancel it.
j. CD: 90 (80) damage, hits mid. Goro lays an aerial smackdown which causes a hard knockdown. It hits at an 60 degree angle but can be ducked under by some characters crouching B's, even while used during a hop. On counter hit, it causes the opponent bounce against the wall then fall towards you for a follow-up (hcf+A, hcf+C when they hit the ground, df+C into hcf+A, or HD mode etc.) of your choice.
GCCD: 10 damage, hits mid. Same as his standing CD.
Throw
Okuriashi Harai = (b/f+C/D) 100 damage, can be broken, causes hard knockdown.
Command Moves
Zujo Barai = (df+C) - 60 damage, cancelable, hits mid.
- Goro's old crouching swing upwards. It is great for anti air and has a great hit box. It chains off a d.A and s.C and can be combo into his qcb + K, hcf + C, hcb~ f+P command grab or his hcb x2 + P DM. You can still do df.C (anti-air) cancel into qcb + K.
Special Moves
Choukemi = (qcb+K) - Goro's command roll. Goro can roll and, if the opponent jumps immediately, he can cancel into hcf+A. If the opponent doesn't move, Goro can cancel into hcb~f+P. Only the B version is cancelable; D version seems to go farther; and the Ex version has invincibilty.
(EX) = qcb+BD
- No damage
Jiraishin = (dp+A) - Goro's earthquake. With two hands raised about his head, Goro slams the ground with great force and, if the opponent is blocking high, then he will fall to the ground (he must crouch or jump). The C version is his earthquake feint and the A version is the one that actually hit. His Ex version is faster, can be canceled out of when his hands slap the ground, and is an overhead.
(EX) = dp+AC
- Drive- / Super-Cancellable (EX only)
- Hit Detection: Low; EX version: Overhead, High (for attack animation), Low (for the ground pound)
- A Damage: 90; EX Damage: 100, 100
Jiraishin (feint) = (dp+C)
Tenchigaeshi = (hcb,f+P) - Goro's trusty command throw. Goro picks up his opponent and slams him or her to one side, picks them up again and throws them into the air. The Ex version has GREAT range and allows a follow up juggle attack such as far D.
(EX) = hcb,f+AC
- Hit Detection: Throw/Close
- Damage: 30, 120; EX Damage: 40, 50, 100
Osotogari = (dp+K) close - Goro's command throw. Has one or two frames of invincibility but basically (much like Clark's dp + K Frankensteiner ) Goro performs a judo trip on his opponents; it'll catch the opponent, if they don't escape. This move is DC'able into qcb+K (into hcf + C), dp + A or super cancellable into his qcbx2+P. Great move to cancel into after his command roll.
(EX) = dp+BD
- Drive- / Super-Cancellable
- Hit Detection: Throw
- Damage: 140; EX Damage: 180
Kumotsukaminage = (hcf+A) - Goro's standard anti-air. He reaches into the sky with one hand outstretched. Used well with predicted jumps (due to it's slow startup you have to use it pre-emptively) and in conjunction with Earthquake Feints (dp + C) on wakeups (Opponents tend to jump and so you do hcf + A to snatch them out of the air.)
(EX) = hcf+AC
- Super Cancelable
- Hit Detection: High
- Damage: 114; EX Damage: 199
Kirikabugaeshi = (hcf+C) - Goro reaches and attacks the ground with one hand. Relatively slow attack, however if you sweep your opponent and they do not tech roll, you get a free OTG hit. Combos off of a d.A, df.C chain.
- Super Cancelable
- Hit Detection: High
- Damage: 76
Desperation Moves
Jigoku Gokurakuotoshi = (hcbx2+P) - Goro's standard command throw DM from past iterations. Picks up the opponent, slams them from side to side violently several times before throwing them into the sky. Ex has increased range so he can combo s.A, d.B, Ex DM.
(EX) = hcbx2+AC
- MAX Cancellable
- Hit Detection: Throw
- Damage: 20 x 4, 150; EX Damage: 20 x 8, 100, 80
Neomax
Kyouten Douchi = (qcfx2+AC) - Goro's counter move DM,. He raises his hands like he's doing Earthquake and, if any physical attack hits Goro during this time, he'll throw them into the and and slam the ground like his Earthquake. If used as a MaxCancel he'll just do the second part and slam the ground.
- Hit Detection: Counter (High, if MAX canceled)
- Damage: 500
Move Metadata
| Move | Damage | Stun | Startup | On Guard | Remarks |
|---|---|---|---|---|---|
| cl.A | 30 | 8 | 4 | +1 | |
| cr.A | 25 | 3 | 6 | +1 | |
| st.A | 25 | 8 | 4 | +1 | |
| j.A | 45 | 3 | 4 | - | |
| h.A | 40 | 3 | 5 | - | |
| cl.B | 40 | 8 | 4 | -2 | |
| cr.B | 30 | 3 | 4 | 0 | |
| st.B | 30 | 8 | 4 | -2 | |
| j.B | 45 | 3 | 5 | - | |
| hop B | 40 | 3 | 5 | - | |
| cl.C | 80 | 10 | 5 | -1 | |
| cr.C | 80 | 10 | 8 | -6 | |
| st.C | 80 | 7 | 9 | -10 | |
| j.C | 72 | 7 | 9 | - | |
| hop C | 70 | 7 | 9 | - | |
| cl.D | 90 | 10 | 6 | -5 | |
| cr.D | 80 | 7 | 6 | -2 | |
| st.D | 80 | 10 | 6 | -5 | |
| j.D | 70 | 7 | 7 | - | |
| hop D | 70 | 7 | 6 | - | |
| st.CD | 75 | 10 | 16 | +2 | |
| j.CD | 90 | 8 | 14 | - | |
| hop CD | 80 | 8 | 12 | - | |
| Zujoubarai = df+C | 60 | 6 | 5 | -11 | |
| Okuriashibarai = b/f+C/D | 100 | 0 | 1 | - | Hard knockdown |
| GCCD | 4 | 0 | 13 | -15 | vs. Wk 13, Str 17, Jump attacks 17 |
| Tenchigaeshi1 = hcb,f+A/C | 30 | 0 | 1 | - | Whiff 38 |
| Tenchigaeshi2 | 150 | 0 | - | - | |
| Kumotsukaminage1 = hcf+A | 0 | 0 | 6 | -10 | |
| Kumotsukaminage2 | 120 | 0 | - | - | |
| Kirikabugaeshi1 = hcf+C | 0 | 0 | 19 | -5 | |
| Kirikabugaeshi2 | 80 | 0 | - | - | |
| Jiraishin = dp+A | 90 | 0 | 27 | - | Full animation 63 |
| Osotogari = dp+B/D | 140 | 0 | 9 | - | Whiff 42 |
| Jiraishin Feint = dp+C | 0 | 0 | - | - | Full animation 33 |
| Chou Ukemi = qcb+B/D | 0 | 0 | - | - | Wk animation 34, Strong animation 41 |
| EX Tenchigaeshi1 = hcb,f+AC | 40 | 0 | 1 | - | Whiff 42 |
| EX Tenchigaeshi2 | 50 | 0 | - | - | |
| EX Tenchigaeshi3 | 100 | 0 | - | - | |
| EX Kumotsukaminage = hcf+AC | 0 | 0 | 5 | -18 | |
| EX Kumotsukaminage | 210 | 0 | - | - | |
| EX Jiraishin1 = dp+AC | 100 | 0 | 15 | - | Earthquak 19 / Full animation 50 |
| EX Jiraishin2 | 100 | 0 | - | -18 | Standing guard, Crouching guard |
| EX Osotogari = dp+BD | 180 | 0 | 9 | - | Whiff 30 |
| EX Chou Ukemi = qcb+BD | 0 | 0 | - | - | Week animation 37 |
| Jigoku Gokurakuotoshi1 = hcbx2+A/C | 20 | 0 | 1 | - | Freeze 29, whiff80(51) |
| Jigoku Gokurakuotoshi2-4 | 20 | 0 | - | - | |
| Jigoku Gokurakuotoshi5 | 150 | 0 | - | - | |
| EX Jigoku Gokurakuotoshi1 = hcbx2+AC | 20 | 0 | 1 | - | Freeze 29, Whiff 80(51) |
| EX Jigoku Gokurakuotoshi2-8 | 20 | 0 | - | - | |
| EX Jigoku Gokurakuotoshi9 | 100 | 0 | - | - | |
| EX Jigoku Gokurakuotoshi10 | 80 | 0 | - | - | |
| Kyokuten Douchi = qcfx2+AC | 480 | 0 | 1-30 | - | Full animation 41 |
Videos
Juicy Bits: Daimon Tutorial
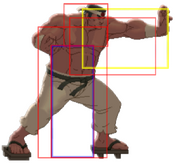
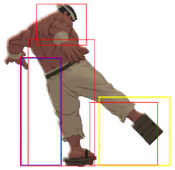
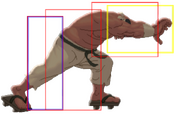
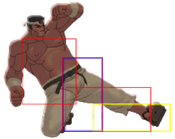
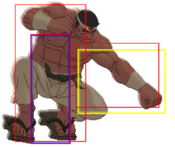
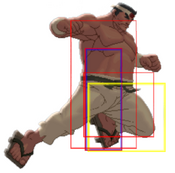
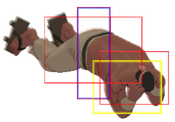
Daimon Hit Boxes
Contributors
Links & References
http://game.snkplaymore.co.jp/official/kof-xiii/blog/archives/2012/04/post_66.html
Discussion Threads
Discuss at Dream Cancel
