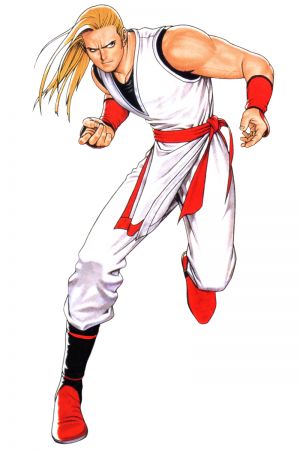
Andy Bogard, despite not being the poster child, plays the most traditional fireball-and-uppercut game in Real Bout 2. A strong defensive character, he has lots of powerful zoning tools and moves that can get him out of tight situations. He's fairly cut-and-dry even compared to the other characters that share his archetype, but his strong points truly shine when a patient and calculated player is controlling him.
Pros
Cons
Good fireball traps and zoning
Can anti-air from afar with Shoryudan
Long range High Avoid attack that can convert easily into further damage
Versatile Breakshots
Lame offense with no high/low threat
Most normals are average at best
His fireball doesn't travel the full length of the screen and only has one speed
Normals
Standing
5A
Damage
Stun
Startup
Active
Recovery
Hit Advantage
Block Advantage
Guard
Cancel
BS
Juggle
8
-
5
4
8
4
0
HL
Y
-
-
A standard 5A with good chaining options. 5A>C is a solid chain as it can cancel and reaches quite far, and can be done on whiff to smack someone trying to punish your 5A. You can also chain with 5A>B, which allows you to access Andy's B chains. These also self chain, giving you very easy hitconfirms.
n.5A (within 46 px of opponent)
Damage
Stun
Startup
Active
Recovery
Hit Advantage
Block Advantage
Guard
Cancel
BS
Juggle
8
-
5
4
8
4
0
HL
Y
-
-
Functionally identical to far A.
5B
Damage
Stun
Startup
Active
Recovery
Hit Advantage
Block Advantage
Guard
Cancel
BS
Juggle
10
-
7
5
10
1
-3
HL
Y
-
-
A nice long range kick. Cancels and has good chaining options. More or less your go-to midrange poke. Combos to Dan Da Dan as well, making for a devastating whiff punish and a great hitconfirm tool off of 2A or 5A (2A > 2A > 2A > 5B > Dan Da Dan for example).
n.5B (within 53 px of opponent)
Damage
Stun
Startup
Active
Recovery
Hit Advantage
Block Advantage
Guard
Cancel
BS
Juggle
10
-
5
6
9
1
-3
HL
Y
-
-
A version of 5B with faster startup and identical chain options to far B. The faster startup keeps it relevant in scrambles, where it's tied for all of Andy's A's in startup, but has some better chaining options. Similarly to 5B, this is useful for confirming into Dan Da Dan.
5C
Damage
Stun
Startup
Active
Recovery
Hit Advantage
Block Advantage
Guard
Cancel
BS
Juggle
23
-
8
6
20
0
-6
HL
N
-
-
A long range smack. Fast startup for a C makes this okay to smack the opponent with sometimes, but the lack of cancel and the large recovery make it a little risky. Still great to poke the opponent with regardless.
n.5C (within 52 px of opponent)
Damage
Stun
Startup
Active
Recovery
Hit Advantage
Block Advantage
Guard
Cancel
BS
Juggle
10,10
-
8
2,3
20
3
-3
HL
Y
-
-
A classic 2 hit n.C. The upward kick animation also means this doubles as a pretty handy anti-air when you aren't confident in a Shoryudan. Lacks any chain options at all however, pretty much nullifying any use as a pressure starter.
Crouching
2A
Damage
Stun
Startup
Active
Recovery
Hit Advantage
Block Advantage
Guard
Cancel
BS
Juggle
8
-
5
5
7
4
0
HL
Y
-
-
A crouch jab with decent frame data and decent chaining options. You can opt to either go into a 5A>C after this, or to chain into Andy's kick chains. Their ability to self chain is just as useful as it is on 5A, letting you easily hitconfirm them into a 5A > C > C Zanei Ken.
2B
Damage
Stun
Startup
Active
Recovery
Hit Advantage
Block Advantage
Guard
Cancel
BS
Juggle
10
-
5
6
9
1
-3
L
Y
-
-
Andy's main low and one of your go-to combo starters. While there isn't too much mixup present on a blocked 2B, you can stagger really easily with repeated 2B's, allowing you to open up pressure with hop B more or work in throws. Also useful as a trip anti-air.
2C
Damage
Stun
Startup
Active
Recovery
Hit Advantage
Block Advantage
Guard
Cancel
BS
Juggle
10
-
8
6
20
KD
-6
L
Y
-
-
A decent sweep. Not quite as long range as you might want it to be, but 2C > Hisho Ken is still a good buffer option.
Command
Rising Palm 3A
Damage
Stun
Startup
Active
Recovery
Hit Advantage
Block Advantage
Guard
Cancel
BS
Juggle
19
-
7
2,9
20
-5
-11
HL
Y
-
-
Andy's 3A is a pretty decent anti-air, and it comes with some fancy (but largely useless) chaining options. You'll almost always want to go for Shoryudan over this however.
Command
Falling Roll Kick 6B
Damage
Stun
Startup
Active
Recovery
Hit Advantage
Block Advantage
Guard
Cancel
BS
Juggle
19
-
12
2,3
20
3
-3
HL
N
-
-
Andy does a little handstand flip kick. Solid range and a hitbox that can be quite good at catching jumps make this a decent poke in neutral, though be careful not to whiff. Prone to the opponent neutral jumping.
Lean Down Kick 5AB
High Avoid Attack
Damage
Stun
Startup
Active
Recovery
Hit Advantage
Block Advantage
Guard
Cancel
BS
Juggle
14
-
10
6
23
-3
-9
HL
Y
-
-
A really really good high avoid attack. Range identical to Andy's amazing 5B but with upper body invincibility on the startup of it, and the ability to cancel for easy knockdowns with C Zanei Ken or safe buffers to Hisho Ken make this an amazing counterpoke tool. Not so great as an anti-air, but Andy has plenty of other options for that.
Jumping
j.A
Version
Damage
Stun
Startup
Active
Recovery
Hit Advantage
Block Advantage
Guard
Cancel
BS
Juggle
Neutral Hop
8
-
5
till landing
6
+8
+4
H
N
-
-
Diagonal Hop
8
-
5
till landing
6
+8
+4
H
N
-
-
Neutral Jump
8
-
5
8
6
+8
+4
H
-
-
-
Diagonal Jump
8
-
5
10
6
+8
+4
H
-
-
-
A solid enough air to air. The hop versions remain active until landing, making things like neutral hop A a good option to wall out an opponent who likes to hop at you a lot.
j.B
Version
Damage
Stun
Startup
Active
Recovery
Hit Advantage
Block Advantage
Guard
Cancel
BS
Juggle
Neutral Hop
10
-
6
till landing
6
+8
+4
H
N
-
-
Diagonal Hop
10
-
6
till landing
6
+8
+4
H
N
-
-
Neutral Jump
10
-
6
6
6
+8
+4
H
Y
-
-
Diagonal Jump
10
-
6
8
6
+8
+4
H
Y
-
-
A deep hitting kick with a nasty hitbox that can be extremely difficult to anti-air. Hop B remains active until landing like hop A, but this finds much more use in offense where hop B can blow through anti-airs early.
j.C
Neutral Jump/HopDiagonal Jump/Hop
Version
Damage
Stun
Startup
Active
Recovery
Hit Advantage
Block Advantage
Guard
Cancel
BS
Juggle
Neutral Hop
19
-
8
8
8
+15
+9
H
N
-
-
Diagonal Hop
19
-
8
8
8
+15
+9
H
N
-
-
Neutral Jump
19
-
8
6
8
+15
+9
H
Y
-
-
Diagonal Jump
19
-
8
6
8
+15
+9
H
Y
-
-
More or less your standard j.C. Long range, high damage and hitstun for easy combos, and a decent hitbox.
Oversway Actions
5D (opponent in oversway)
Damage
Stun
Startup
Active
Recovery
Hit Advantage
Block Advantage
Guard
Cancel
BS
Juggle
19
-
9
5
20
-1
12
H
Y
-
-
The usual 5D. Swats the opponent out of the backplane as an overhead, and can be cancelled for a combo.
2D (opponent in oversway)
Damage
Stun
Startup
Active
Recovery
Hit Advantage
Block Advantage
Guard
Cancel
BS
Juggle
19
-
10
4,5
16
1
-5
L
Y
-
-
The usual 2D. Mostly exists to open them up to 5D more, but it also notably has longer range, letting you catch opponents out of the backlane from farther away.
A (from oversway)
Damage
Stun
Startup
Active
Recovery
Hit Advantage
Block Advantage
Guard
Cancel
BS
Juggle
10
-
24
3
13
3
-1
H
N
-
-
Overhead option out of sway. Can use this to hop over the opponents 2D attempt for a little damage, but can't be combo'd from.
B (from oversway)
Damage
Stun
Startup
Active
Recovery
Hit Advantage
Block Advantage
Guard
Cancel
BS
Juggle
10
-
20
4
16
1
-1
L
N
-
-
Low option out of sway. The low profile hurtbox can dodge under a 5D or an attempted punish.
C (from oversway)
Damage
Stun
Startup
Active
Recovery
Hit Advantage
Block Advantage
Guard
Cancel
BS
Juggle
19
-
24
4
11
12
-2
HL
N
-
-
A big mid out of oversway that can link into normals on hit. Useful to start punishes, like if you backswayed through a fireball or dp.
Throw
Uchimata 4/6C
Damage
Stun
Startup
Active
Recovery
Hit Advantage
Block Advantage
Guard
Cancel
BS
Juggle
26
-
-
-
-
-
-
-
-
-
-
Andy tosses the opponent over his shoulder. Gives you plenty of time for oki.
Feints
Feint Choreppa Dan 2BC
Damage
Stun
Startup
Active
Recovery
Hit Advantage
Block Advantage
Guard
Cancel
BS
Juggle
-
-
-
-
32
-
-
-
-
-
-
Andy squats down like he's doing Choreppa Dan but quickly gets back up. Extremely long animation and feinting a move you almost never do in neutral make this feint useless in both pressure and neutral.
Feint Hi Sho Ken 2AC
Damage
Stun
Startup
Active
Recovery
Hit Advantage
Block Advantage
Guard
Cancel
BS
Juggle
-
-
-
-
18
-
-
-
-
-
-
One of Andy's three feints. Can open up pressure a bit for the otherwise lackluster Andy offense, but doesn't really offer up any new routes. You can also use this as a neutral mindgame to bait out a jump or any other anti-fireball and punish with Shoryudan.
Feint Zanei Ken 6AC
Damage
Stun
Startup
Active
Recovery
Hit Advantage
Block Advantage
Guard
Cancel
BS
Juggle
-
-
-
-
18
-
-
-
-
-
-
Andy feints Zanei Ken. Identical frame data to Feint Hisho Ken means fairly identical uses. Zanei Ken does have some usage in neutral, but this one doesn't work quite as well as a mindgame.
Special Moves
Hi Sho Ken/Geki Hi Sho Ken 214A/C
A versionC version
Version
Damage
Stun
Startup
Active
Recovery
Hit Advantage
Block Advantage
Guard
Cancel
BS
Juggle
A
16
-
12
-
49 total
1
-3
HL
-
Y
Y
Andy's fireball. Solid zoning tool and midrange poke, and an easy buffer off of Andy's normals as it's fairly safe on block. You'll harass the opponent into making mistakes with this.
C
10,8,8,8,8(35)
-
10
9(7)12
37
-18
-20
HL
-
Y
-
Andy does a big energy ball. DO NOT USE. Extremely negative on both hit and block, doesn't knock down, and resets on air hit leaving Andy crazy negative.
Shoryudan 623C
Damage
Stun
Startup
Active
Recovery
Hit Advantage
Block Advantage
Guard
Cancel
BS
Juggle
12,10,10,10
-
3
9
58
-9
-36
HL
-
Y
-
Andy's DP. Extremely fast startup, lots of range, a hitbox that catches crossups, it does almost everything you would want a DP to do without being Sky of Fire. Your go-to anti-air and reversal. Can also be used in max damage corner combos.
Zanei Ken 16A/C
C version follow-up
Version
Damage
Stun
Startup
Active
Recovery
Hit Advantage
Block Advantage
Guard
Cancel
BS
Juggle
A
28
-
10
17
8
1
-5
HL
-
Y
-
A Zanei Ken mostly sees use as a buffer or fast neutral tool. Andy covers a lot of ground fast, and it can be relatively hard or even impossible to punish. Meshes well with Andy's midrange playstyle.
Version
Damage
Stun
Startup
Active
Recovery
Hit Advantage
Block Advantage
Guard
Cancel
BS
Juggle
C
32
-
11
19
8
-2
-8
HL
-
-
-
Trades off the safety of the A version for longer range and a followup that knocks down.
Version
Damage
Stun
Startup
Active
Recovery
Hit Advantage
Block Advantage
Guard
Cancel
BS
Juggle
C>16C
11
-
8
6
28
KD
-11
HL
-
N
-
Mostly just exists to allow you to get a knockdown off of C Zanei Ken. Be sure to hitconfirm this, as -11 is enough for just about anyone to punish you.
Kuhadan 1236B
Damage
Stun
Startup
Active
Recovery
Hit Advantage
Block Advantage
Guard
Cancel
BS
Juggle
12,29(37)
-
14
10,5
4
1
-11
-
-
Y
-
Andy does a big screwdriver spinning kick. Can kinda work as a hail mary sometimes, but Zanei Ken covers that much better. It has extremely high priority though, but if this whiffs or gets blocked you die. Mostly you'll use this to end A/B > B > 3C chains for your highest damage combos.
Genei Shiranui j.214D
Damage
Stun
Startup
Active
Recovery
Hit Advantage
Block Advantage
Guard
Cancel
BS
Juggle
10,26(32)
-
14
till landing(24), 4
20
4
-2
HL
-
N
-
Andy's divekick is kinda unique. On hit or block it immediately transitions to Andy jumping into Oversway before coming back in with an Oversway C. This version of Oversway C has much less hitstun however, not enough to get a combo from. The followup does mean that your frame data here is pretty much always the same, though whether the followup combos or not can be affected by how the divekick connects.
S-Power
Choreppa Dan 21416BC
Damage
Stun
Startup
Active
Recovery
Hit Advantage
Block Advantage
Guard
Cancel
BS
Juggle
20,20,20,29
-
18
7,6,3,12
29
KD
-10
HL
-
Y
-
A super version of Choreppa Dan. Not very combo friendly, and extremely unsafe on block. Only combo's from n.C or the B > 3C launcher, but as a juggle it loses out on damage. Midscreen it beats a regular Choreppa Dan in damage, but in the corner where you can link Shoryudan, it actually does less damage.
P-Power
Dan Da Dan 21416C (Mash C)
Damage
Stun
Startup
Active
Recovery
Hit Advantage
Block Advantage
Guard
Cancel
BS
Juggle
24,11,16,18,45(91)
-
1+12
2,[(4),1]*3(21),3
12
KD
-4
HL
-
N
-
A very solid P-Power. Can be almost used as a mini Houou Kyaku, as it combos from 5B even at the tip of its range. It's harder to hitconfirm than Houou Kyaku since you have to cancel 5B as soon as it hits, though it is only -4, making it a difficult move to punish. There is a gap on block before the final hit, which the opponent can use as a way to punish consistently however, either by using an invincible move, a strong Breakshot, or sidestepping to avoid it. Always mash C for the extra damage.