-Happy New Year 2025!
Samurai Shodown VI/Spirits: Difference between revisions
Created page with "==I Spirit (怒 Rage)== File:1spirit.png '''Properties''' *Your Weapon Gauge will increase from 100% to 180% when in Rage. *Your Rage retention is ~73%. *Your Rage durati..." |
m Minor text corrections. |
||
| (66 intermediate revisions by 4 users not shown) | |||
| Line 1: | Line 1: | ||
==I Spirit (怒 Rage)== | Spirits are subsystems which alter your Rage values, Weapon Gauge and defense while giving you access to various mechanics. They are similar in concept to Grooves from Capcom vs. SNK 2, particularly in that they have been inspired by the unique mechanics of their respective Samurai Shodown entry but they are not exact replicas. There are three extra Spirits which are only available in the console ports. | ||
==Arcade== | |||
===I Spirit (怒 Rage)=== | |||
[[File:1spirit-icon.png|right]] | |||
[[File:1spirit.png]] | [[File:1spirit.png]] | ||
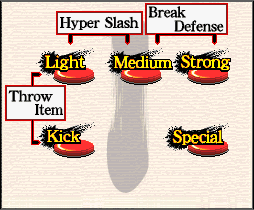
Essentially the X-ism of Samurai Shodown VI. I Spirit removes your ability to perform WFTs of any sort but boosts your damage tremendously when in Rage. Furthermore, you gain access to a Hyper Slash, a slow, highly-damaging slash attack which will absorb one hit of damage but is vulnerable to Deflects. Only recommended if your character doesn't have any use for WFTs or Meditation but appreciates the burst damage. | |||
*You do not have access to WFTs. | *You do not have access to WFTs. | ||
'''Hyper Slash''' - A+B | '''Hyper Slash''' - A+B | ||
*A powerful, delayed strike which is essentially a | *A powerful, delayed strike which is essentially a souped-up heavy slash. During the attack your character can absorb one hit of anything (even WFTs) and continue the attack uninterrupted, although you still take all the damage. If you get hit by something with multiple hits, the Hyper Slash will stop. Performing this move will furthermore drain your entire Weapon Gauge, but on hit it will result in a soft knockdown. Damage differs between characters. | ||
*Hyper Slash's armor bleeds into its active frames, and while armored you cannot be knocked down. If two Hyper Slashes connect on the same frame, both players will take the damage and remain standing. | |||
*This move can not be special cancelled into, but it can be recoil cancelled into. | |||
*If this move is deflected you will be left disarmed. | |||
*Any absorbed hit will contribute to the opponent's combo count. | |||
*The opponent's hurtbox disappears after getting hit by Hyper Slash, disabling any juggles afterwards. | |||
*If a special move such as [[Samurai Shodown VI/Basara|Basara]]'s 236D hits at the same time as Hyper Slash, the former's hit properties will override the latter's. In this example, the opponent would be fully actionable while the player would be stuck in Hyper Slash's extended hitstun, leaving them wide open to a Counter Hit punish. | |||
==II Spirit (真 True)== | ===II Spirit (真 True)=== | ||
[[File:2spirit-icon.png|right]] | |||
[[File:2spirit.png]] | [[File:2spirit.png]] | ||
' | One of two Spirits which gives you access to the advanced movement system, though unlike V Spirit you only have access to neutral hops. When you have reached Rage and finished recovering from an attack, your character will activate a fully invincible pose which can be cancelled into most things at any point. Furthermore, your WFTs will destroy the opponent's weapon. II Spirit also has access to Secret Moves, which can be performed once per match at any point but have complex inputs. This Spirit is recommended for characters who both appreciate having roll cancels to get in with and can put Rage to good use. | ||
*When your Rage activates and you finish recovering from an attack, your character will be put into a fully invincible pose for a brief period of time. This can be cancelled into a throw, Deflect/Weapon Catch, dashes, E-button movement (though you can only cancel into neutral hop with 4E), special moves, WFTs, or Secret Moves. It cannot be cancelled into crouches, jumps, normals, command normals, taunts, or Toy Transformations. In the arcade version, this pose is the only way to escape throw loops from [[Samurai Shodown VI/Gaira|Gaira]] and [[Samurai Shodown VI/Mizuki|Mizuki]]. | |||
*When your Rage activates and you finish recovering from an attack, your character will be put into a fully invincible pose for a brief period of time. This can be cancelled into a throw, | |||
*Upon landing a WFT, the opponent's weapon will break. | *Upon landing a WFT, the opponent's weapon will break. | ||
'''Roll''' - 1/3E | '''Roll''' - 1/3E | ||
*Your character will roll a set distance forward or backward. There is a brief period during the roll where you are fully invincible, but afterwards you will be able to take strike damage or be thrown. You will maintain a low profile, however. There is a brief period in every character's roll where it can be special cancelled, which is particularly useful for characters with command grabs or fast zoning tools. | *Your character will roll a set distance forward or backward. There is a brief period during the roll where you are fully invincible, but afterwards you will be able to take strike damage or be thrown. You will maintain a low profile, however. There is a brief period in every character's roll where it can be special cancelled, which is particularly useful for characters with command grabs or fast zoning tools. Rolls can also be canceled into Deflect. | ||
'''Lie | '''Lie Down/Duck''' - 2E | ||
*Your character will lie down for a brief period of time. They maintain a low profile and are immune to throws by the first frame. | *Your character will lie down for a brief period of time. They maintain a low profile and are immune to throws by the first frame. | ||
'''Neutral | '''Neutral Hop''' - 4E (E on its own will usually work) | ||
*Your character will hop in place for a brief period of time. They maintain a high profile and are immune to throws by the first frame. | *Your character will hop in place for a brief period of time. They maintain a high profile and are immune to throws by the first frame. | ||
'''Toy Transformation''' | '''Toy Transformation''' | ||
*Every character receives a new taunt reminiscent of the | *Every character receives a new taunt reminiscent of the Toy Transformations in Samurai Shodown II. The input is different for each character. Transformations are fully invulnerable for a brief period on startup and can cancel into specials at any time. | ||
*These moves cannot be done unarmed. | |||
'''Secret Move''' | '''Secret Move''' | ||
*A powerful move which can be | *A powerful move which can only be performed once per match. Unlike in VI Spirit, the input is different for each character. | ||
===III Spirit (斬 Behead)=== | |||
[[File:3spirit-icon.png|right]] | |||
[[File:3spirit.png]] | [[File:3spirit.png]] | ||
One of two Spirits which gives you access to dodges and sways. In addition to these evasive manuevers, III Spirit also gives you access to an air parry, which behaves similarly to those in 3rd Strike but has a whiff animation. You can also charge your Rage manually, and at a certain threshold you will have access to unlimited Rage. These qualities are appreciated by characters who rely on jumping to get in and who have plenty of opportunities to charge, but Rage resetting at the end of a round is detrimental to characters who have a hard time building it. | |||
*When your health is in the orange region, starting from 10%, you will remain in Rage without it depleting. This gives you a constant damage boost and unlimited access to WFTs. | *When your health is in the orange region, starting from 10%, you will remain in Rage without it depleting. This gives you a constant damage boost and unlimited access to WFTs. | ||
*Rage does not carry over between rounds. | *Rage does not carry over between rounds. | ||
'''Dodge''' - E | |||
'''Dodge/Side Step''' - E | |||
*Your character dodges in place. You are invulnerable to strikes but you can still be thrown. | *Your character dodges in place. You are invulnerable to strikes but you can still be thrown. | ||
'''Sway''' - | '''Sway/Circle Step''' - n6E | ||
*Your character swerves around the opponent, switching sides. | *Your character swerves around the opponent, switching sides. The sway portion is fully invincible but the startup and recovery are vulnerable to strikes and throws. May lead into Back Hit combos. | ||
'''Air | '''Air Defense''' - jE | ||
*Essentially an air parry, which means you can fall into an opponent's anti-air safely and punish them but you still have to time it, | *Essentially an air parry, which means you can fall into an opponent's anti-air safely and punish them, but you still have to time it; moreover, it requires more commitment than simply holding back in the air. | ||
'''Rage | '''Rage Increase''' - [A+B] | ||
*Your character can charge in place to increase their Rage meter. Charging will build | *Your character can charge in place to increase their Rage meter. Charging will exponentially build more meter the longer you hold the buttons down. When attempting to perform this while your character is in Rage, they will simply pause for a few frames then stop. | ||
==IV Spirit (天 Heaven)== | ===IV Spirit (天 Heaven)=== | ||
[[File:4spirit-icon.png|right]] | |||
[[File:4spirit.png]] | |||
One of two Spirits which gives you access to dodges and sways. The main draw to this Spirit is Continuous Slash, which give characters stronger punishes and easy ways to confirm into their WFT. For some characters, it's their only way to combo into it. IV Spirit also grants access to Rage Explosion, a grounded burst which works a little like it does in Samurai Shodown (2019) in that you have more time in Rage the lower you are on health upon activation while also enabling access to Fatal Flash. If your character has a WFT worth using that they can't combo into from close medium slashes, give this Spirit a shot. | |||
'''Dodge/Side Step''' - E | |||
'''Dodge''' - E | |||
*Your character dodges in place. You are invulnerable to strikes but you can still be thrown. | *Your character dodges in place. You are invulnerable to strikes but you can still be thrown. | ||
'''Sway''' - | '''Sway/Circle Step''' - n6E | ||
*Your character swerves around the opponent, switching sides. | *Your character swerves around the opponent, switching sides. The sway portion is fully invincible but the startup and recovery are vulnerable to strikes and throws. May lead into Back Hit combos. | ||
'''Continuous Slash''' - A+B | '''Continuous Slash''' - A+B | ||
*'''Continuous Slash I''' - ... AAA | *'''Continuous Slash I''' - ... AAA | ||
| Line 66: | Line 70: | ||
*'''Continuous Slash III''' - ... CCD | *'''Continuous Slash III''' - ... CCD | ||
*'''Continuous Slash IV''' - ... AABBCCC | *'''Continuous Slash IV''' - ... AABBCCC | ||
*The low Weapon Gauge percentages are there to compensate for the potential damage output you get with Continuous Slash. CS1 and CS3 are simple dial-a-combos, but the end of CS2 is always special cancellable whether it be on the ground or in the air. Some characters' CS4 have a segment or two which | *The low Weapon Gauge percentages are there to compensate for the potential damage output you get with Continuous Slash. CS1 and CS3 are simple dial-a-combos with different effects per character, but the end of CS2 is always special cancellable whether it be on the ground or in the air. CS4 is a longer combo string that grants a chunk of Rage on the last hit, with the amount of gauge filled depending on the character's Rage retention. All of these will result in soft knockdowns on their own. CS2 and CS4 are generally the most useful for each character. | ||
* | *Continuous Slashes can be Deflected. | ||
*Continuous Slash starters have varying hitboxes and frame data but are always very minus on block and can't recoil or special cancel. | |||
*Kazuki, Nakoruru, Rera, and Ukyo have throw invulnerability during Continuous Slash startup. | |||
*Some characters' CS4 also have a segment or two which can cancel into specials: | |||
**AABBC: Amakusa, Sieger, Yumeji | |||
**AABBCC: Gaoh, Hanzo, Haohmaru, Sankuro, Ukyo, Wan-Fu | |||
**AABBCCC: Cham Cham, Shizumaru (Specials will not combo after.) | |||
'''Rage Explosion''' - ABC | '''Rage Explosion''' - ABC | ||
*This is a safe burst which can only be performed on the ground. This means it can only break combos if you haven't been launched. Upon Rage Explosion you will stay in a buffed version of Rage for an amount of time which is determined by the amount of health you have lost that round beforehand, with a maximum time of | *This is a safe burst which can only be performed on the ground. This means it can only break combos if you haven't been launched. Upon Rage Explosion, you will stay in a buffed version of Rage for an amount of time which is determined by the amount of health you have lost that round beforehand, with a maximum time of 10 seconds (this is not affected by your character's usual Rage duration). If you have 40% health remaining for instance, you will spend 6 seconds in Rage Explosion. If you burst at full health, you will have exactly zero seconds to work with. This will also replenish your Weapon Gauge. | ||
*Once either the timer for Rage Explosion runs out, you land a WFT or you use | *Once either the timer for Rage Explosion runs out, you land a WFT, or you use Issen, your meter is gone for the rest of the match. | ||
'''Fatal Flash''' - | '''Fatal Flash/Issen''' - ABC during Rage Explosion | ||
*During Rage Explosion you have access to a fast, fullscreen-travelling punish tool. Damage is determined by how much time you have remaining as represented by the current state of your meter. On block you quickly bounce back to fullscreen, which makes it safe but can potentially ruin your momentum. | *During Rage Explosion you have access to a fast, fullscreen-travelling punish tool. Damage is determined by how much time you have remaining as represented by the current state of your meter. On block you quickly bounce back to fullscreen, which makes it safe but can potentially ruin your momentum. | ||
==V Spirit (零 Null)== | ===V Spirit (零 Null)=== | ||
[[File:5spirit-icon.png|right]] | |||
[[File:5spirit.png]] | |||
One of two Spirits which gives you access to the advanced movement system. This Spirit requires serious devotion to Meditation, as V Spirit features the worst Rage duration modifier in the game but still a reasonable amount of retention. This Meditation goes towards State Of Nothingness, a one-time-use comeback mechanic that slows down time and allows you to go for some pretty serious combos that you couldn't pull off otherwise and punish moves you normally couldn't. These combos can be broken by Rage Explosion unless the opponent is being juggled in the air. This Spirit also gives you access to Rage Explosion if you absolutely must break a combo or need the damage, but you must choose between either Rage Explosion or State Of Nothingness, if either. This system works best for characters who often have space to meditate safely and who can make the most out of State Of Nothingness with fast mixups and launchers. | |||
'''Roll''' - 1/3E | '''Roll''' - 1/3E | ||
*Your character will roll a set distance forward or backward. There is a brief period during the roll where you are fully invincible, but afterwards you will be able to take strike damage or be thrown. You will maintain a low profile, however. There is a brief period in every character's roll where it can be special cancelled, which is particularly useful for characters with command grabs or fast zoning tools. | *Your character will roll a set distance forward or backward. There is a brief period during the roll where you are fully invincible, but afterwards you will be able to take strike damage or be thrown. You will maintain a low profile, however. There is a brief period in every character's roll where it can be special cancelled, which is particularly useful for characters with command grabs or fast zoning tools. Rolls can also be canceled into Deflect. | ||
'''Lie | '''Lie Down/Duck''' - 2E | ||
*Your character will lie down for a brief period of time. They maintain a low profile and are immune to throws by the first frame. | *Your character will lie down for a brief period of time. They maintain a low profile and are immune to throws by the first frame. | ||
'''Neutral | '''Neutral Hop''' - 4E | ||
*Your character will hop in place for a brief period of time. They maintain a high profile and are immune to throws by the first frame. | *Your character will hop in place for a brief period of time. They maintain a high profile and are immune to throws by the first frame. | ||
'''Forward | '''Forward Hop''' - 6E | ||
*Your character will hop forward. They maintain a high profile, though not as high as for neutral hops, and are immune to throws by the first frame. | *Your character will hop forward. They maintain a high profile, though not as high as for neutral hops, and are immune to throws by the first frame. | ||
'''Meditation''' - [A+B] | '''Meditation''' - [A+B] | ||
*Instead of letting your Rage accumulate, you can instead choose to meditate it away if you have a moment. This will expand the blue bar in your health gauge. | *Instead of letting your Rage accumulate, you can instead choose to meditate it away if you have a moment. This will expand the blue bar in your health gauge. | ||
'''Rage Explosion''' - ABC | '''Rage Explosion''' - ABC | ||
*This is a safe burst which can only be performed on the ground. This means it can only break combos if you haven't been launched. Upon Rage Explosion you will stay in a buffed version of Rage for | *This is a safe burst which can only be performed on the ground. This means it can only break combos if you haven't been launched. Upon Rage Explosion, you will stay in a buffed version of Rage for 7 seconds. This will also replenish your Weapon Gauge. | ||
*Once either the timer for Rage Explosion runs out or you land a WFT, your meter is gone for the rest of the match. | *Once either the timer for Rage Explosion runs out or you land a WFT, your meter is gone for the rest of the match. | ||
'''State | '''State Of Nothingness/Time Slow''' - D+E | ||
*If your health is in the blue area, starting at 10% but increasing as you meditate, and you're on a losing round, you can activate State | *If your health is in the blue area, starting at 10% but increasing as you meditate, and you're on a losing round, you can activate State Of Nothingness where time for the opponent slows to a crawl, allowing you to not only punish the opponent easily but lead into big combos thanks to the extended hitstun you get from slowed time. Characters with launchers are particularly effective in V Spirit as these types of combos are immune to Rage Explosion. The more you meditate, the more time you have to work with, though at minimum the game treats it as if you have meditated at least up to 33% which makes plenty of short, damaging combos in State Of Nothingness feasible. | ||
'''Fatal Flash''' - | *State Of Nothingness starts up instantly, and furthermore there is a brief period where you can move before your opponent unfreezes, making it easy to either block strikes or evade throws. | ||
*During State | '''Fatal Flash/Issen''' - ABC during State Of Nothingness | ||
*During State Of Nothingness you have access to a fast, fullscreen-travelling punish tool. Damage is determined by how much you have meditated. On block you quickly bounce back to fullscreen, which makes it safe but can potentially ruin your momentum. | |||
===VI Spirit (剣 Sword)=== | |||
[[File:6spirit-icon.png|right]] | |||
[[File:6spirit.png]] | [[File:6spirit.png]] | ||
'' | VI Spirit is unique in that it grants you a traditional meter system. You gain meter by attacking rather than getting hit, and while your meter doesn't drain when full, performing your WFT will use your entire meter even if it doesn't hit. You have access to special dodges that make attacks whiff while you gain a bit of meter, and furthermore you can spend a bit of meter on a pushblock if needed. Finally, VI grants unlimited access to Secret Moves which have simple inputs, but only if your health is in the green portion of your life bar. VI is useful for characters who are constantly fishing for ways to confirm into WFT and can build meter easily by playing aggressively. | ||
*You build Rage by hitting the opponent rather than getting hit yourself. This is unaffected by your defensive damage modifiers. | |||
* | |||
*Your Rage duration is unlimited until you perform a WFT or use Hyper Guard. | *Your Rage duration is unlimited until you perform a WFT or use Hyper Guard. | ||
'''Hyper Dodge/Mikiri''' | '''Hyper Dodge/Mikiri''' | ||
*'''Backward | *'''Backward Step''' - 5E | ||
*'''Lie | *'''Lie Down/Duck''' - 2E | ||
*'''Neutral | *'''Neutral Hop''' - 4/6E | ||
*These are special dodges which will parry different areas for attacks. Upon performing these dodges your character will perform an evasive manuever while a blue afterimage lurks briefly behind you. If your opponent hits this afterimage, you will recover quickly while the rest of their attack whiffs. Additionally you will | *These are special dodges which will parry different areas for attacks. Upon performing these dodges your character will perform an evasive manuever while a blue afterimage lurks briefly behind you. If your opponent hits this afterimage, you will recover quickly while the rest of their attack whiffs. Additionally you will gain a small amount of meter. If the Mikiri fails and they hit you, you will take regular damage. Generally speaking, backward steps will parry ranged pokes at their tip, ducking will parry upper attacks, and neutral hops will parry lower attacks. Additionally, both ducking and neutral hop will parry throws. | ||
'''Hyper Guard''' - A+B | '''Hyper Guard''' - A+B | ||
*You may only perform this move when your meter is flashing white, as it will cost you | *You may only perform this move when your meter is flashing white, as it will cost you 40 pixels of your meter. This is a parry which covers your entire body, negates chip damage, and pushes the opponent a great distance back from you as they continue to whiff the rest of their attack. This is mainly used for getting the opponent off of you rather than for punishes. | ||
*This will work on anything that can be blocked normally, meaning it will lose to throws and unblockable attacks. Interestingly, the opponent will be pushed back even if you Hyper Guard a fireball. | |||
*Hyper Guard can immediately cancel into jump, specials, and supers upon successfully guarding an attack. | |||
'''Secret Move''' - 236BC | '''Secret Move''' - 236BC | ||
*A powerful move which can be | *A powerful move which can be performed as much as you want if your health is in the green portion of your life bar, which starts off at 16% but will increase by a small amount depending on the strength of attack you parry. The green portion will reset back to 16% at the end of a round. After recovering from a Secret Move, the green portion will disappear for 2.5 seconds before recharging back to 16% at a rate of 1 pixel per frame, and once your life is back in the green range you may perform a Secret Move again. The nature of this regeneration means it technically takes a shorter amount of time to recharge the less life you have. | ||
==0 Spirit (魔 Demon)== | ==Console== | ||
===0 Spirit (魔 Demon)=== | |||
[[File:0spirit-icon.png|right]] | |||
[[File:0spirit.png]] | |||
''' | This was [[Samurai Shodown VI/Makai Gaoh|Makai Gaoh]]'s exclusive Spirit in the arcade version, but it is now freely selectable by anyone in the console ports. Being able to build Rage both offensively and defensively and then having access to a WFT which destroys the opponent's weapon means that this Spirit greatly benefits characters who have good WFTs. Roll cancels open up not only mixup options but also ways to land WFT depending on the character. If there's one character who would benefit the most from this Spirit, it's [[Samurai Shodown VI/Rasetsumaru|Rasetsumaru]] hands down. | ||
*You build Rage by either hitting the opponent or getting hit. The former is unaffected by your defensive damage modifiers. | |||
* | |||
*Your Rage duration is unlimited until you perform a WFT. | *Your Rage duration is unlimited until you perform a WFT. | ||
*Upon landing a WFT, the opponent's weapon will break. | *Upon landing a WFT, the opponent's weapon will break. | ||
'''Roll''' - E | '''Roll''' - E | ||
*Your character will roll a set distance forward or backward. There is a brief period during the roll where you are fully invincible, but afterwards you will be able to take strike damage or be thrown. You will maintain a low profile, however. There is a brief period in every character's roll where it can be special cancelled, which is particularly useful for characters with command grabs or fast zoning tools. | *Your character will roll a set distance forward or backward. There is a brief period during the roll where you are fully invincible, but afterwards you will be able to take strike damage or be thrown. You will maintain a low profile, however. There is a brief period in every character's roll where it can be special cancelled, which is particularly useful for characters with command grabs or fast zoning tools. | ||
==VII Spirit (獣 Beast)== | ===VII Spirit (獣 Beast)=== | ||
[[File:7spirit-icon.png|right]] | |||
[[File:7spirit.png]] | |||
''' | Most animals can't block IRL, so this is a Spirit designed around this limitation for four bonus characters who happen to be animals. Instead of blocking, the animals will have to rely on Mikiri Dodges, their own evasive maneuvers, and the Spirit-exclusive delayed wakeup to wade through an opponent's offense. To offset the low damage and range on the animals' normals, this Spirit unlocks access to a Magic Series which allows them to chain normals together for big damage. When applied to a regular character, the sheer damage potential of the Magic Series counterbalances the inability to block, making for a high-risk/high-reward Spirit choice. If you're playing a character like [[Samurai Shodown VI/Ukyo|Ukyo]] or [[Samurai Shodown VI/Yumeji|Yumeji]] with far-reaching light slashes then the sky's the limit. | ||
*This is the only Spirit which [[Samurai Shodown VI/Poppy|Poppy]], [[Samurai Shodown VI/Shikuru Mamahaha|Shikuru Mamahaha]], [[Samurai Shodown VI/Pak Pak|Pak Pak]], and [[Samurai Shodown VI/Chample|Chample]] can select. | |||
*This is the only Spirit which Poppy, Shikuru | |||
*You are unable to block. | *You are unable to block. | ||
'''S.C.S Samurai Combination System''' - 5A > 2A > 5D > 2D > 6D > 3D > 5B > 2B > 5C > 2C | |||
*Universal | '''S.C.S Samurai Combination System''' - 66X > 5A > 2A > 5D > 2D > 6D > 3D > 5B > 2B > 5C > 2C > Command Move | ||
* | *Universal Magic Series which opens up new possible combos. An example combo with [[Samurai Shodown VI/Haohmaru|Haohmaru]] is n5A n2A 6D n5B n5C. Projectile-esque attacks such as Basara's far B and C normals can not be chained from. Can be done unarmed. | ||
'''Play Possum''' - | *In Samurai Shodown, if an opponent is hit by a heavy attack while in hitstun from a previous heavy attack, they will fall into a soft knockdown. This rule applies to S.C.S as well. 5D n5C with [[Samurai Shodown VI/Basara|Basara]] will cause a knockdown but 5D n5B n5C will not. | ||
*Delayed wakeup. If you hold down for as long as possible ( | '''Play Possum''' - Hold 1, 2 or 3 while knocked down. | ||
*Delayed wakeup. If you hold down for as long as possible (5 seconds) you will restore a bit of life, but this can be interrupted if the opponent lands a pursuit and you will rise immediately. | |||
'''Hyper Dodge/Mikiri''' | '''Hyper Dodge/Mikiri''' | ||
*'''Backward | *'''Backward Step''' - 5E | ||
*'''Lie | *'''Lie Down''' - 2E | ||
*'''Neutral | *'''Neutral Hop''' - 4/6E | ||
*This is what you have to work with instead of blocking. Unlike in VI Spirit you will not gain any meter from a successful Mikiri. | *This is what you have to work with instead of blocking. Unlike in VI Spirit, you will not gain any meter from a successful Mikiri. | ||
===VIII Spirit (祭 Festival)=== | |||
[[File:8spirit-icon50.png|right]] | |||
[[File:8spirit-icon300.png|right]] | |||
[[File:8spirit.png]] | |||
This is a custom Spirit mode where you can mix and match any of the subsystems listed above. You can work within a limit of either 50 or 300 points, in which the maximum amount of points you can use is 252. | |||
'''Spirits Edit Mode''' | '''Spirits Edit Mode''' | ||
*There are eight slots for custom systems, in which up to 50 points may be spent on different system mechanics (the exception is forfeiting your ability to block, which will | *There are eight slots for custom systems, in which up to 50 points may be spent on different system mechanics (the exception is forfeiting your ability to block, which will grant you an extra eight points). The last two of these slots, distinguished by a blue logo instead of an orange logo, give the player 300 points to work with instead. Below are the selectable subsystems unique to VIII Spirit: | ||
'''Continue Cancel''' | '''Continue Cancel''' | ||
*You can perform consecutive Mikiri moves. | *You can perform consecutive Mikiri moves. | ||
| Line 172: | Line 175: | ||
*You are allowed to walk and crouch before the round starts. | *You are allowed to walk and crouch before the round starts. | ||
'''Samurai Drive''' | '''Samurai Drive''' | ||
*Certain special moves are super cancellable into WFTs and Secret Moves. Some Secret Moves are super cancellable into | *Certain special moves are super cancellable into WFTs and Secret Moves. Some Secret Moves are super cancellable into WFTs but not into themselves. An example combo with [[Samurai Shodown VI/Haohmaru|Haohmaru]] is 421S SM 236AB. | ||
{{Navbox SS6}} | {{Navbox SS6}} | ||
[[Category:Samurai Shodown VI]] | [[Category:Samurai Shodown VI]] | ||
Latest revision as of 20:32, 19 June 2024
Spirits are subsystems which alter your Rage values, Weapon Gauge and defense while giving you access to various mechanics. They are similar in concept to Grooves from Capcom vs. SNK 2, particularly in that they have been inspired by the unique mechanics of their respective Samurai Shodown entry but they are not exact replicas. There are three extra Spirits which are only available in the console ports.
Arcade
I Spirit (怒 Rage)

Essentially the X-ism of Samurai Shodown VI. I Spirit removes your ability to perform WFTs of any sort but boosts your damage tremendously when in Rage. Furthermore, you gain access to a Hyper Slash, a slow, highly-damaging slash attack which will absorb one hit of damage but is vulnerable to Deflects. Only recommended if your character doesn't have any use for WFTs or Meditation but appreciates the burst damage.
- You do not have access to WFTs.
Hyper Slash - A+B
- A powerful, delayed strike which is essentially a souped-up heavy slash. During the attack your character can absorb one hit of anything (even WFTs) and continue the attack uninterrupted, although you still take all the damage. If you get hit by something with multiple hits, the Hyper Slash will stop. Performing this move will furthermore drain your entire Weapon Gauge, but on hit it will result in a soft knockdown. Damage differs between characters.
- Hyper Slash's armor bleeds into its active frames, and while armored you cannot be knocked down. If two Hyper Slashes connect on the same frame, both players will take the damage and remain standing.
- This move can not be special cancelled into, but it can be recoil cancelled into.
- If this move is deflected you will be left disarmed.
- Any absorbed hit will contribute to the opponent's combo count.
- The opponent's hurtbox disappears after getting hit by Hyper Slash, disabling any juggles afterwards.
- If a special move such as Basara's 236D hits at the same time as Hyper Slash, the former's hit properties will override the latter's. In this example, the opponent would be fully actionable while the player would be stuck in Hyper Slash's extended hitstun, leaving them wide open to a Counter Hit punish.
II Spirit (真 True)

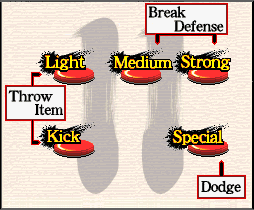
One of two Spirits which gives you access to the advanced movement system, though unlike V Spirit you only have access to neutral hops. When you have reached Rage and finished recovering from an attack, your character will activate a fully invincible pose which can be cancelled into most things at any point. Furthermore, your WFTs will destroy the opponent's weapon. II Spirit also has access to Secret Moves, which can be performed once per match at any point but have complex inputs. This Spirit is recommended for characters who both appreciate having roll cancels to get in with and can put Rage to good use.
- When your Rage activates and you finish recovering from an attack, your character will be put into a fully invincible pose for a brief period of time. This can be cancelled into a throw, Deflect/Weapon Catch, dashes, E-button movement (though you can only cancel into neutral hop with 4E), special moves, WFTs, or Secret Moves. It cannot be cancelled into crouches, jumps, normals, command normals, taunts, or Toy Transformations. In the arcade version, this pose is the only way to escape throw loops from Gaira and Mizuki.
- Upon landing a WFT, the opponent's weapon will break.
Roll - 1/3E
- Your character will roll a set distance forward or backward. There is a brief period during the roll where you are fully invincible, but afterwards you will be able to take strike damage or be thrown. You will maintain a low profile, however. There is a brief period in every character's roll where it can be special cancelled, which is particularly useful for characters with command grabs or fast zoning tools. Rolls can also be canceled into Deflect.
Lie Down/Duck - 2E
- Your character will lie down for a brief period of time. They maintain a low profile and are immune to throws by the first frame.
Neutral Hop - 4E (E on its own will usually work)
- Your character will hop in place for a brief period of time. They maintain a high profile and are immune to throws by the first frame.
Toy Transformation
- Every character receives a new taunt reminiscent of the Toy Transformations in Samurai Shodown II. The input is different for each character. Transformations are fully invulnerable for a brief period on startup and can cancel into specials at any time.
- These moves cannot be done unarmed.
Secret Move
- A powerful move which can only be performed once per match. Unlike in VI Spirit, the input is different for each character.
III Spirit (斬 Behead)

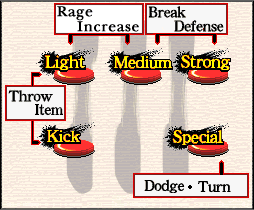
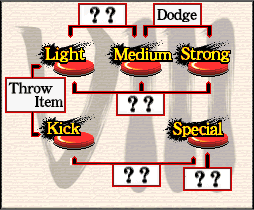
One of two Spirits which gives you access to dodges and sways. In addition to these evasive manuevers, III Spirit also gives you access to an air parry, which behaves similarly to those in 3rd Strike but has a whiff animation. You can also charge your Rage manually, and at a certain threshold you will have access to unlimited Rage. These qualities are appreciated by characters who rely on jumping to get in and who have plenty of opportunities to charge, but Rage resetting at the end of a round is detrimental to characters who have a hard time building it.
- When your health is in the orange region, starting from 10%, you will remain in Rage without it depleting. This gives you a constant damage boost and unlimited access to WFTs.
- Rage does not carry over between rounds.
Dodge/Side Step - E
- Your character dodges in place. You are invulnerable to strikes but you can still be thrown.
Sway/Circle Step - n6E
- Your character swerves around the opponent, switching sides. The sway portion is fully invincible but the startup and recovery are vulnerable to strikes and throws. May lead into Back Hit combos.
Air Defense - jE
- Essentially an air parry, which means you can fall into an opponent's anti-air safely and punish them, but you still have to time it; moreover, it requires more commitment than simply holding back in the air.
Rage Increase - [A+B]
- Your character can charge in place to increase their Rage meter. Charging will exponentially build more meter the longer you hold the buttons down. When attempting to perform this while your character is in Rage, they will simply pause for a few frames then stop.
IV Spirit (天 Heaven)

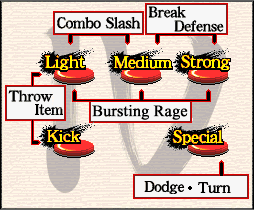
One of two Spirits which gives you access to dodges and sways. The main draw to this Spirit is Continuous Slash, which give characters stronger punishes and easy ways to confirm into their WFT. For some characters, it's their only way to combo into it. IV Spirit also grants access to Rage Explosion, a grounded burst which works a little like it does in Samurai Shodown (2019) in that you have more time in Rage the lower you are on health upon activation while also enabling access to Fatal Flash. If your character has a WFT worth using that they can't combo into from close medium slashes, give this Spirit a shot.
Dodge/Side Step - E
- Your character dodges in place. You are invulnerable to strikes but you can still be thrown.
Sway/Circle Step - n6E
- Your character swerves around the opponent, switching sides. The sway portion is fully invincible but the startup and recovery are vulnerable to strikes and throws. May lead into Back Hit combos.
Continuous Slash - A+B
- Continuous Slash I - ... AAA
- Continuous Slash II - ... BBC
- Continuous Slash III - ... CCD
- Continuous Slash IV - ... AABBCCC
- The low Weapon Gauge percentages are there to compensate for the potential damage output you get with Continuous Slash. CS1 and CS3 are simple dial-a-combos with different effects per character, but the end of CS2 is always special cancellable whether it be on the ground or in the air. CS4 is a longer combo string that grants a chunk of Rage on the last hit, with the amount of gauge filled depending on the character's Rage retention. All of these will result in soft knockdowns on their own. CS2 and CS4 are generally the most useful for each character.
- Continuous Slashes can be Deflected.
- Continuous Slash starters have varying hitboxes and frame data but are always very minus on block and can't recoil or special cancel.
- Kazuki, Nakoruru, Rera, and Ukyo have throw invulnerability during Continuous Slash startup.
- Some characters' CS4 also have a segment or two which can cancel into specials:
- AABBC: Amakusa, Sieger, Yumeji
- AABBCC: Gaoh, Hanzo, Haohmaru, Sankuro, Ukyo, Wan-Fu
- AABBCCC: Cham Cham, Shizumaru (Specials will not combo after.)
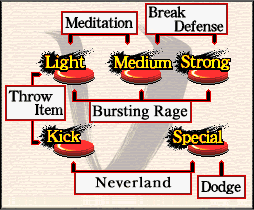
Rage Explosion - ABC
- This is a safe burst which can only be performed on the ground. This means it can only break combos if you haven't been launched. Upon Rage Explosion, you will stay in a buffed version of Rage for an amount of time which is determined by the amount of health you have lost that round beforehand, with a maximum time of 10 seconds (this is not affected by your character's usual Rage duration). If you have 40% health remaining for instance, you will spend 6 seconds in Rage Explosion. If you burst at full health, you will have exactly zero seconds to work with. This will also replenish your Weapon Gauge.
- Once either the timer for Rage Explosion runs out, you land a WFT, or you use Issen, your meter is gone for the rest of the match.
Fatal Flash/Issen - ABC during Rage Explosion
- During Rage Explosion you have access to a fast, fullscreen-travelling punish tool. Damage is determined by how much time you have remaining as represented by the current state of your meter. On block you quickly bounce back to fullscreen, which makes it safe but can potentially ruin your momentum.
V Spirit (零 Null)

One of two Spirits which gives you access to the advanced movement system. This Spirit requires serious devotion to Meditation, as V Spirit features the worst Rage duration modifier in the game but still a reasonable amount of retention. This Meditation goes towards State Of Nothingness, a one-time-use comeback mechanic that slows down time and allows you to go for some pretty serious combos that you couldn't pull off otherwise and punish moves you normally couldn't. These combos can be broken by Rage Explosion unless the opponent is being juggled in the air. This Spirit also gives you access to Rage Explosion if you absolutely must break a combo or need the damage, but you must choose between either Rage Explosion or State Of Nothingness, if either. This system works best for characters who often have space to meditate safely and who can make the most out of State Of Nothingness with fast mixups and launchers.
Roll - 1/3E
- Your character will roll a set distance forward or backward. There is a brief period during the roll where you are fully invincible, but afterwards you will be able to take strike damage or be thrown. You will maintain a low profile, however. There is a brief period in every character's roll where it can be special cancelled, which is particularly useful for characters with command grabs or fast zoning tools. Rolls can also be canceled into Deflect.
Lie Down/Duck - 2E
- Your character will lie down for a brief period of time. They maintain a low profile and are immune to throws by the first frame.
Neutral Hop - 4E
- Your character will hop in place for a brief period of time. They maintain a high profile and are immune to throws by the first frame.
Forward Hop - 6E
- Your character will hop forward. They maintain a high profile, though not as high as for neutral hops, and are immune to throws by the first frame.
Meditation - [A+B]
- Instead of letting your Rage accumulate, you can instead choose to meditate it away if you have a moment. This will expand the blue bar in your health gauge.
Rage Explosion - ABC
- This is a safe burst which can only be performed on the ground. This means it can only break combos if you haven't been launched. Upon Rage Explosion, you will stay in a buffed version of Rage for 7 seconds. This will also replenish your Weapon Gauge.
- Once either the timer for Rage Explosion runs out or you land a WFT, your meter is gone for the rest of the match.
State Of Nothingness/Time Slow - D+E
- If your health is in the blue area, starting at 10% but increasing as you meditate, and you're on a losing round, you can activate State Of Nothingness where time for the opponent slows to a crawl, allowing you to not only punish the opponent easily but lead into big combos thanks to the extended hitstun you get from slowed time. Characters with launchers are particularly effective in V Spirit as these types of combos are immune to Rage Explosion. The more you meditate, the more time you have to work with, though at minimum the game treats it as if you have meditated at least up to 33% which makes plenty of short, damaging combos in State Of Nothingness feasible.
- State Of Nothingness starts up instantly, and furthermore there is a brief period where you can move before your opponent unfreezes, making it easy to either block strikes or evade throws.
Fatal Flash/Issen - ABC during State Of Nothingness
- During State Of Nothingness you have access to a fast, fullscreen-travelling punish tool. Damage is determined by how much you have meditated. On block you quickly bounce back to fullscreen, which makes it safe but can potentially ruin your momentum.
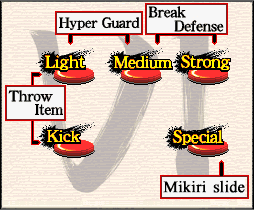
VI Spirit (剣 Sword)

VI Spirit is unique in that it grants you a traditional meter system. You gain meter by attacking rather than getting hit, and while your meter doesn't drain when full, performing your WFT will use your entire meter even if it doesn't hit. You have access to special dodges that make attacks whiff while you gain a bit of meter, and furthermore you can spend a bit of meter on a pushblock if needed. Finally, VI grants unlimited access to Secret Moves which have simple inputs, but only if your health is in the green portion of your life bar. VI is useful for characters who are constantly fishing for ways to confirm into WFT and can build meter easily by playing aggressively.
- You build Rage by hitting the opponent rather than getting hit yourself. This is unaffected by your defensive damage modifiers.
- Your Rage duration is unlimited until you perform a WFT or use Hyper Guard.
Hyper Dodge/Mikiri
- Backward Step - 5E
- Lie Down/Duck - 2E
- Neutral Hop - 4/6E
- These are special dodges which will parry different areas for attacks. Upon performing these dodges your character will perform an evasive manuever while a blue afterimage lurks briefly behind you. If your opponent hits this afterimage, you will recover quickly while the rest of their attack whiffs. Additionally you will gain a small amount of meter. If the Mikiri fails and they hit you, you will take regular damage. Generally speaking, backward steps will parry ranged pokes at their tip, ducking will parry upper attacks, and neutral hops will parry lower attacks. Additionally, both ducking and neutral hop will parry throws.
Hyper Guard - A+B
- You may only perform this move when your meter is flashing white, as it will cost you 40 pixels of your meter. This is a parry which covers your entire body, negates chip damage, and pushes the opponent a great distance back from you as they continue to whiff the rest of their attack. This is mainly used for getting the opponent off of you rather than for punishes.
- This will work on anything that can be blocked normally, meaning it will lose to throws and unblockable attacks. Interestingly, the opponent will be pushed back even if you Hyper Guard a fireball.
- Hyper Guard can immediately cancel into jump, specials, and supers upon successfully guarding an attack.
Secret Move - 236BC
- A powerful move which can be performed as much as you want if your health is in the green portion of your life bar, which starts off at 16% but will increase by a small amount depending on the strength of attack you parry. The green portion will reset back to 16% at the end of a round. After recovering from a Secret Move, the green portion will disappear for 2.5 seconds before recharging back to 16% at a rate of 1 pixel per frame, and once your life is back in the green range you may perform a Secret Move again. The nature of this regeneration means it technically takes a shorter amount of time to recharge the less life you have.
Console
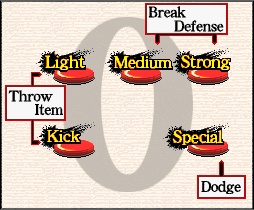
0 Spirit (魔 Demon)

This was Makai Gaoh's exclusive Spirit in the arcade version, but it is now freely selectable by anyone in the console ports. Being able to build Rage both offensively and defensively and then having access to a WFT which destroys the opponent's weapon means that this Spirit greatly benefits characters who have good WFTs. Roll cancels open up not only mixup options but also ways to land WFT depending on the character. If there's one character who would benefit the most from this Spirit, it's Rasetsumaru hands down.
- You build Rage by either hitting the opponent or getting hit. The former is unaffected by your defensive damage modifiers.
- Your Rage duration is unlimited until you perform a WFT.
- Upon landing a WFT, the opponent's weapon will break.
Roll - E
- Your character will roll a set distance forward or backward. There is a brief period during the roll where you are fully invincible, but afterwards you will be able to take strike damage or be thrown. You will maintain a low profile, however. There is a brief period in every character's roll where it can be special cancelled, which is particularly useful for characters with command grabs or fast zoning tools.
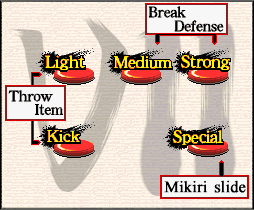
VII Spirit (獣 Beast)

Most animals can't block IRL, so this is a Spirit designed around this limitation for four bonus characters who happen to be animals. Instead of blocking, the animals will have to rely on Mikiri Dodges, their own evasive maneuvers, and the Spirit-exclusive delayed wakeup to wade through an opponent's offense. To offset the low damage and range on the animals' normals, this Spirit unlocks access to a Magic Series which allows them to chain normals together for big damage. When applied to a regular character, the sheer damage potential of the Magic Series counterbalances the inability to block, making for a high-risk/high-reward Spirit choice. If you're playing a character like Ukyo or Yumeji with far-reaching light slashes then the sky's the limit.
- This is the only Spirit which Poppy, Shikuru Mamahaha, Pak Pak, and Chample can select.
- You are unable to block.
S.C.S Samurai Combination System - 66X > 5A > 2A > 5D > 2D > 6D > 3D > 5B > 2B > 5C > 2C > Command Move
- Universal Magic Series which opens up new possible combos. An example combo with Haohmaru is n5A n2A 6D n5B n5C. Projectile-esque attacks such as Basara's far B and C normals can not be chained from. Can be done unarmed.
- In Samurai Shodown, if an opponent is hit by a heavy attack while in hitstun from a previous heavy attack, they will fall into a soft knockdown. This rule applies to S.C.S as well. 5D n5C with Basara will cause a knockdown but 5D n5B n5C will not.
Play Possum - Hold 1, 2 or 3 while knocked down.
- Delayed wakeup. If you hold down for as long as possible (5 seconds) you will restore a bit of life, but this can be interrupted if the opponent lands a pursuit and you will rise immediately.
Hyper Dodge/Mikiri
- Backward Step - 5E
- Lie Down - 2E
- Neutral Hop - 4/6E
- This is what you have to work with instead of blocking. Unlike in VI Spirit, you will not gain any meter from a successful Mikiri.
VIII Spirit (祭 Festival)


This is a custom Spirit mode where you can mix and match any of the subsystems listed above. You can work within a limit of either 50 or 300 points, in which the maximum amount of points you can use is 252.
Spirits Edit Mode
- There are eight slots for custom systems, in which up to 50 points may be spent on different system mechanics (the exception is forfeiting your ability to block, which will grant you an extra eight points). The last two of these slots, distinguished by a blue logo instead of an orange logo, give the player 300 points to work with instead. Below are the selectable subsystems unique to VIII Spirit:
Continue Cancel
- You can perform consecutive Mikiri moves.
Opening Action
- You are allowed to walk and crouch before the round starts.
Samurai Drive
- Certain special moves are super cancellable into WFTs and Secret Moves. Some Secret Moves are super cancellable into WFTs but not into themselves. An example combo with Haohmaru is 421S SM 236AB.
