The King of Fighters '98 UMFE/Clark Still
Introduction
Clark is the purest grappler in the game (perhaps any game), and as such his whole gameplan revolves around scoring a knockdown and then running his scary knockdown mixups over and over until the opponent is dead. In neutral Clark has to play a solid fundamental game using his decent normals and movement to try and get in on the opponent; he has no real anti-zoning measures, so he has to rely on careful decision-making to get in. Once Clark is in, he has an impressive vortex game where each move he lands will lead to a hard knockdown and another mixup situation. Clark requires a lot more mindgames and reading than most other characters as he always has to be one step ahead to choose the correct measure against the opponent's defensive decisions, but the upside of this is that he is never more than a couple of good guesses away from taking the entire round.
Changes from previous versions
98 to 98UM
Normals:
- st.D's recovery is 1 frame longer, and its priority is reduced
- st.D's priority reduced
- cr.D starts up 3 frames faster and recovers 3 frames longer
- st.CD has 7 frames faster startup
Specials:
- Mash P can now be cancelled with ABCD to stop it, and it can also be cancelled with dp+A for an ender
Supers:
- Added hcbx2+K, an anti-air grab super
98UM to 98UMFE
Normals:
- cl.B now has less recovery
- cr.D's recovery reduced by 4 frames
Normal Moves
Close
- cl.A: Same as st.A.
- cl.B: Clark's fastest normal at 2f so useful when you're up close and need the speed. Chainable and cancelable.
- cl.C: Very fast at 3f and his main heavy combo normal. Good for meaties due to its long active frames. Cancelable on the first hit.
- cl.D: Looks like a big anti-air, but Clark has better options in that department. Has low invul from startup until after the active frames, so it can be good for blowing up lows on a read.
Stand
- st.A: Has nice priority and a decent amount of active frames so it's good for stopping hops. Chainable and cancelable.
- st.B: A decent poke as it has good speed and priority.
- st.C: Lite version of Ralf's. Reaches really far but whiffs on most crouchers.
- st.D: Hits low crouchers, has better priority than st.C, and is faster, but it doesn't reach as far.
Crouch
- cr.A: Pretty standard. Could be good for tick throws if you cancel dp+K out of it. Chainable and cancelable.
- cr.B: Your main low combo starter and a core part of his mixup and pressure game. Not cancelable but you can link Super Argentine Backbreaker out of it. Chainable.
- cr.C: Has less range than his standing pokes, but has pretty fantastic frame data, with lots of active frames in particular. Can be used as a shorter ranged poke or as a meaty. Sadly not cancelable.
- cr.D: Fast sweep with decent range. As of this version it's decently safe if spaced.
Jump
- j.A: Your main jump-in button for combos, thanks to its downward angle. Comes out quite fast.
- j.B: Fast air-to-air normal, good for hitting characters straight in front of Clark.
- nj.B: Another air-to-air normal, with about the same range and priority as the non-neutral version.
- j.C: His most damaging air to air normal, so good for max damage punishes, but outclassed in other situations.
- j.D: Great air-to-air normal that hits above Clark. Especially good when done with a short hop.
- nj.D: Pretty slow air normal with a hitbox more suited to a jump-in, despite its neutral jump requirement.
Blowback
- st.CD: Has a large hitbox that essentially creates a wall in front of Clark, but it has quite a lot of startup. Good for whiff canceling.
- j.CD: Your main jump-in normal for pressure. Big hitbox, great angle.
Throws
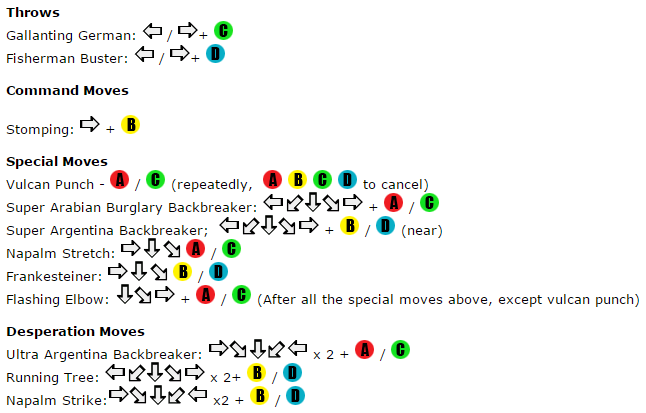
Gallanting German: b/f+C (close)
- Regular throw, techable. Clark goes behind the opponent and performs a release suplex, sending them full screen away with a soft knockdown.
Fisherman Buster: b/f+D (close)
- Regular throw, techable. Clark picks the opponent up and suplexes them behind him, causing a backturned hard knockdown.
Death Lake Driver: b/d/f+C/D (in the air)
- Air grab, not techable. Clark grabs the opponent in the air and throws them down to the ground in front of him causing a hard knockdown.
Command Normals
Stomping f+B
- Mostly used after a meaty cl.C, though it won't combo into anything else after this due to the pushback of it. Doesn't really do anything as a result. Cancelable.
Special Moves
Super Argentine Backbreaker: hcf+B/D (close) ($)
- Clark's 1 frame command grab, and a staple of his mixup and combo game. Pretty much his entire gameplan relies on either landing this or making his opponent scared that he's gonna land it.
- Causes a hard knockdown.
Frankensteiner: dp+B/D (close) ($)
- A slower command grab with full invul until the grab comes out. Clark's second-most important special move.
- Great move to catch people trying to wake up with a button or reversal as your invul frames will allow you to go through those.
- Staple move of his mixup game as this will catch people trying to beat some of your other options like cr.B or a meaty. Punishes your opponent for trying to escape your pressure.
- Causes a backturned hard knockdown.
Vulcan Punch: press A/C repeatedly (can be cancelled by pressing ABCD simultaneously)
- Clark delivers a series of quick punches angled upwards. The punches have 2 alternating hitboxes, one angled upwards and one angled in front of Clark.
- This move isn't great as an anti air, as it can be hard to time and even the upwards hitbox isn't that great.
- Can be made safer on block or whiff by cancelling it with ABCD.
- Can be cancelled into dp+A on hit for a combo.
Super Arabian Burglary Backbreaker: hcf+A ($)
- A running command grab that puts the opponent behind Clark with a hard knockdown.
- Has a nice amount of low invul when Clark has started running.
- Certainly not bad, but outclassed by hcf+C in pretty much every situation where you'd want to use it.
Rolling Cradle: hcf+C ($)
- A running grab where Clark rolls around with the opponent backwards.
- Clark runs further with this version compared to hcf+A and this version has more corner carry as well. Also does more damage.
- Has a nice amount of low invul when Clark has started running.
- Can be followed up with qcf+P for added damage and oki.
- Causes a face down hard knockdown giving Clark more time to put pressure on the opponent on their wakeup compared to hcf+A.
Napalm Stretch: dp+A/C ($)
- An anti air grab designed to catch people trying to jump out of his grounded command grabs.
- Not great as an anti air since its priority sucks, so Clark will get hit out of it if the opponent has an attack out.
- Pretty hard read, Clark has less risky options for dealing with jumps.
- Causes a hard knockdown.
Flashing Elbow: qcf+A/C after ($) moves
- An OTG followup to a variety of Clarks specials.
- Adds extra damage and gives him great oki opportunities, so it's advisable to always go for this followup.
- Causes a hard knockdown.
Desperation Moves
Ultra Argentine Backbreaker: hcb,hcb+A/C (close)
- Super version of hcf+K, does more damage but is otherwise extremely similar.
- Causes a backturned hard knockdown.
- MAX version does more damage.
Running Three: hcf,hcf+B/D
- Super version of hcf+P. Hard to combo into.
- Has some startup invul.
- Causes a hard knockdown.
- MAX version has a bit more startup invul and does more damage. Clark's most damaging DM, and one of the more damaging DMs in the game.
Napalm Strike: hcb,hcb+B/D
- Super version of dp+P.
- Still not great as an anti-air, but good for making a statement with hard reads.
- MAX version does more damage.
Combos
- cr.B (cr.A) hcf+B qcf+P
- Clark's main low combo. You can either chain into a cr.A and cancel that into the command grab, or you can link the command grab directly after the cr.B.
- cr.A [A] dp+P qcf+P
- Corner combo with the mash punch and the followup.
- (j.A) cl.C (1) hcf+K qcf+P/hcbx2+P
- Clark's BnB for punishes and meaties. Can be combo-ed after j.A for Clark's best jump-in combo.


