-Happy New Year 2025!
The King of Fighters '98 UMFE/EX Geese


Introduction
EX Geese is a zoning-focused character with a good fireball game. In neutral, EX Geese has access to some good grounded and aerial projectiles to control space with, some solid pokes, and a set of counters he can use to stop the opponent from poking or jumping in on him. He also has access to the infamous Raging Storm, which works great as an anti-air. Up close, EX Geese has access to both a regular and DM command grab. EX Geese struggles some on defense, as he has no invincible reversal; not even his Raging Storm is fully invincible, and while his counters are fast, they're also risky.
Changes from Previous Versions
98UM to 98UMFE
Normals:
- c.C no longer whiffs on short characters
- 6B now has less recovery, is now +2 on block
Supers:
- 1632143P hitbox extended to the interior of the move
Normal Moves
Close
- c.A: Can be used to anti-air hops if you're too close for f.A to come out. Whiffs on regular crouchers. Chainable and cancelable.
- c.B: His fastest normal, at 2f startup. Good to use in point-blank situations where the speed is important. Chainable and cancelable.
- c.C: Your go-to heavy button for combos. Cancelable.
- c.D: A two-hitting normal. Comes out fairly fast, but is not cancelable, so its use is limited.
Standing
- f.A: Good for stopping hops. Whiffs on regular crouchers. Cancelable.
- f.B: A mid-range poke. It doesn't have very good priority.
- f.C: A fast, slightly longer-range poke than f.B. Hits higher, but it does have decent priority.
- f.D: Geese's longest-range normal. Has nice priority and range, but also quite a lot of recovery.
Crouching
- 2A: A standard 2A. Good for combos and blockstrings. Chainable and cancelable.
- 2B: Hits low. Good for low combos and for blockstrings. Chainable, not cancelable.
- 2C: An okay anti-air normal for full jumps or predictable hops. It has 3 separate stages, but only the third one is great for anti-airs, making it a bit inconsistent. Cancelable.
- 2D: A nice cancelable sweep.
Jumping
- j.A: Good jump-in for when you want to have more consistency than j.C. Can crossup, but not as well as j.B.
- j.B: Nice crossup jump-in normal. Also his fastest jumping normal, so good for fast air-to-airs. Instant overhead.
- j.C: A two-hitting jump-in, making it good for pressure and mixups.
- 8j.C: A straight downwards punch with a lot of active frames. Can work as an instant overhead on large crouchers.
- j.D: An air-to-air normal.
CD Normals
- 5CD: Has fairly long startup, but has a nice hitbox in front of Geese. Cancelable on hit, block, and whiff.
- j.CD: Good for blockstun pressure or anti-airs. You can land it on short crouchers, but it's tricky.
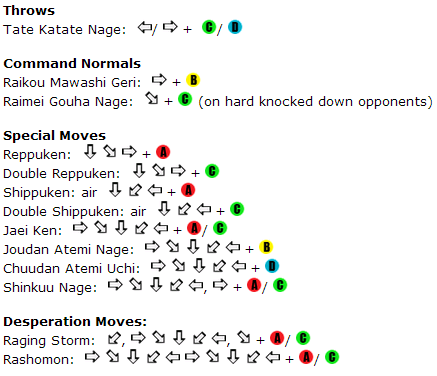
Throws
Tate Katate Nage: 4/6C/D
- EX Geese's normal throw. C version keeps you on the same side, while D version switches sides. Both leave the opponent facing you with a hard knockdown, giving you enough time for an unblockable fireball on wakeup.
- An unblockable fireball can be done by timing a meaty light Reppuken
236Aand then either execute a Joudan Atemi Nage63214Bor a Shinkuu Nage632146A/C (close)just when the fireball hits. - Your opponent can avoid this by rolling or dodging but you can always choose not do the unblockable and punish their escape attempt.
Command Moves
Raikou Mawashi Geri: 6B
- Doesn't combo from anything, not cancelable, but plus on block.
Raimei Gouha Nage: 3C (during opponent knockdown)
- OTG throw, not guaranteed from anything. Switches sides, poor recovery.
Special Moves
Reppuken: 236A
- EX Geese throws an energy wave out that travels on the ground fullscreen.
- Combos from light/heavy attacks, but only at close range.
- The hitbox is much smaller than it actually appears, most chars can hop over it (think of the hitbox more like Iori's fireball).
- Disadvantage at point blank, but from even a short distance away (e.g. c.C > 236A) you will be at advantage.
- A way to use it is to anti-air with a late 2C and then cancel it into Repukken so your opponent lands on it to get advantage.
Double Reppuken: 236C
- EX Geese creates a bigger wave that takes longer to come out, but still travels along the ground fullscreen.
- Combos from heavy attacks in the corner or when opponent is backturned.
- The first part of the startup can absorb a projectile and the second wave will still come out, allowing EX Geese to win projectile wars easily with good timing.
- The hitbox for this move actually follows the sprite and cannot be hopped over.
- Frame advantage works similar to 236A.
Shippuken: 214A (in air)
- EX Geese creates a big energy projectile in the air and throws it diagonally down towards the ground.
- Can't be used on a hop, backdash or step dash. It has a minimum height for using after a jump.
- Maintains jump direction during recovery, although the short pause while he throws the projectile can be useful for modifying EX Geese's trajectory.
- Possible to combo after if in the corner.
- Good frame advantage when blocked.
- Can be cancelled into from neutral j.C.
Double Shippuken: 214C (in air)
- Same as above, but throws two projectiles instead of one.
- Worse recovery (can't combo after).
Jaei Ken: 63214A/C
- EX Geese rushes forwards with an energy attack. Solid combo ender.
- A version combos from lights and soft knockdowns. C version combos from heavy attacks, switches sides and hard knockdowns. You can set up an unblockable fireball afterwards.
- Unsafe on block.
Joudan Atemi Nage: 63214B
- EX Geese does a counter move.
- Counters jumping attacks and physical specials/DMs.
- Active immediately, so it beats meaty overheads and meaty jumpins.
Chuudan Atemi Uchi: 63214D
- Counters mid-hitting normals and non overhead command normals.
- Activates very quickly but loses to meaties.
- Can be used to beat Guard Cancel CDs.
- Can also be good to catch neutral pokes on a read.
Shinkuu Nage: 632146A/C (close)
- EX Geese tosses the opponent behind him.
- Fast (but importantly not 1-frame) command throw with long recovery after it connects. Switches sides.
- If you use this when your back is close to the corner, you'll be minus afterwards as the opponent will recover before you do, but you won't get punished as Geese is fully invincible until the end of the animation.
- Helps with his otherwise pretty lacking mixup game.
Desperation Moves
Raging Storm: 1632143A/C
- Huge projectile hitbox. Great anti-air and metered combo ender.
- Combos from lights and heavies.
- The move absorbs normal and some DM projectiles.
- The hitbox is only in front of Geese, not behind him.
- MAX version does more damage.
Rashomon: 6321463214A/C
- DM version of 632146P. 1-frame command throw DM.
- If you use this when the opponent is close to the corner, you may be minus afterwards as the opponent will recover before you do, but you won't get punished as Geese is fully invincible until the end of the animation.
- A more damaging mixup option compared to his regular command grab.
- MAX version does more damage.
Combos
General Notes
- If you have the resources, you can replace 1632143P with 1632143AC for more damage. The same is true of 6321463214P and 6321463214AC.
Meterless
Low
2B > 2Ax2 > f.B
2B > 2A > 632146P/63214A- More damaging low confirm.
Mid/Jump-In
(j.B/j.C) > c.C > 63214C/63214A- EX Geese's best meterless punish/jump-in combo. 63214C does more damage, but 63214A might be a better option if you want to keep your opponent in the corner.
6B > Quick Dodge > 63214A
c.D > Quick Dodge > 63214A
Corner
5CD > c.C- Corner juggle from a counterhit 5CD.
With Meter
Low
2B > 2A > (2A/f.A) > 1632143P- Basic light confirm into DM.
2B > 2A > 6321463214P- Light confirm into EX Geese's other DM.
Mid/Jump-In
(j.B/j.C) > c.C/2C > 6321463214P- Basic combo into DM from a heavy or jump-in.
c.D(1) > AB (roll cancel) > 6321463214P/632146P- This might seem impractical but depending on how close you are with
c.D(1), you can roll through your opponent or stay on the same side. It can catch your opponent offguard once in a while if you use it as a block string.
6B > Quick Dodge > 1632143P
(j.B/j.C) > c.D > Quick Dodge > 1632143P
With Quick MAX
Low
2B > 2A > ABC > c.C/2C > 63214A/6321463214P- Requires a microwalk after the Quick MAX.
Roll Cancel
2B(x1~2) > ABC > c.D(1) > AB > 6321463214P- Requires roll, won't work with dodge. This combo also works from a jump-in if you're close enough.
