-Happy New Year 2025!
The King of Fighters '98 UMFE/Shermie


Introduction
Shermie excels at close to medium range. At medium range, she has a some solid pokes and anti-airs to control a lot of space. Her jump arc, speed, and buttons also allow for aggressive approaches in the air from this range. At close range, her options include command grabs, a low confirm that combos into those command grabs, an overhead, and the aforementioned jump/hop pressure. What Shermie lacks are long confirms, and a solid reversal to get her out of pressure herself. These are minor weaknesses, since the confirms she has work well enough, and thanks to her reach and anti-air capability she can still hold her ground when cornered.
Changes from Previous Versions
98 to 98UM
Normals:
- c.C's hitbox has been extended downward
- f.C now has 5 frames less startup and 8 frames less recovery
- f.D now recovers 2 frames faster
- 2B now recovers 4 frames faster, and can be linked out of
- 2D now recovers 5 frames faster
- j.D's active frames are now 3 frames shorter
- 8j.D's active frames are now 2 frames shorter
Specials:
- 236K OTG followup now hits correctly even in the corner
98UM to 98UMFE
Normals:
- 2B now easier to chain into itself
- c.C no longer whiffs on short characters
- j.D now has faster startup
Specials:
- 41236K now travels further, does more damage
- 214P now has a bigger collision box
Normal Moves
Close
- c.A: Same as f.A.
- c.B: Same as f.B.
- c.C: Cancelable combo filler. Same damage as 2C. Your main heavy normal for combos.
- c.D: Same as f.D.
Standing
- f.A: Whiffs on most crouchers and doesn't have much range. Can stop hops, but useless otherwise. Chainable and cancelable.
- f.B: 2 hits: first one is cancelable, second one is safe on block but not cancelable and whiffs on a lot of crouchers, which leaves Shermie open for a punish.
- f.C: Covers a wide arc in front of Shermie. Very good range, speed and active frames. Amazing poke in general.
- f.D: A little more range than 2C, but slower. Good anti-air, but only if used early enough. Whiffs on crouchers.
Crouching
- 2A: Fast but not much range. Chainable and cancelable.
- 2B: Very fast and good range. Nice low poke. Links into 41236P if close enough. Chainable.
- 2C: Very reliable anti-air. Same damage as c.C. Cancelable.
- 2D: Good range, a little more than 2B. A bit slow, but active for longer than a typical sweep.
Jumping
- j.A: Nice air-to-air. Hits a bit above Shermie.
- j.B: Also a great air-to-air, and still viable as a jump-in.
- j.C: Fantastic jump-in. Easy to hit on all crouchers, and just as easy to crossup.
- j.D: Another great jump-in. Deals a little more damage than j.C and has more horizontal range. A little harder to crossup with.
- 8j.D: Most horizontal range of her jumping normals, together with j.CD. Okay as a defensive air-to-air.
CD Normals
- 5CD: Has no lower hurtbox, in line with its appearance. Cancelable on hit, block, and whiff. Cancel window is not generous, so it is hard to confirm a counterhit.
- j.CD: Same great horizontal range as nj.D. A bit harder to hit crouchers with compared to j.C and j.D.
Throws
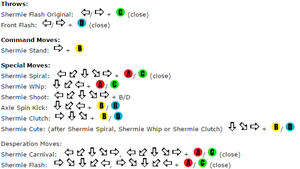
Shermie Flash Original: 4/6C (close)
- Regular throw, techable. Throws forward. Causes hard knockdown. You can use this instead of hcf+P if you do not want to throw the opponent out of the corner.
- Leaves the opponent too far away to apply pressure afterwards, except when thrown into the corner.
Front Flash: 4/6D (close)
- Regular throw, techable. Throws behind Shermie. Causes a soft knockdown.
- Leaves the opponent too far away to apply pressure afterwards, except when thrown into the corner.
Command Moves
Shermie Stand: 6B
- Does 2 hits. Both hit overhead. Slow but good range. First hit whiffs on small crouchers. Second one can hit from halfscreen away.
- Loses the overhead property when cancelled into. Makes the last hit cancelable into specials, which is not useful.
- When late-canceled into, it maintains the overhead property, allowing you to slip mixups into pressure.
Special Moves
Shermie Spiral: 41236A/C (close) ($)
- 1f startup command grab. Your main combo and mixup tool.
- Combos from any cancelable normal (except 6B) and links from 2B. Throws behind Shermie and leaves the opponent on their back, facing away from Shermie.
- No difference between A and C versions.
- Only use qcf+K afterward if it kills, omitting the follow up gives you enough time to pressure the opponent afterwards.
Shermie Whip: 214A/C ($)
- A hitgrab-type move. Useful for whiff punishing thanks to its speed and hitbox.
- Leaves the opponent facedown behind Shermie, facing her. Can also catch opponents out of the air.
- Combos from cancelable normals but deals less damage than 41236P, recovers slower, and is unsafe on block (although pushback helps mitigate this). Use with caution.
- A and C versions deal the same damage. C version starts slower. Both have some startup invincibility, but not enough that it matters.
- Always use 236K after this because it doesn't allow for pressure afterwards anyway, so just take the extra damage.
Shermie Shoot: 41236B/D
- Forward moving command grab. Deals more damage than 41236P without 236K and does not switch sides.
- Risky since the opponent can react to the startup animation and sound. Still useful as a whiff punish or as an occasional surprise move.
- Combos from 2C or c.C if cancelled fast enough. Usually won't after a jump-in due to pushback, unless it's a crossup.
- Can be whiff-cancelled from 5CD or 2C to make it harder to react to.
- B and D versions deal the same damage. B version travels about halfscreen, D version travels fullscreen.
Axle Spin Kick: 214B/D
- Shermie spins while jumping forward in an arc and does a kick after landing.
- Full invincibility until Shermie reaches the apex of the jump.
- The kick itself is safe on block, but Shermie can easily be hit out of the air before she can land to do her kick. Can get you out of some situations, but not very useful.
- D version goes further than B version and deals more damage.
Shermie Clutch: 623B/D ($)
- Anti-air command grab. Sounds cool in theory, but loses to any decent jump-in.
- Too slow to react with, but on a hard read it can catch an opponent trying to jump out of a command grab.
- Leaves the opponent on their back in front of Shermie, facing away from her.
- B and D versions deal the same damage.
- Only use 236K after if it kills, omitting the followup gives you enough time to pressure the opponent afterwards.
Shermie Cute: 236B/D (during ($) moves)
- An OTG followup to some of Shermie's specials. Trades advantage on a knockdown for some extra damage.
- Has to be input in the direction the opponent will be thrown in.
- No difference between the two versions.
Desperation Moves
Shermie Carnival: 4123641236A/C (close)
- Fully invincible command grab DM with slow startup. Leaves the opponent facedown, facing Shermie.
- A and C versions are identical. MAX version deals more damage and leaves the opponent faceup, facing away from Shermie.
- All versions switch sides.
Shermie Flash: 6321463214A/C (close)
- 0f startup command grab DM. Can be combo-ed into from cancelable normals (except 6B) or linked from 2B.
- A and C versions are identical. MAX version lets you and the opponent mash for more or less damage. Damage if not mashed against is ridiculously high.
- All versions leave the opponent on their back in front of Shermie, facing her.
Combos
General Notes:
- Use
236Kafter41236Pfor extra damage if it would secure the kill, otherwise take the wake up pressure.
- 2C can be used instead of c.C (same damage) if you find it easier to input.
- In any combo with 6321463214P/4123641236P, it can be replaced with 6321463214AC/4123641236AC for more damage if you have the resources.
Meterless
Low
2B > 41236P- Basic low confirm into command grab. Since this is a link, it should give you just enough time to confirm the hit.
2B > 5B(1) > 41236P- More damaging version of the above that does not work on some crouchers.
Mid/Jump-In
(j.X) > c.C > 41236P- Your default punish or jump-in combo filler.
(j.X) > c.C > 41236K- Punish for when you don't want to switch sides. Also works after a crossup, but not a regular jump-in.
With Meter
Low
2B > 6321463214P- Low link into DM. Since this is a link, it should give you just enough time to confirm the hit.
2B > 5B(1) > 6321463214P- More damaging version of the above that does not work on some crouchers. 4123641236P also works here.
Mid/Jump-In
c.C > 6321463214P- Combo into DM as a punish or jump-in combo filler.
With Quick MAX
2B > ABC > c.C > 6321463214P- Low Quick MAX conversion.