Difference between revisions of "The King of Fighters '98 UMFE/Ryo Sakazaki"
Jump to navigation
Jump to search
| Line 54: | Line 54: | ||
;Ko Ou Ken | ;Ko Ou Ken | ||
:Unlaunched forward moving projectile | :Unlaunched forward moving projectile | ||
: | :<code>236+A/C</code> | ||
:Both versions only combo from heavy attacks but are not optimal for combos since other options are more damaging. C version deals more damage and moves further. Both are safe on block if spaced properly and punishable when not, they make good pokes to throw out at the right distance. Easily beaten by slide moves. | |||
;Kohou | ;Kohou | ||
:DP type move. | :DP type move. | ||
: | :<code>623+A/C</code> | ||
:'''Incredible anti air'''. Both versions will beat most jump in attempts but are punishable when missed. A is harder to punish, C equals a free combo of choice for your opponent. | |||
:*'''A: Invulnerable frame 1-2, active on frame 3.''' | |||
:*'''C: Invulnerable frame 1-7, active on frame 5.''' | |||
;Moh Koh Raijin Satsu | ;Moh Koh Raijin Satsu | ||
:Flying Overhead | :Flying Overhead | ||
: | :<code>236+B/D</code> | ||
:Overhead that travels forward in an arc. Useful to punish reckless projectile usage, less useful as an overhead itself. B version hits about half screen away. D version hits almost full screen but not quite. | |||
;Moh Koh Raijin Gou | ;Moh Koh Raijin Gou | ||
:Special cancelable armor move | :Special cancelable armor move | ||
: | :<code>214+A/C or A+C</code> | ||
:This move has armor frames during startup and is cancelable into other version specific special moves. Unsafe on block. | |||
:*A: Cancelable into from heavy normals. Is cancelable into 623+A/C. | |||
:*C: Can not be cancelled into. Is cancelable into 63214+B/D. | |||
:*'''(A+C): Cancelable into from heavy normals. Cancels into 623+A/C or 63214+B/D. Crazy.''' | |||
:'''Pressing both buttons together combines the best parts of both versions into one. Cancelled into 63214+D makes this the most damaging meterless combo ender.''' | |||
;Hien Shippuu Kyaku | ;Hien Shippuu Kyaku | ||
: Spinning kicks | : Spinning kicks | ||
: | :<code>63214+B/D</code> | ||
:Both versions combo from light attacks. B version alone does more damage than 623+A/C or 236+A/C, D version does even more damage. '''This is the meterless combo ender to use for longer confirms.''' | |||
;Kyokugen-ryuu Renbu Ken | ;Kyokugen-ryuu Renbu Ken | ||
:Proximity unblockable | :Proximity unblockable | ||
: | :<code>41236+A/C (close)</code> | ||
:An unblockable attack that puts your opponent in juggle state. Use j.CD after launch for extra damage, that way it does more damage than 63214D alone. '''This is the best you can get out of 2B, 5A without meter.''' | |||
== Desperation Moves == | == Desperation Moves == | ||
Revision as of 14:28, 6 October 2020


Introduction
Ryo is a dangerous allrounder who is scary at every range. On the defense he has great pokes and some of the best anti air tools in the game, a real walking wall. On the offense he can confirm into big damage from any situation with or without meter. He is playable at every spot in a team. He is also quite simple and easy to pick up for new players.
Normal Moves
- f.5A: Good range. Special cancelable. Use this after 2B for combos and to stop hops.
- f.5B: Great poke to keep the opponent at bay and whiffpunish.
- f.5C: Not a bad button to throw out after a blockstring, not great either.
- f.5D: Can anti air in situations where 2C lacks horizontal range but its too slow to react with, rather use 5A, DP or block.
- cl.5A: Will hit where f.5A might whiff on small characters. So use accordingly in confirms from 2B.
- cl.5B: 5A is better do not use this. Special cancelable.
- cl.5C: Less damage than 2C but can make combos easier than with 2C. Special cancelable.
- cl.5D: Same as cl.5C really. Same damage. Activates further away but comes out a little slower. Special cancelable.
- 2A: Not great but use it after 2B instead of 5A if the opponent is too short while crouching.
- 2B: Low combo starter. Chains into itself, 5A and 2A. Links into 2C. Does not special cancel.
- 2C: Very reliable anti air normal, one of the best in the game. Insanely fast at 1f startup. Links from 2B for combos. Special cancelable. Leaves you very open when whiffed so use with care.
- 2D: Fast sweep with okay range. Special cancelable. Cancel into 236B for low->high gimmick.
- j.A: No use for it really. Maybe air to air but j.B works just as well.
- j.B: Best horizontal range of his air normals. Use for air to air or to poke when too far away for j.C/j.D/j.CD.
- j.C: The button to use for jumping in. Can crossup.
- j.D: Same damage as j.C and just as fast. A little harder to cross with but a bit more horizontal range.
- CD: Quite fast, recovers fast enough to link into 623A after a counter hit in the corner. Enough range to connect after 2B, 2B blockstring. Nice to fish for counterhits to combo. Special cancelable.
- j.CD: Good move. Downward hitbox makes it easy to hit crouchers with. Great for pressure. Enough blockstun to run up or jump in an again after connecting. Also good air to air. Lets you combo after counterhit.
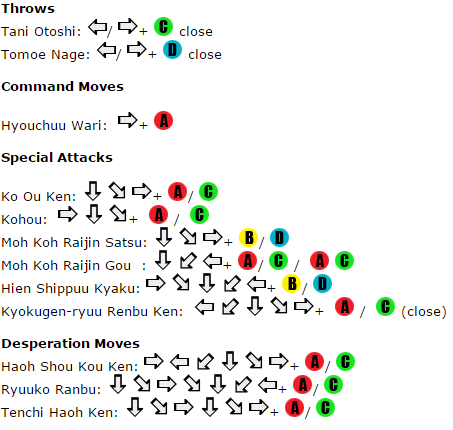
Throws
- Tani Otoshi
- 4/6 + C (close)
- Throws forward. Causes hard knockdown, leaves opponent backturned and allows for pressure.
- Tomoe Nage
- 4/6 + D (close)
- Throws back. Recovery roll possible, making it only useful to throw the opponent into the corner.
Command Moves
- Hyouchuu Wari
- 6+A
- Overhead when done raw. Reaches surprisingly far. Pretty safe to throw out. Hits mid when cancelled into. Not cancelable into other moves directly. When done REAL meaty on opponents wakeup you can link f.5A to combo further. It is also possible to combo from this move using quick max or cancel into dodge and its follow-up attack.
Special Moves
- Ko Ou Ken
- Unlaunched forward moving projectile
236+A/C- Both versions only combo from heavy attacks but are not optimal for combos since other options are more damaging. C version deals more damage and moves further. Both are safe on block if spaced properly and punishable when not, they make good pokes to throw out at the right distance. Easily beaten by slide moves.
- Kohou
- DP type move.
623+A/C- Incredible anti air. Both versions will beat most jump in attempts but are punishable when missed. A is harder to punish, C equals a free combo of choice for your opponent.
- A: Invulnerable frame 1-2, active on frame 3.
- C: Invulnerable frame 1-7, active on frame 5.
- Moh Koh Raijin Satsu
- Flying Overhead
236+B/D- Overhead that travels forward in an arc. Useful to punish reckless projectile usage, less useful as an overhead itself. B version hits about half screen away. D version hits almost full screen but not quite.
- Moh Koh Raijin Gou
- Special cancelable armor move
214+A/C or A+C- This move has armor frames during startup and is cancelable into other version specific special moves. Unsafe on block.
- A: Cancelable into from heavy normals. Is cancelable into 623+A/C.
- C: Can not be cancelled into. Is cancelable into 63214+B/D.
- (A+C): Cancelable into from heavy normals. Cancels into 623+A/C or 63214+B/D. Crazy.
- Pressing both buttons together combines the best parts of both versions into one. Cancelled into 63214+D makes this the most damaging meterless combo ender.
- Hien Shippuu Kyaku
- Spinning kicks
63214+B/D- Both versions combo from light attacks. B version alone does more damage than 623+A/C or 236+A/C, D version does even more damage. This is the meterless combo ender to use for longer confirms.
- Kyokugen-ryuu Renbu Ken
- Proximity unblockable
41236+A/C (close)- An unblockable attack that puts your opponent in juggle state. Use j.CD after launch for extra damage, that way it does more damage than 63214D alone. This is the best you can get out of 2B, 5A without meter.
Desperation Moves
- Haoh Shou Kou Ken
- Projectile DM
641236+A/C- A and C version combo from heavy normals and deal the same damage.
- A moves slow.
- C moves very fast.
- SDM version also comboes from heavy normals. Deals more damage and has a bigger hitbox, moves about as fast as C version.
- Punish reckless projectile use with this. Can also catch jumping opponents.
- Ryuuko Ranbu
- Ranbu type move, as name suggests.
2363214+A/C- A and C version combo from heavy normals and deal the same damage.
- A connects much more reliable in combos because it starts faster.
- C has some meaningless invulnerability on startup, not a reliable reversal.
- SDM comboes the same way A version does and deals more damage. Also has some invulnerability.
- Most damaging out of the regular DMs.
- Tenchi Haoh Ken
- ICHIGEKI HISSATSU
236236+A/C- A and C version deal the same damage and a lot more on counterhit.
- A connects from light normals.
- C has some meaningless invulnerability on startup, not a reliable reversal.
- SDM connects from light normals and deals less damage on its own but will stun the opponent.
- This SDM turns out to be his most damaging SDM since it lets you hit a combo of your choice afterward. Paired with even just hist best meterless combo this deals more damage than any other SDM alone.